How to Reupholster Chairs: A Simple Step-by-step Guide
This step-by-step guide will show you exactly how to reupholster chairs including a complete materials list, a simple explanation of basic upholstery techniques, and lots of tips for getting beautiful results.
Reupholstering furniture used to really intimidate me. Painting furniture was no problem. I could handle stripping and refinishing furniture. But upholstery? That seemed way too complicated and unknowable.
My first major reupholstery project was a big armchair glider for my son’s nursery and I remember feeling so scared as I started pulling the fabric off. What if I couldn’t figure out how to put it back together again?
Thankfully, the reupholstered armchair actually turned out great, and since then I’ve reupholstered quite a few other pieces of furniture. It seems like I am constantly finding great deals on furniture with gorgeous clean lines and absolutely hideous old fabric just begging for a makeover. Sometimes I manage to resist, but other times I just feel compelled to snap them up and make them beautiful and useful again.
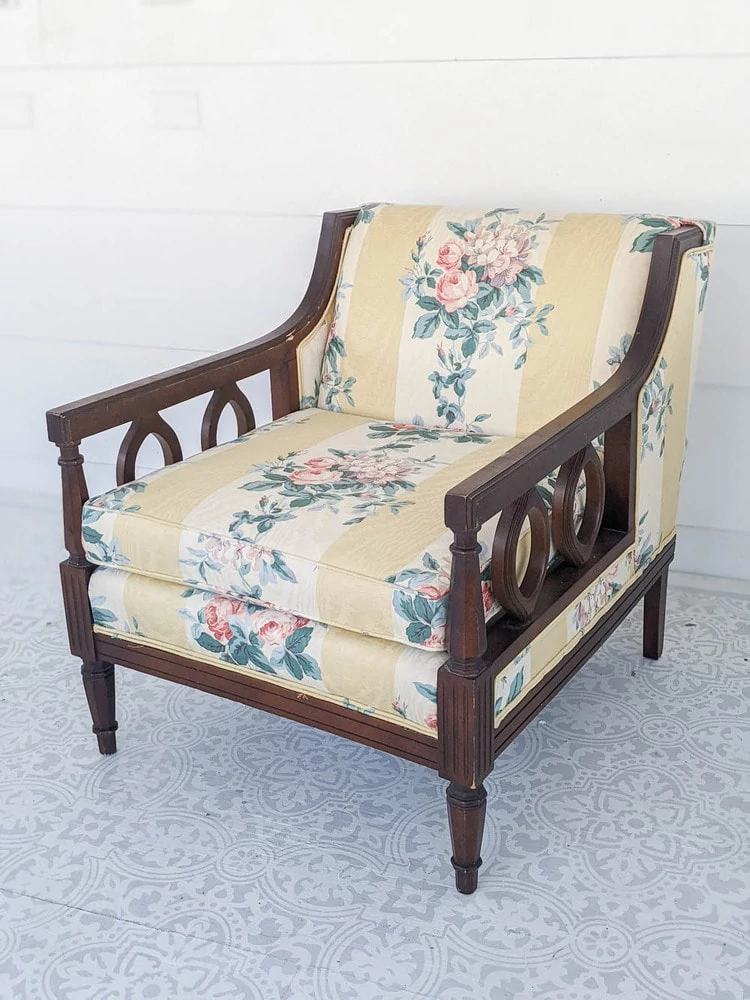
That’s exactly what happened with the chairs I’m sharing today. They started out pretty hideous, but underneath the floral fabric I could see major potential.
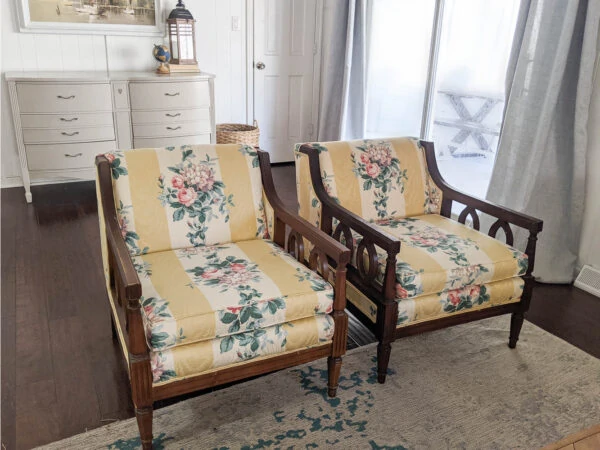
I picked these chairs up along with a matching couch a few years ago and I’ve already reupholstered the sofa. I wasn’t really sure what I wanted to do with the chairs, but after rearranging some furniture recently, I found the perfect spot for them in our living room. So I got to work giving them a makeover.
I’m going to walk you step-by-step through how to upholster chairs. I’ll be sharing how I transformed my own chairs along with everything you need to know to transform other types of wooden chairs and armchairs as well.
I’ll be breaking down standard upholstery techniques so you can easily understand how to approach your own furniture upholstery project. And I’ve also included a full video tutorial at the end of this post for those who prefer to follow along that way.
This post contains affiliate links which means if you make a purchase after clicking a link I will earn a small commission but it won’t cost you a penny more. Click here to see my full disclosure policy.
Time and Cost to Reupholster Chairs
As much as I would love for every DIY project to be cheap and easy, this was not a quick project. Upholstering furniture is a pretty time-consuming process; that’s why it’s so expensive to pay someone else to do it!
It’s hard to say exactly how many hours it took to reupholster these two chairs because I spread the work out over several weeks, but I would estimate that it took 5-10 hours for each chair.
On the other hand, this was a pretty affordable project. I bought my two chairs off Facebook Marketplace for $25 and I was able to get my fabric for only $50. So the total cost for this pair of beautiful matching chairs was only $75.
Of course you aren’t going to find these exact same chairs for the same price, but luckily Facebook marketplace, thrift stores, and estate sales are full of upholstered furniture in need of a makeover. And since most people don’t know how to reupholster furniture, you can usually snap these pieces up for cheap.
Materials
Your exact supply list may vary slightly depending on the details of the chairs you are working on, but these are the basic tools and supplies you will need to reupholster furniture.
- Chairs to upholster – Facebook marketplace, thrift stores, and estate sales are great places to find sturdy upholstered fabric for a steal
- Fabric – I’ll share more below about choosing your fabric, but these are the velvet curtains I used to reupholster my chairs.
- Upholstery staple remover – this thing makes removing the old upholstery 1000 times easier
- Flathead Screwdriver
- Needle nose pliers – if you don’t have an upholstery staple remover, you can use a screwdriver and needle nose pliers to remove the old stapes
- Hammer or upholstery hammer – to help with removing and attaching tack strips and other upholstery parts
- Sharpie – for labeling the old upholstery pieces as you remove them
- Rotary cutter and cutting mat – for cutting your fabric
- Good fabric scissors – these are also for cutting fabric, I’ve found that it is helpful to have both to use in different situations
- Staple gun – this is a must-have for any upholstery project
- Upholstery pins – these are awesome for holding upholstery in place in hidden areas
- Trim of your choice – for finishing off your reupholstery job, you can make your own trim or buy gimp or another premade trim
- Liquid Stitch fabric glue or a hot glue gun – this makes adding trim to finish off your upholstery job a breeze
- Piping cord – for making piping for your chair cushions
- Zippers – for the cushion covers or you may be able to reuse the zippers from your old cushion covers.
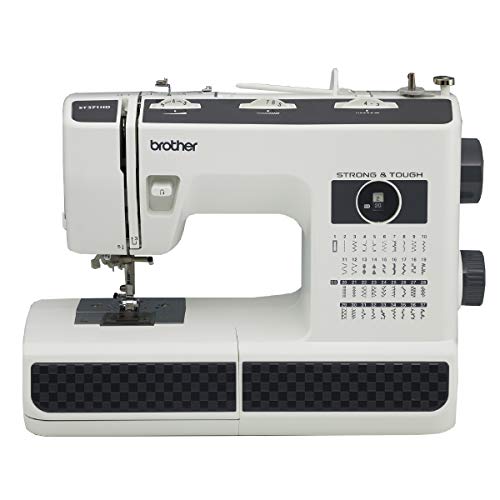
- Sewing machine – this is the one I have and love. It’s super easy to use even if you aren’t the most experienced at sewing.
How to Reupholster Chairs
Removing the Old Upholstery
When you’re reupholstering a piece of furniture, removing the old fabric is actually one of the most important parts of the process. As you remove the old fabric, it gives you a roadmap to how to put the new fabric on.
I think the most intimidating part of taking on a furniture upholstery project is the thought of having to figure out how to put everything back together. Thankfully you really don’t have to figure out much of anything on your own.
As you take off each piece of fabric, you’re going to pay close attention to how it was previously attached and simply reattach the new fabric in the same way.
Also pay attention to the order you are removing pieces of fabric. When you attach the new upholstery, you will be attaching the new fabric in the opposite order. So whatever you take off last is what you will put on first.
Before you start taking anything off, look things over carefully. I like to take photos, especially of any complicated looking areas.
I also label each piece as I remove it from the chair so I know where it went. The fabric you remove will then serve as your pattern for cutting your new fabric and the labels will make it easy to know where each new piece of fabric goes.
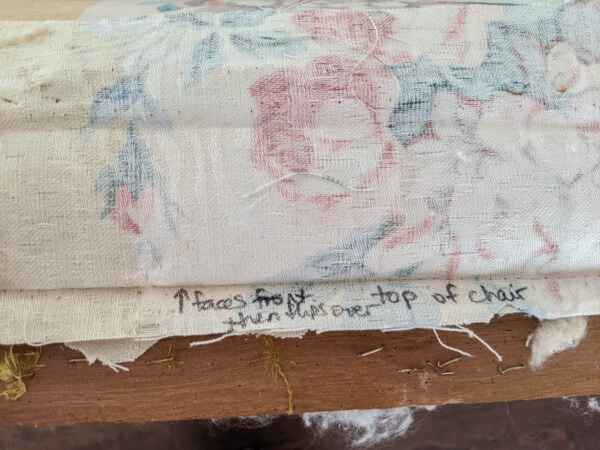
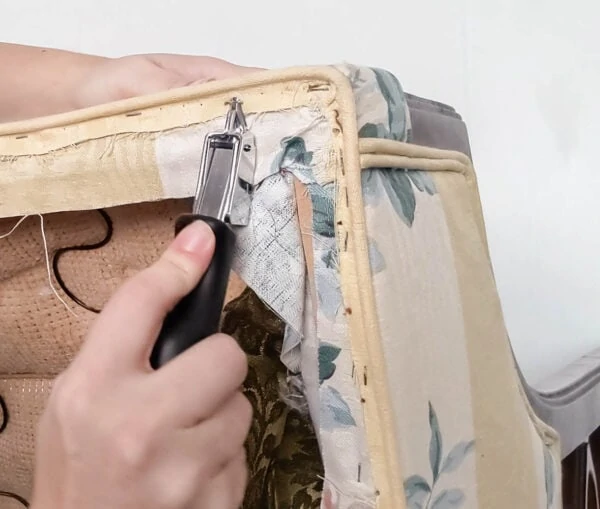
As far as actually removing the fabric, there are a couple of different ways to do it. Most if not all of the fabric is going to be stapled on. One way to remove the staples is to pry them out with a flathead screwdriver and then remove them with needle-nose pliers.
However, I highly recommend using an upholstery staple remover instead. They aren’t very expensive and they make it much faster and easier to pry the staples out. And when you are reupholstering furniture, there are going to be many, many staples to remove.
As you start deconstructing your chair, you might find that in some areas the fabric is attached with upholstery tacks, tackstrips, cardboard strips, and more. Don’t be intimidated by these. As you take your chair apart and see these things, you are seeing exactly how you need to put it back together with the new fabric.
Remember you don’t have to figure anything out on your own. Just follow the pattern of what was there before.
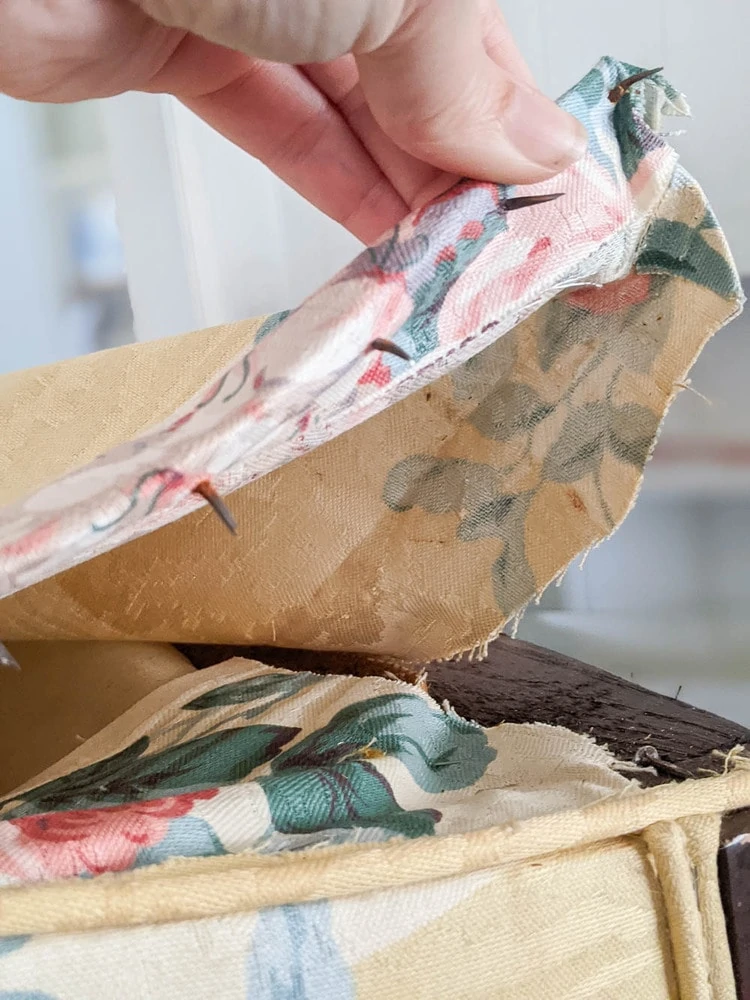
Label each of these parts and set them aside. If they are in good condition, you can reuse them when you attach your new fabric. And if they aren’t in good condition, you can use them to help choose the right replacement. You can buy replacement upholstery tacks and tack strips online and cardboard strips can easily be cut from scrap cardboard.
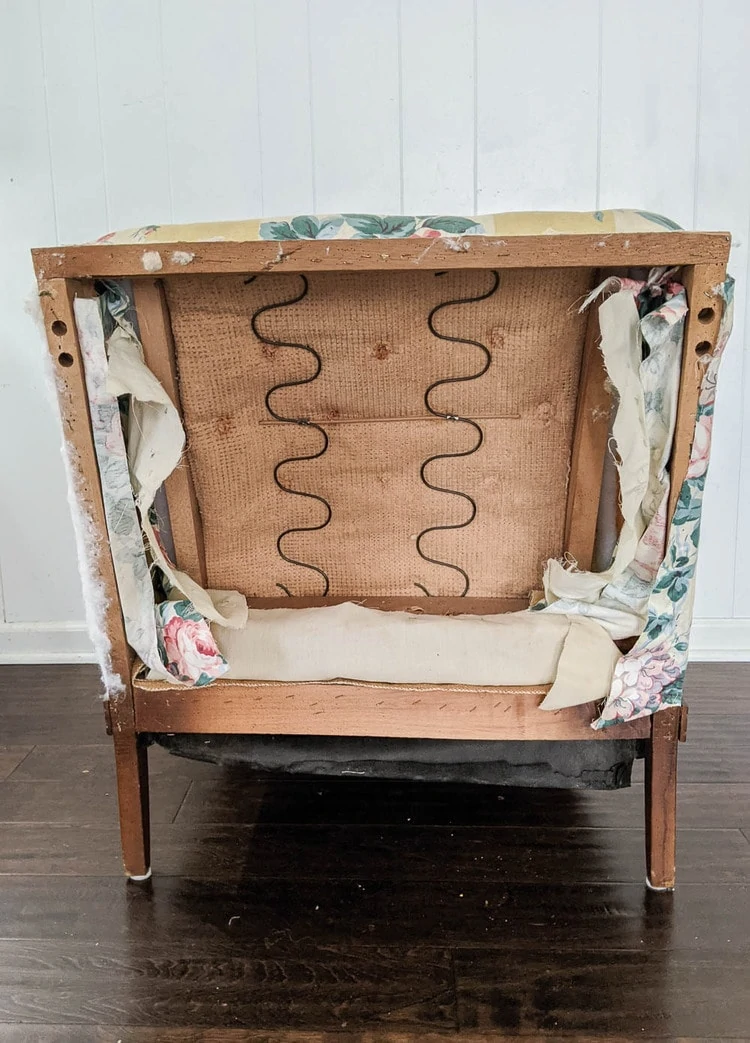
For most upholstered chairs, the first thing you need to remove is the dust cover on the underside of the chair. This is usually a thin black piece of fabric that keeps the inside of the chair clean. Once you have removed that, you will generally remove the back and work from there.
You do not have to remove every single bit of the old fabric from your chair. There may be areas of your chair where you can attach the new fabric right over top of the old fabric.
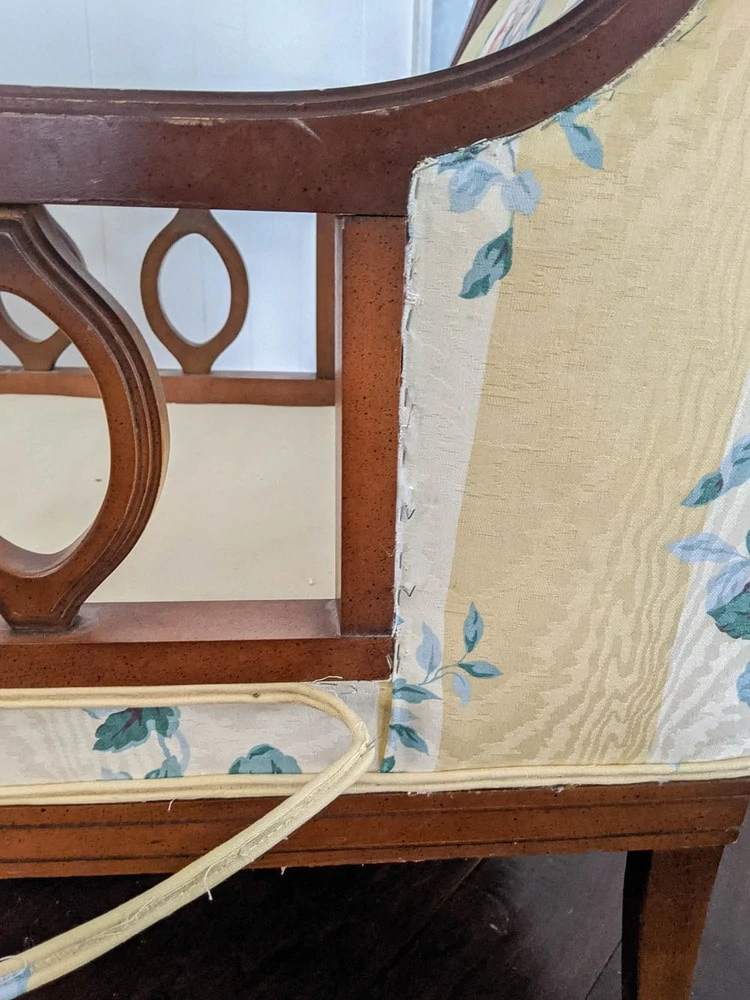
You do need to remove all of the trim from your chair and also any piece of fabric that keeps you from accessing another piece of fabric. You also need to remove any fabric that is attached using tackstrips or cardboard strips.
For my own chairs, I removed the back and top pieces, but I was able to leave everything else in place because I was able to access all of the areas necessary to staple on my new fabric.
Don’t worry if you aren’t totally sure about what fabric needs to be removed. When you start putting your chair back together, it will become apparent if you need to remove more fabric to access the areas you need.
Updating the Wood Frame
Not all upholstered chairs have wooden arms, but most do have some sort of wooden feet. You can paint or stain the wooden parts of your chair just like any other wood furniture.
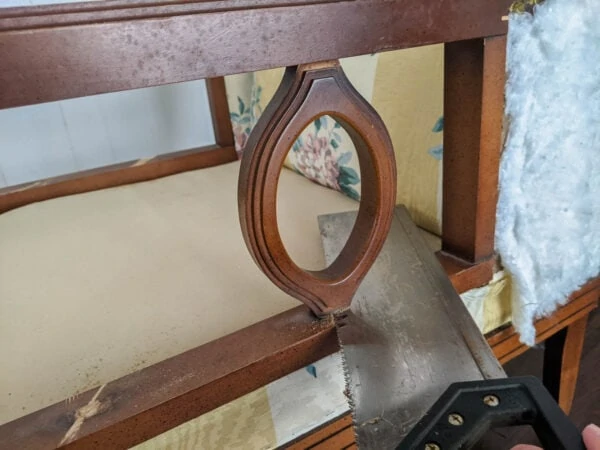
For my own chairs, I started by cutting the oval details from the chair arms. I’m sure these were a great period feature at some point, but I was going for a more classic look.
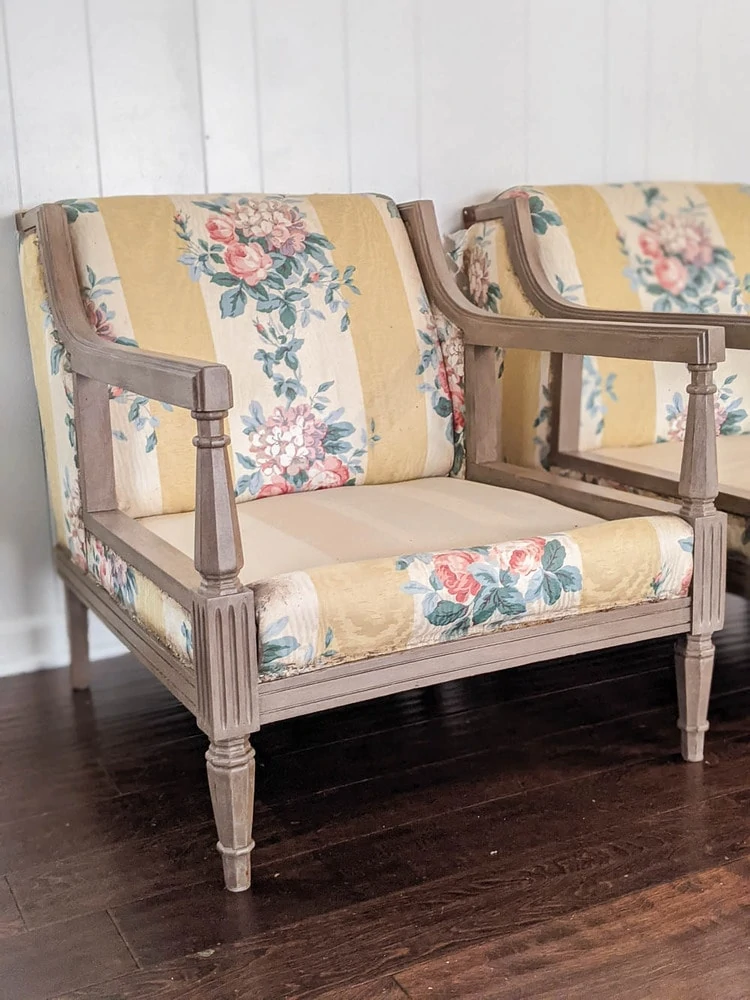
Then I decided to paint the wood frames of my chairs. The wood finish was pretty scratched up and the two chairs had actually faded differently over the years so they were two different colors. I painted my frames with the same weathered wood paint technique I used to paint the sofa they came with.
Choosing Fabric
When you are upholstering furniture, there are many different colors, styles, and types of fabric you can choose. The most important thing is to choose a fabric that is heavy duty enough to last on furniture.
It needs to be tough enough to be pulled tight during the upholstery process and it needs to be durable enough to withstand lots of wear and tear as people sit on it over the years.
You can find many gorgeous upholstery fabric options at fabric stores. These will usually be labeled to let you know if they will work well for upholstery.
The downside of using upholstery fabric from a fabric store is it can get very expensive very fast. Especially when you consider that it can take 3-7 yards of fabric to reupholster different types of chairs. At $20 per yard that adds up fast.
Waiting for a great sale can definitely help, but I’ve also found that using nontraditional sources of fabric is another way to get really cheap fabric for projects like this.
When I reupholstered a sofa a few years ago, I used painter’s drop cloth and it looked beautiful and saved a ton of money. This time around I used a pair of velvet curtain panels. I was able to get extra long curtains panels so I got a ton of fabric for a great price.
Of course I am taking a risk that this velvet fabric may not be as high quality as velvet labeled for upholstery. But the fabric looks beautiful and feels nice and thick so it’s a chance I’m willing to take.
Cutting the new fabric
The old fabric you removed from your chair is going to serve as a pattern for cutting your new fabric.
When you’re ready to start cutting your fabric, you want to waste as little fabric as possible. It works best to start by laying out your biggest pieces and then fit smaller pieces around them. (If you are using a fabric with any type of printed pattern or very noticeable grain, be sure to line those up appropriately with your pattern pieces.)
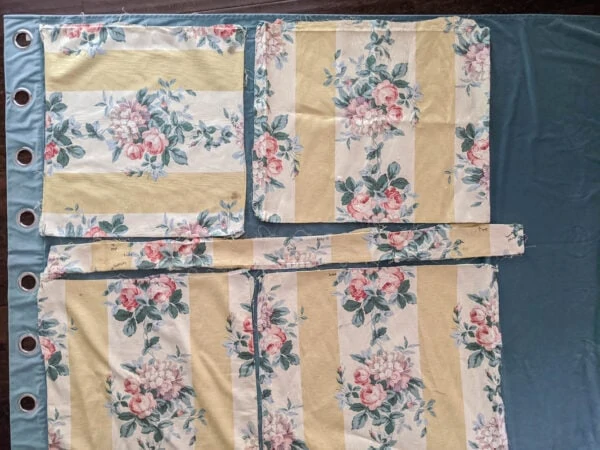
As you prepare to cut your fabric, don’t forget about any fabric pieces that you didn’t remove from your chair. You won’t have the old fabric to use as a pattern for those pieces, but you can use a tape measure to get a rough idea of how big to cut your piece and then trim it as needed.
Also if your chair has a removable cushion, don’t forget to cut the pieces for your cushion as well. I chose to use a seam ripper to take one of my chair cushions apart so I would have a good pattern for cutting the new pieces.
I recommend having a good rotary cutter and cutting mat as well as sharp sewing scissors for cutting your fabric. In some cases the rotary cutter is easier to use and in some cases the scissors will be easier.
Whichever you use, just be sure it is nice and sharp. Everyday scissors that you use to cut paper will not cut fabric well.
Ways to attach the new upholstery
Now you are ready to start putting that beautiful new fabric on your chair. There are several different ways to attach fabric to furniture and at this point you already know which ones you need to use. However the fabric was attached to your chair before, you will be reattaching it more or less the same way.
I’m breaking this section down into the different methods of upholstering chairs so you can easily skip to the sections that apply to your own chair.
Stapling on new fabric
The majority of upholstering furniture is simply using a staple gun to staple new fabric to your chair frame.
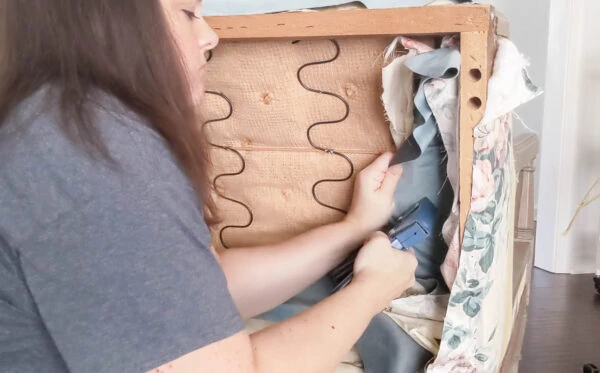
Sometimes the fabric will be pulled behind the frame or between two parts of the chair and stapled out of sight. And sometimes the fabric will be cut exactly to size and stapled along the edge of the fabric. Those staples will need to be covered later with trim.
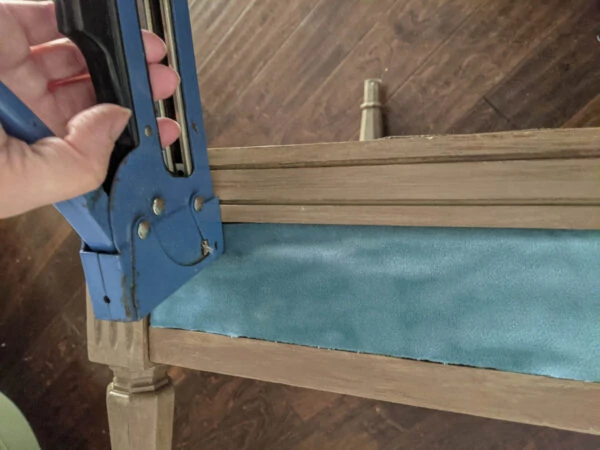
As you are stapling your fabric, it is really important to pull the fabric taut. Any loose, saggy, wrinkled fabric is going to make your upholstery job look unprofessional and sloppy. Not what we want!
Using upholstery pins (instead of sewing)
A lot of upholstered armchairs have a small strip of fabric on the front of the chair below the cushion that is sewn in place. You can handstitch your new fabric in place if you would like, but there is actually a much easier way – using upholstery pins.
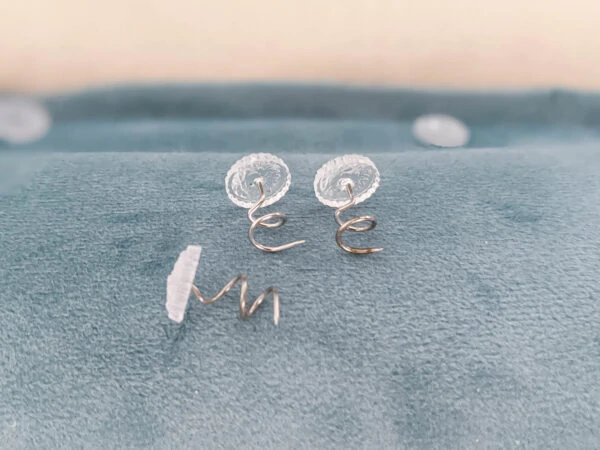
Upholstery pins are twisty pins that can be used to hold fabric in place. Once your fabric is in place, just twist the pins through the fabric into the chair. Because of the twisty shape, these pins hold fabric in place really well. I have used these pins when reupholstering several pieces of furniture and they really stay in place well.
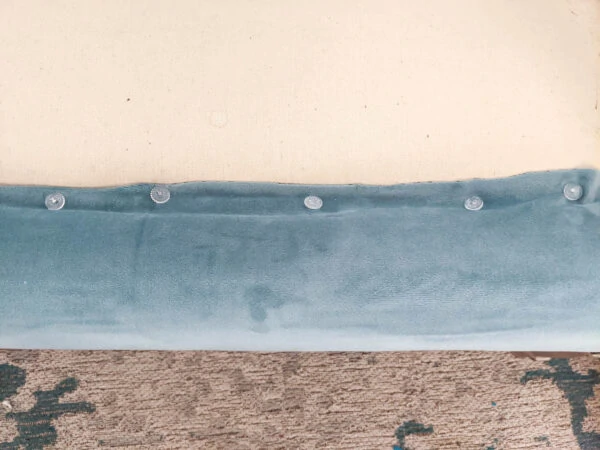
If your chair has other areas that are sewn where pins aren’t going to work, just do your best to replicate how the pieces were sewn together before. My first major reupholstery project was a big cushy armchair that required sewing some parts of the arms together. I was a terrible seamstress (though I’m a bit better now) but still managed to get it done.
Stapling fabric over cardboard strips
Cardboard strips or sometimes plastic strips are another common upholstery technique. The cardboard or plastic helps give a really nice, smooth line to the fabric.
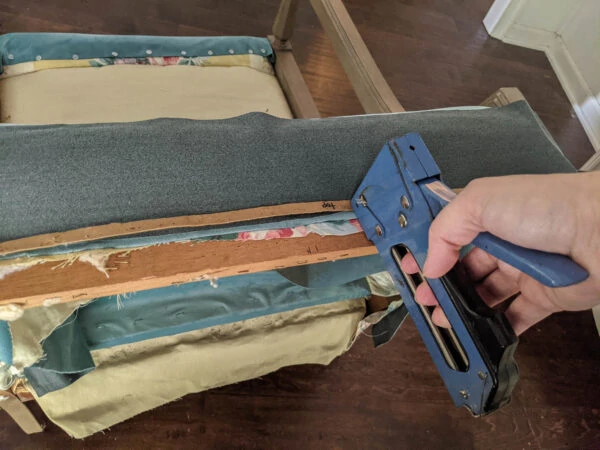
When attaching fabric with cardboard strips you place your fabric facedown, put the cardboard on top of it, and then staple through them both.
Before you start stapling, make sure that your fabric is centered and lined up where you want it. As you staple along the cardboard strip, double check that the cardboard is straight and use frequent staples.
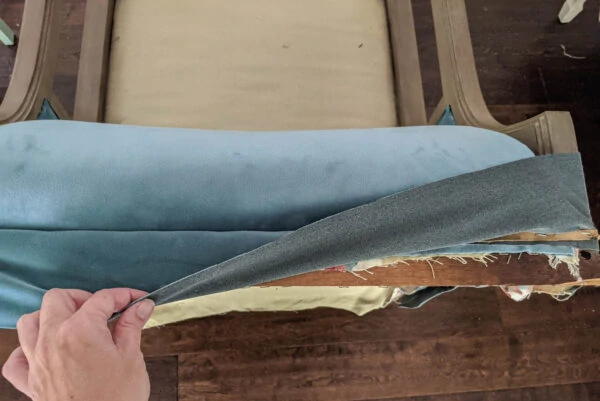
Once you have finished stapling, you can flip the fabric over the cardboard for crisp, clean line.
Adding the trim
Most chairs need some sort of trim to cover some of the staples used in upholstery. If your chair had trim before, you’re going to need trim now too.
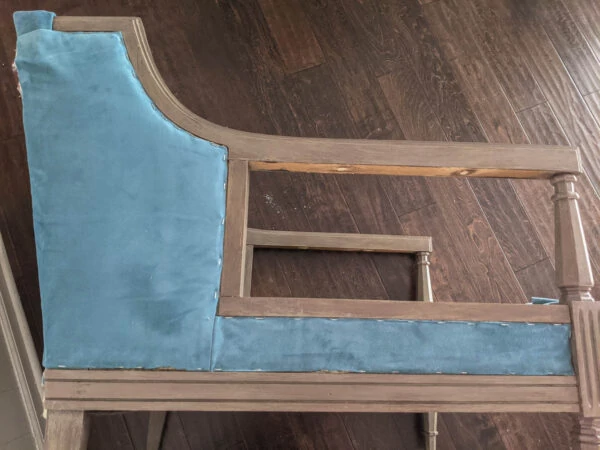
There are a few different types of trim you can use. You can buy a premade trim like gimp or cording. Or you can make your own double welt cord.
I chose to make my own double welt cord using the same fabric I used on the rest of my chairs.
I have a separate tutorial that shows exactly how to make double welt cord. I love that the double welt cord matches my chairs exactly and it gives a really nice professional finish. And making your own isn’t nearly as difficult as it looks.
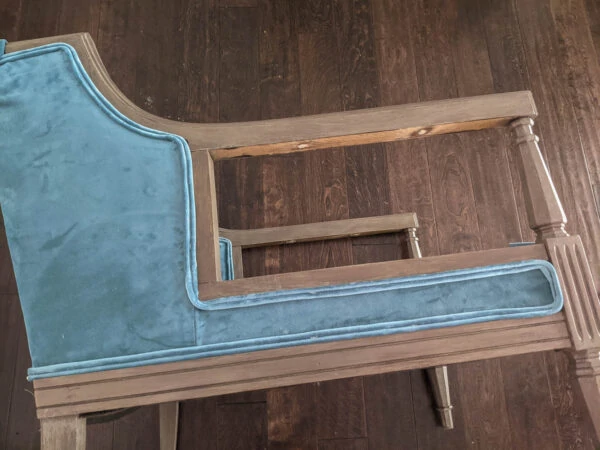
Whatever kind of trim you are using, there are a couple of different ways to attach it. You can staple it on or you can glue it on.
The original double welting on my chair was stapled on with the staples deep in the middle channel between the two rows of piping. But when I tried to recreate that, I found I just couldn’t get the staples in deep enough so that the shiny metal was hidden.
So I decided to use a different method I had seen others use, which was a good old hot glue gun. I have to admit I’m not always a huge hot glue gun fan, but in this case it actually worked really well.
I started out using the hot glue gun and also adding a few staples here and there to make sure it was really firmly attached. But after awhile, I stopped using the staples altogether because I found the hot glue gun did a great job on its own.
Attaching fabric with tack strips
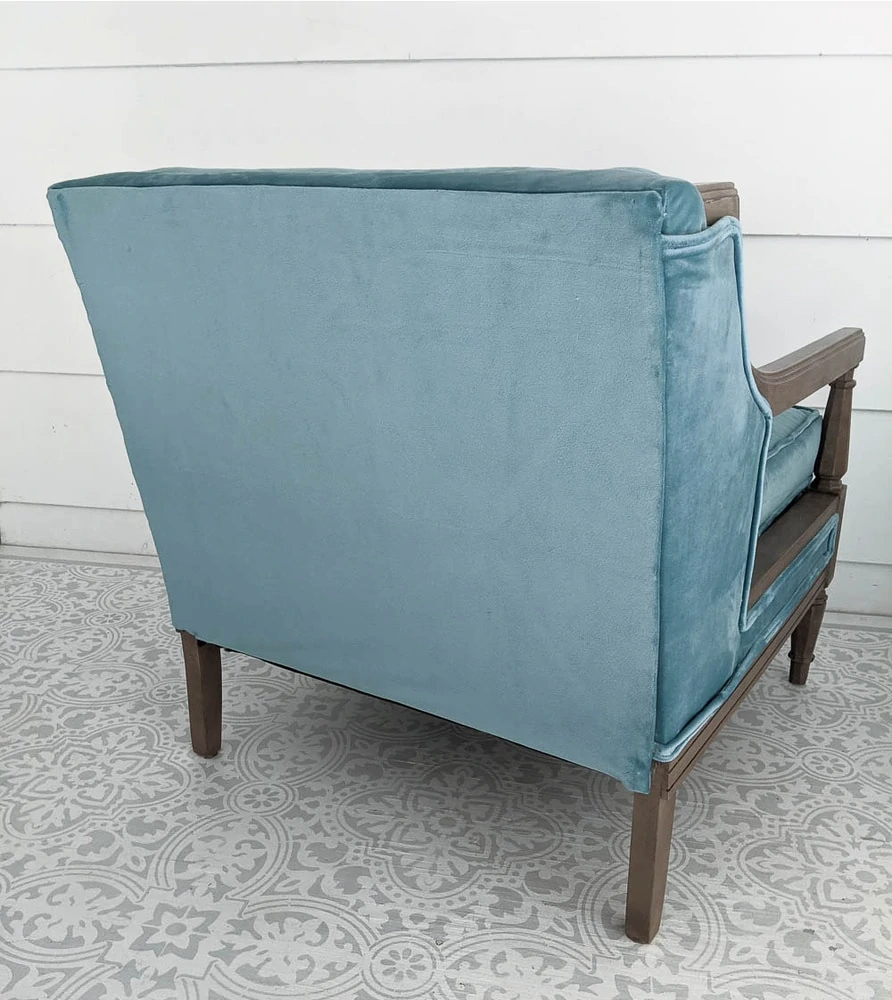
The back of my chair was attached using a cardboard strip at the top and a tack strip along each side. This is a really common way for armchair backs to be attached because it gives a clean finish and there are no visible staples.
When attaching fabric with tack strips, you can reuse the original tack strips from your chair if they are still in good condition. If they aren’t, you can get replacement tack strips on Amazon.
You need to attach the tack strips to your fabric before putting it on your chair. The fabric will be folded over each tack strip so that you have a clean folded outer edge with tacks sticking out the back.
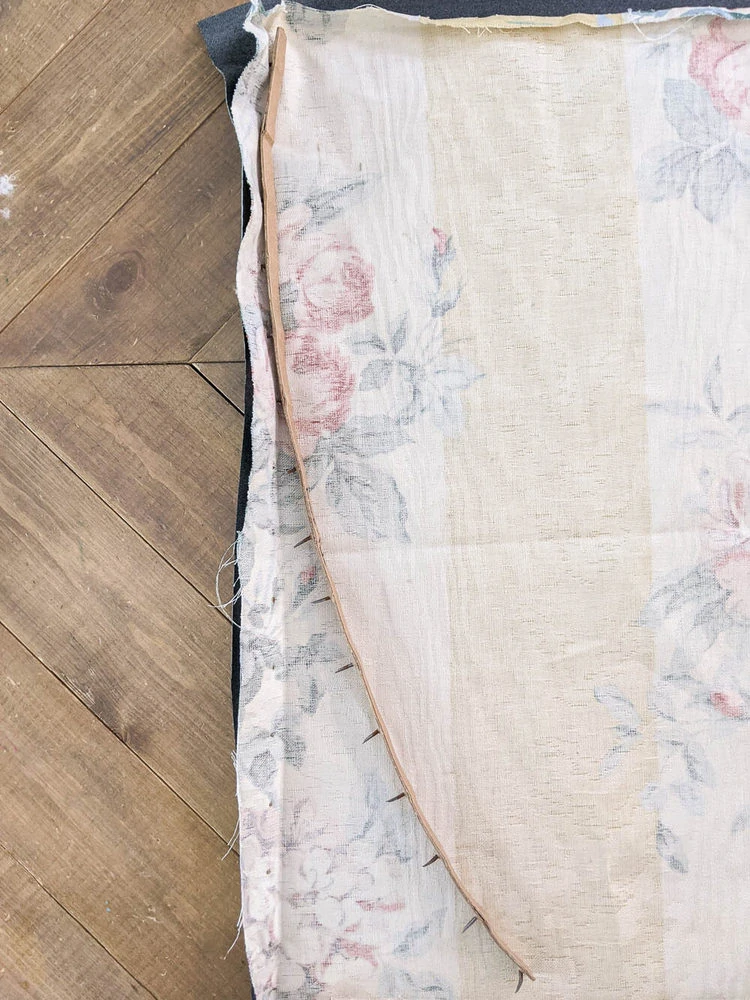
This can be a bit tricky because each tack strip needs to be placed at the right spot on your fabric so that it will fit your chair exactly. I found the easiest way to do this was by using the old fabric as a pattern. I lined up the old and new fabric and poked holes in the new fabric exactly where the old holes were.
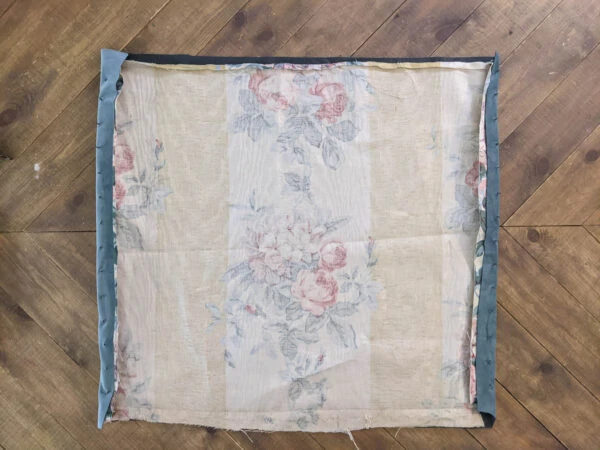
Then I removed the old fabric and poked the tacks of the tack strips through those holes.
If you don’t have the same tack strips or the old fabric, just measure carefully to make sure that once your fabric is folded around the tack strips, it will fit the back of your chair well.
Also make sure you leave a little extra space along the top of your fabric above the tack strips. This is to allow for the top to fold over a cardboard strip when you attach it for a nice clean edge.
Reattaching the chair back with tack strips is one of the more technical parts of upholstering a piece of furniture, but as long as you really pay attention to what you are doing, it will turn out beautifully.
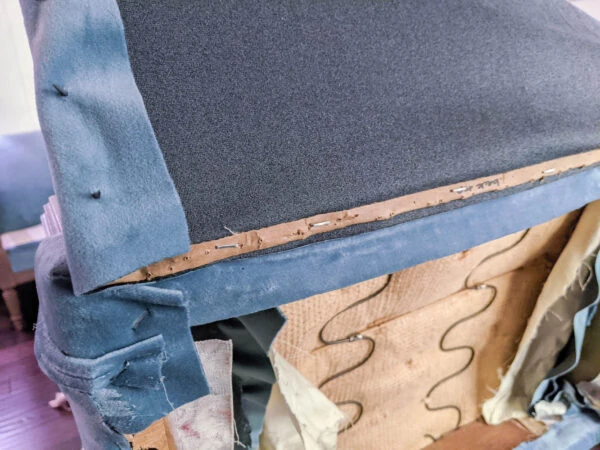
To get a nice clean line along the top of the chair, use a cardboard strip like I talked about earlier. Start with the fabric upside down, add the cardboard over it, and staple through them both.
It is extra important that you double check your fabric placement before you start stapling anything. You need to make sure that the fabric is centered so that each of the tack strips is going to fall right along the edges of the chair back.
Once the top is attached, you can flip the fabric over and start attaching the tack strips along the sides by gently hammering them into the chair. An upholstery hammer is ideal for this because it is a bit gentler on the fabric than a regular hammer, but a regular hammer can also work as long as you are careful.
Be sure to pull the fabric tight as you hammer the tack strips down along the sides of the chair. Then you can staple the final side under the chair and staple the dust cover back into place.
Sewing the cushion
The final step is sewing a new cushion. Sewing has always intimidated me way more than any of the other parts of reupholstering furniture. But I just keep working on it and I did manage to sew my own cushions with piping and a zipper that look pretty darn good.
I don’t feel confident enough in my sewing yet to share a tutorial, but this box cushion tutorial is really helpful and thorough.
Before and After of Reupholstered Chairs
And now for everyone’s favorite part – the before and after pics!
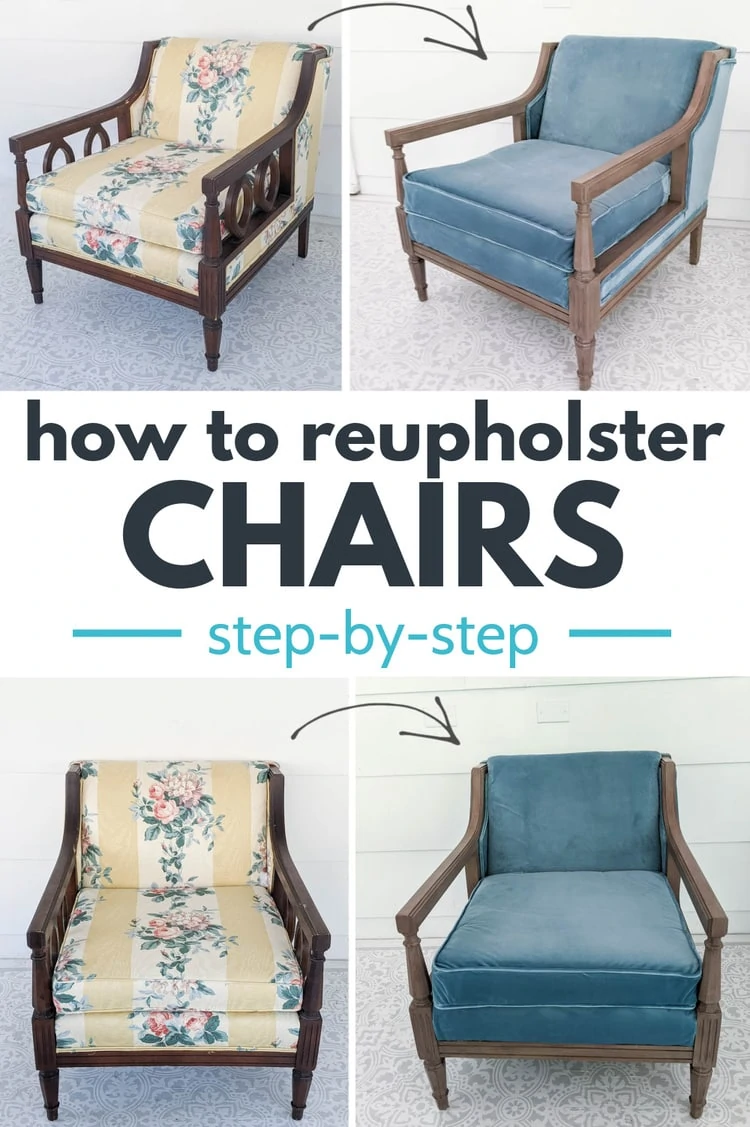
Here’s a reminder of how these chairs looked before:
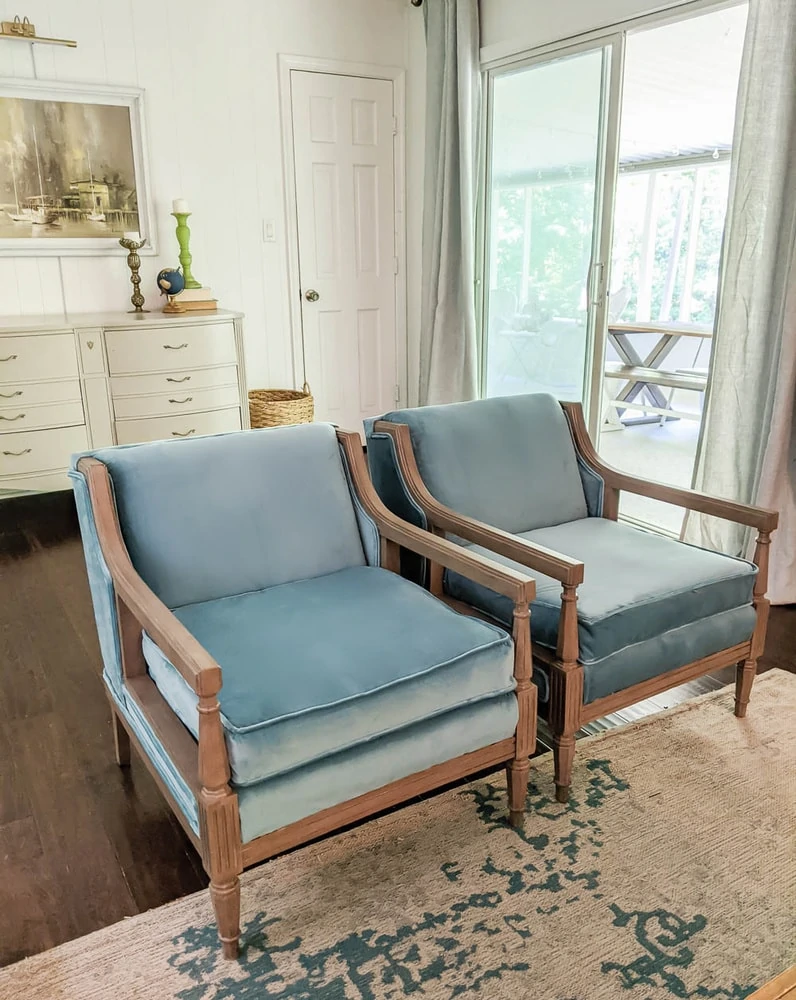
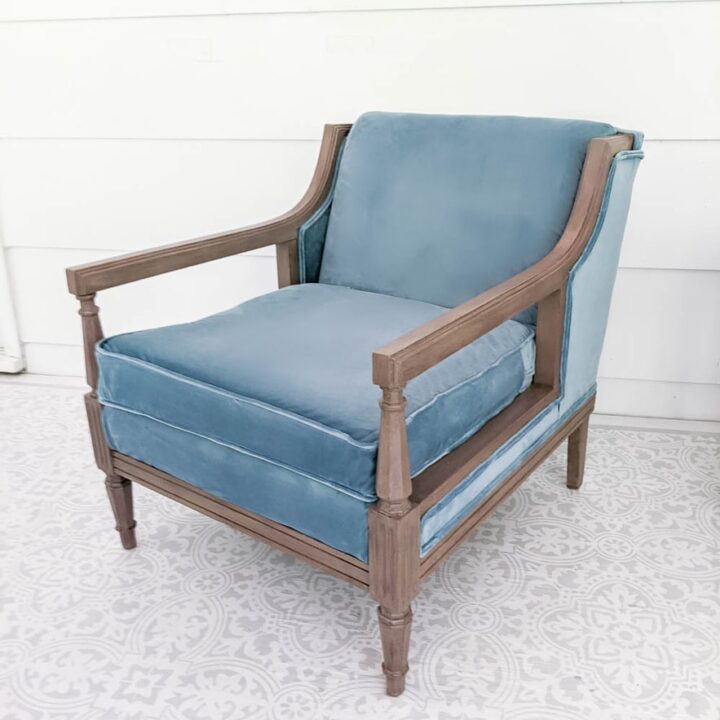
And here they are now:
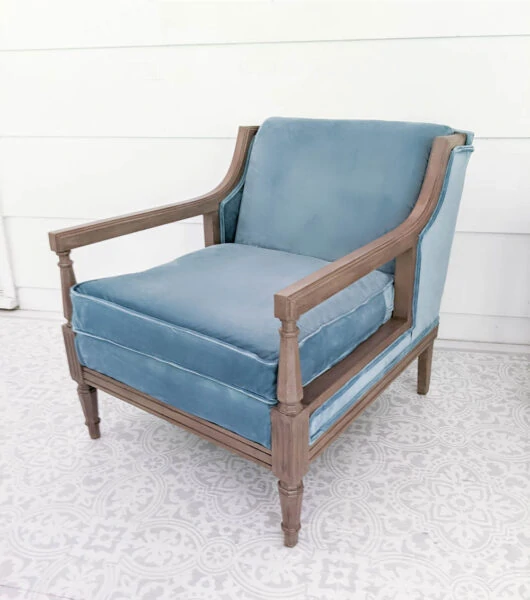
These chairs turned out so great! They are 1000 times better without the striped, floral fabric!
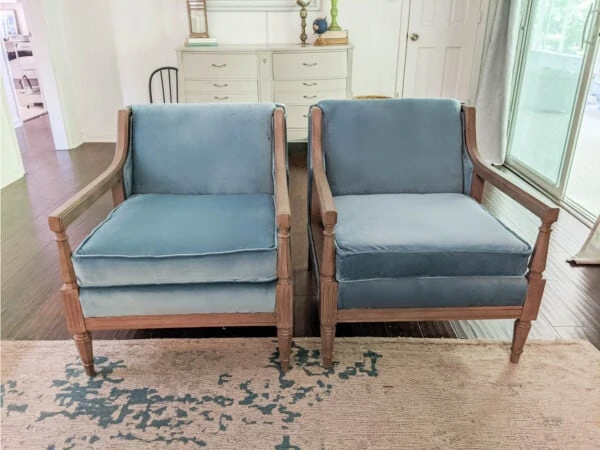
And now I’m probably going to take a bit of a break before tackling another long reupholstery project! I’m ready to whip up some quick but satisfying, easy DIY projects for awhile instead.
Video Tutorial
I’d love for you to subscribe to my Youtube channel!
Other DIY upholstery ideas I think you’ll love:
- 10 Secrets for Finding Incredibly Cheap Fabric
- How to Make Easy Double Welt Cord for Reupholstering Furniture
- How to Reupholster a Couch on the Cheap
- How to Reupholster an Armchair
I’d love for you to pin this post on Pinterest!

How to Reupholster Chairs: A Simple Step-by-step Guide
I'm sharing a detailed explanation of basic upholstery techniques, with tips for getting beautiful results.
Materials
- Chairs to upholster
- Fabric
- Sharpie
- Upholstery pins
- Trim of your choice
- Piping cord
- Zippers
Tools
- Rotary cutter and cutting mat
- Good fabric scissors
- Staple gun
- Sewing machine
- Upholstery staple remover
- Flathead Screwdriver
- Needle nose pliers
- Hammer or upholstery hammer
Instructions
- Remove the old fabric. Label each piece as you remove it so you know where it goes.
- Remove the staples by prying them out with a flathead screwdriver and then remove them with needle-nose pliers or using an upholstery staple remover.
- As you take your chair apart, label each of these parts and set them aside.
- Remove all of the trim from your chair and also any piece of fabric that keeps you from accessing another piece of fabric.
- Choose your new fabric.
- Use the fabric you removed as a pattern for your new fabric. Start by laying out your biggest pattern pieces on top of your new fabric and then fit smaller pieces around them.
- It's best to use a good rotary cutter and cutting mat as well as sharp sewing scissors for cutting your fabric.
- Start putting the new fabric on your chair, reattaching it the same way it was attached before.
- When using a staple gun to staple new fabric to your chair frame, the fabric will be pulled behind the frame or between two parts of the chair and stapled out of sight. Be sure to pull the fabric taut.
- You can use upholstery pins to attach the front piece of fabric under the seat cushion.
- When stapling fabric over cardboard strips, make sure your fabric is centered and lined up where you want it.
- Add trim to cover any exposed staples. You can buy a premade trim like gimp or cording or you can make your own double welt cord.
- When attaching fabric with tack strips, you can reuse the original tack strips from your chair, or purchase new ones. The fabric will be folded over each tack strip so that you have a clean folded outer edge. Use the old fabric as a pattern for attaching your new fabric to the tack strips.
- Pull the fabric tight as you hammer the tack strips down along the sides of the chair.
- Staple the final side under the chair and staple the dust cover back into place.
- Sew the new cushion and add piping and a zipper.
Recommended Products
As an Amazon Associate and member of other affiliate programs, I earn from qualifying purchases.
-
Brother ST371HD Sewing Machine, Strong & Tough, 37 Built-in Stitches, Free Arm Option, 6 Included Feet
-
Bed N' Basics Upholstery Twisty Pins with Clear Heads - 50 Pack - Holds Bedskirts, Slip Covers, Drapes and Other Fabric and Materials Securely in Place - for Sewing and Home Decor
-
Arrow T50 Heavy Duty Staple Gun
-
LIVINGO Premium Tailor Scissors Heavy Duty Multi-Purpose Titanium Coating Forged Stainless Steel Sewing Fabric Leather Dressmaking Softgrip Shears Professional Crafting (9.5 INCH)
-
Fiskars Crafts Rotary Cutter, 60mm Titanium
-
Keadic 5pcs Upholstery Tacks Tools Set, Double-Faced Upholstery Mallet with 2 Replacement Rubber Heads, Staple Lifter and Removal Pliers, for Furniture Repair and Jewelry Craft Decoration Project
-
Air Locker A01 Upholstery & Construction Heavy-Duty Staple Remover



Great job!
The chairs look amazing!!. I love the idea of using drapery panels. You’re brilliant! Upholstery fabric can be so expensive. Well done.
Thank you michelle!
Thank you!
Exactly the look I want to go for with my chairs. Are the curtain panels really the “teal” option on the website you mentioned? They look so much lighter on the chairs! Just checking before I make a purchase!
Yes, they are the teal curtains! Because they are velvet, they look lighter where the light hits them.