How to Put Ribbon on a Christmas Tree: The Best and Easiest Method
After lots of trial and error, I’m sharing the best way to put ribbon on a Christmas tree – it’s easy, anyone can do it, and it looks beautiful every time.
Putting the ribbon on the tree is definitely the trickiest part of decorating a Christmas tree. Honestly, I think the ribbon is the thing that really separates the ordinary Christmas trees from the beautiful ones.
If you can get the ribbon right, you’ve got it made.
How NOT to put ribbon on your Christmas Tree
When I first started trying to add ribbon to my Christmas tree, I had no idea what I was doing and it showed.
My early attempts at adding ribbon to our Christmas tree looked something like this:
I took a roll of ribbon, wrapped it around and around the tree, and called it a day.
I call this method wrapping a tree up ‘mummy style’. To be honest, it looks a bit like the tree is being strangled.
Clearly, I’m not a big fan of this look.
So I started experimenting with different techniques to get my tree to look more like the beautiful Christmas trees I saw in magazines and online.
At first, it seemed like the more I tried to get the ribbon to do what I wanted, the more it just looked messy and tortured.
But slowly, I figured out several hacks and tricks that made it so much easier to add ribbon to my Christmas tree. And even better, it actually looked really beautiful!

I shared a bit about Christmas tree ribbon in my post on my best tricks for decorating a beautiful Christmas tree, but since the ribbon really is the hardest part, I wanted to give a bit more detail on how to do it.
In this post I’m sharing a step-by-step tutorial for adding ribbon to your tree and tips on the best ribbon to use. Plus, I have a full video tutorial at the bottom of this post for anyone who wants to see these tips in action.
If you’re looking for more Christmas tree ribbon inspiration, I also put together a post full of 25 gorgeous trees with a huge variety of different types, colors, and arrangements of Christmas tree ribbon.
This post contains affiliate links which means if you make a purchase after clicking a link I will earn a small commission but it won’t cost you a penny more. Click here to see my full disclosure policy.
What type of ribbon works best on a Christmas tree?
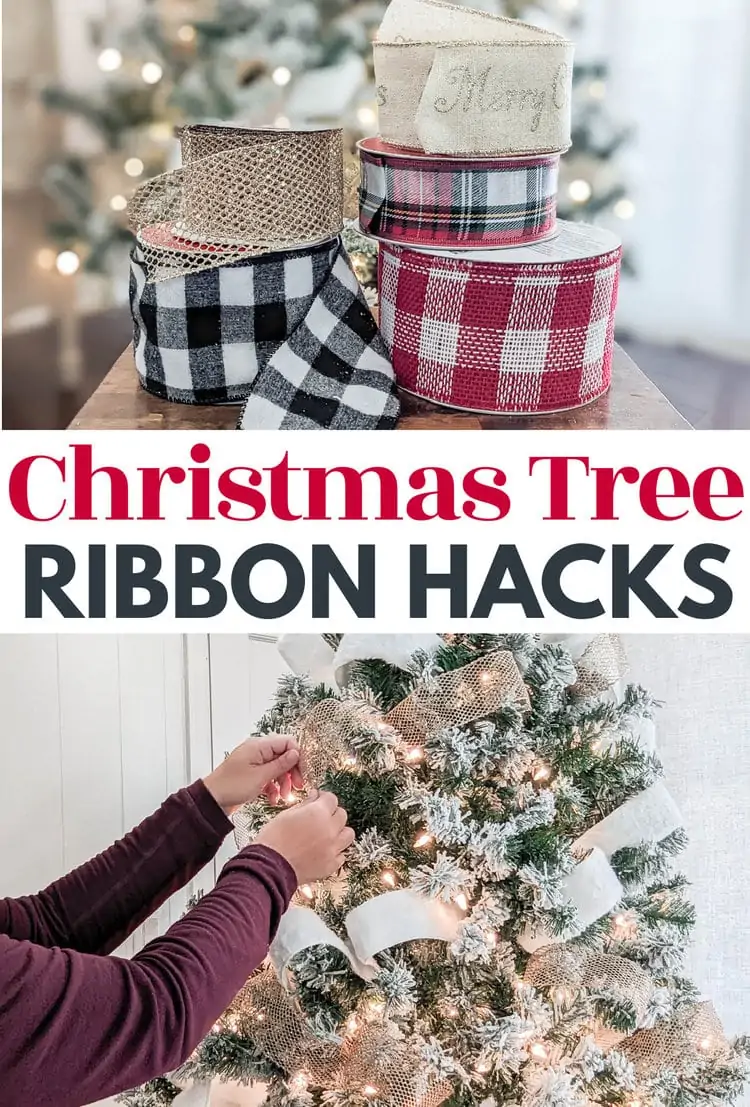
You can use just about any type of ribbon on your Christmas tree, but wired ribbon is by far the easiest to work with.
You can get wired Christmas ribbon in a huge range of colors, textures, and patterns at craft stores like Michaels, Hobby Lobby, and JoAnn Fabrics. (Even better, these stores almost always have a sale going and coupons available.)
You can also find a lot of options on Amazon, though they’ll be a bit more expensive.
Ribbon that is between 2 and 4 inches works best, but you can use narrower or wider ribbon if you prefer. Just keep in mind that very narrow ribbon is more likely to ‘get lost’ in the tree and very wide ribbon can be more difficult to work with.

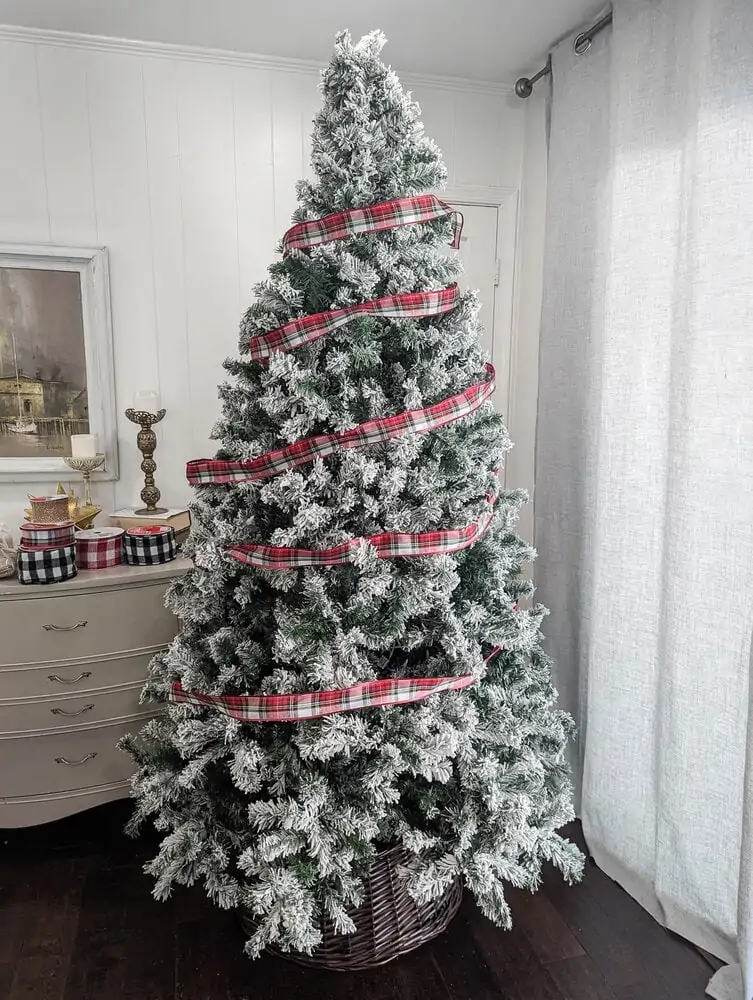
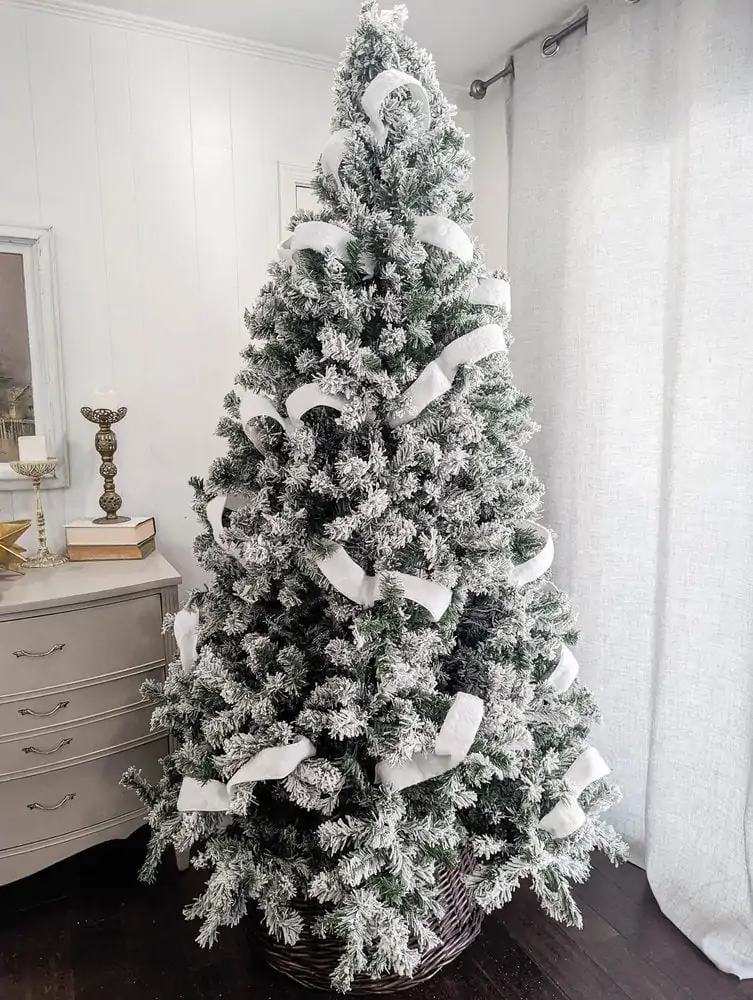
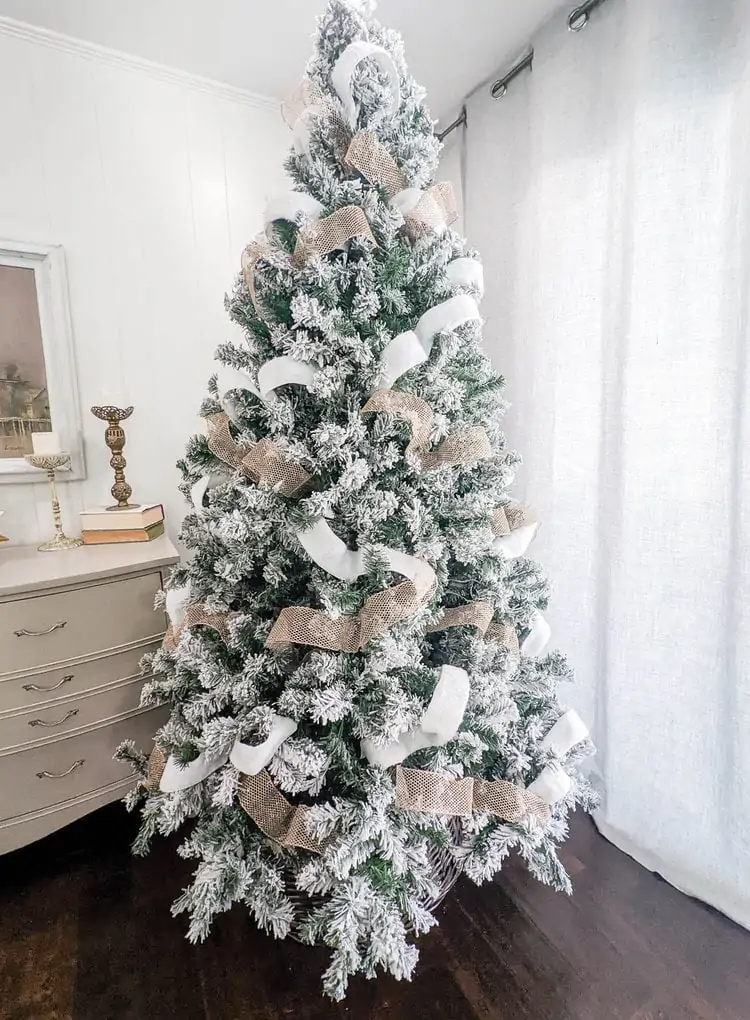
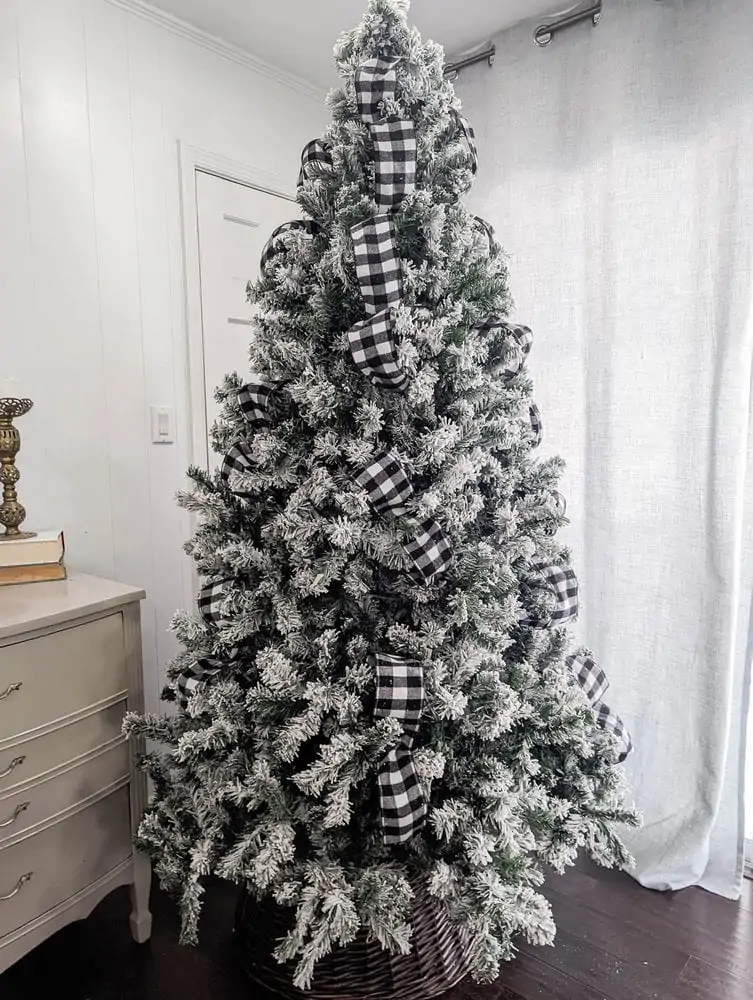
I like to use two different ribbons on my Christmas tree. Using two ribbons adds more interest and color.
Choosing ribbons with different widths, textures, and colors usually works really well. They don’t need to be matchy-matchy, they just need to look good together.
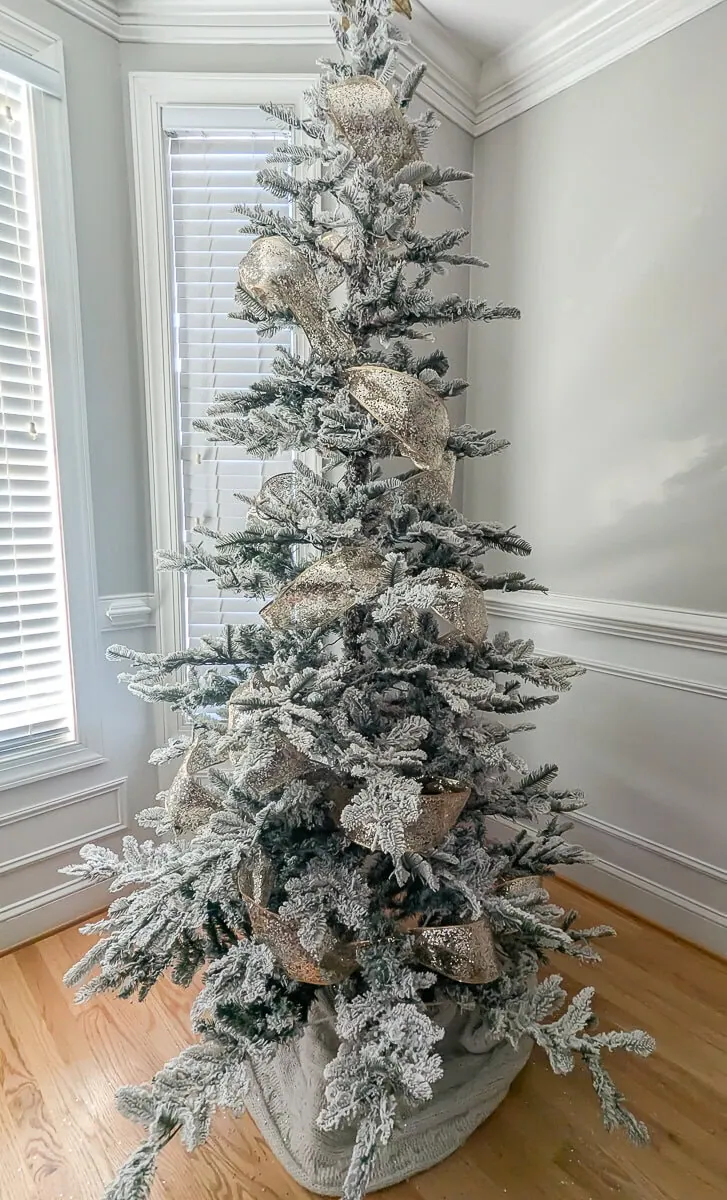
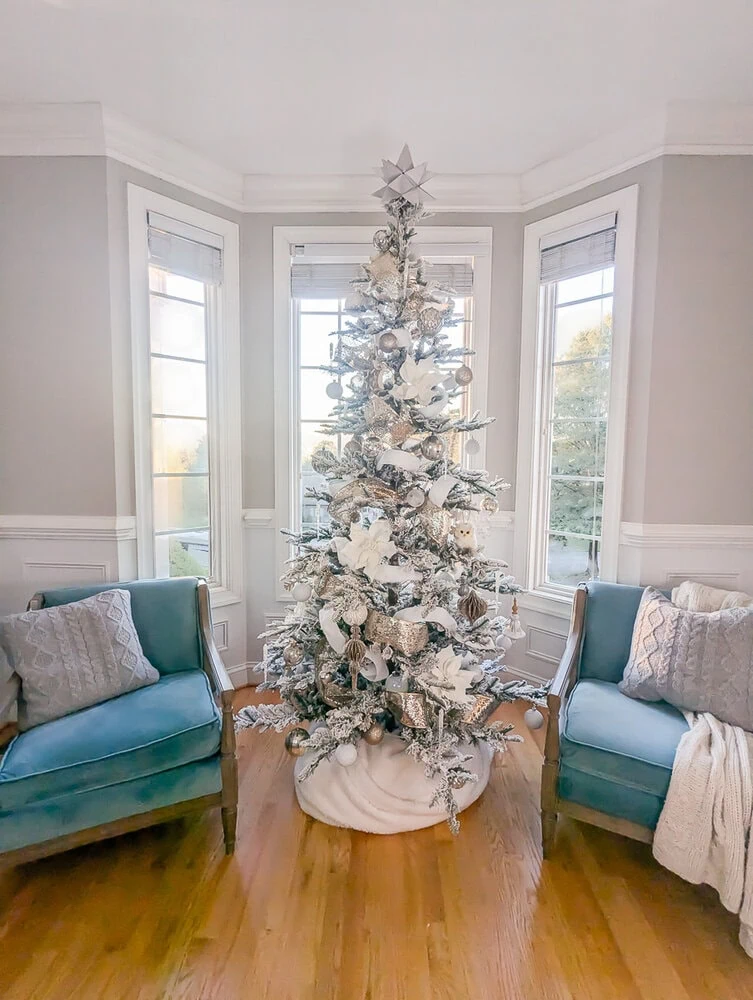
For this tree I am using a 2.5 inch gold mesh ribbon and a 2.5 inch white faux fur ribbon, both from Michaels.
How much ribbon do you need?
One of the great things about this method for putting ribbon on your Christmas tree is it really cuts down on the amount of ribbon you need.
We aren’t going to waste ribbon by putting it anywhere it won’t be seen, so you don’t need rolls and rolls of ribbon.
For a typical 7.5 foot tree, I usually buy two 25 foot rolls of each type of ribbon I want to use and have some left over.
If you are only using one type of ribbon, you may need 3 rolls, depending on how ribbony you want your tree.
How to put ribbon on a Christmas Tree
What goes on before ribbon
If you have an artificial Christmas tree, before you start decorating, be sure to fluff it well.
Christmas tree branches tend to get flattened and moved out of place in the box. Fluffing your branches makes a huge difference in how your finished tree looks. (If you are looking for a new tree, I have this flocked pre-lit tree from Amazon and I absolutely love it.)
Just work through the branches, spreading the tips to fill in any bare spots.
Then you can go ahead and add lights to your tree if needed.
Some people also like to put the tree topper on before adding ribbon. I usually save that for the end, but you can add yours now if you prefer.
Cut your ribbon into strips
If you only follow one tip from this whole post, this is the one to choose.
Cutting your ribbon into strips before putting it on the tree makes the whole process so much easier. It’s way easier to work with a small strip of ribbon than it is to try to maneuver a trailing 25 foot tail of ribbon.
Using strips of ribbon also makes it easier to avoid the whole mummy-tree look.
And it also saves money. When you use small strips of ribbon, you can cover the same size tree with less ribbon. Plus you only need to put ribbon where it will actually be seen rather than having extra wrapped all around the back of the tree.
I recommend cutting your ribbon into strips that are around 18-24″ long.
Start by cutting just a few strips and as you go, you can decide if you would like them a bit shorter or longer.
Put the ribbon on the tree
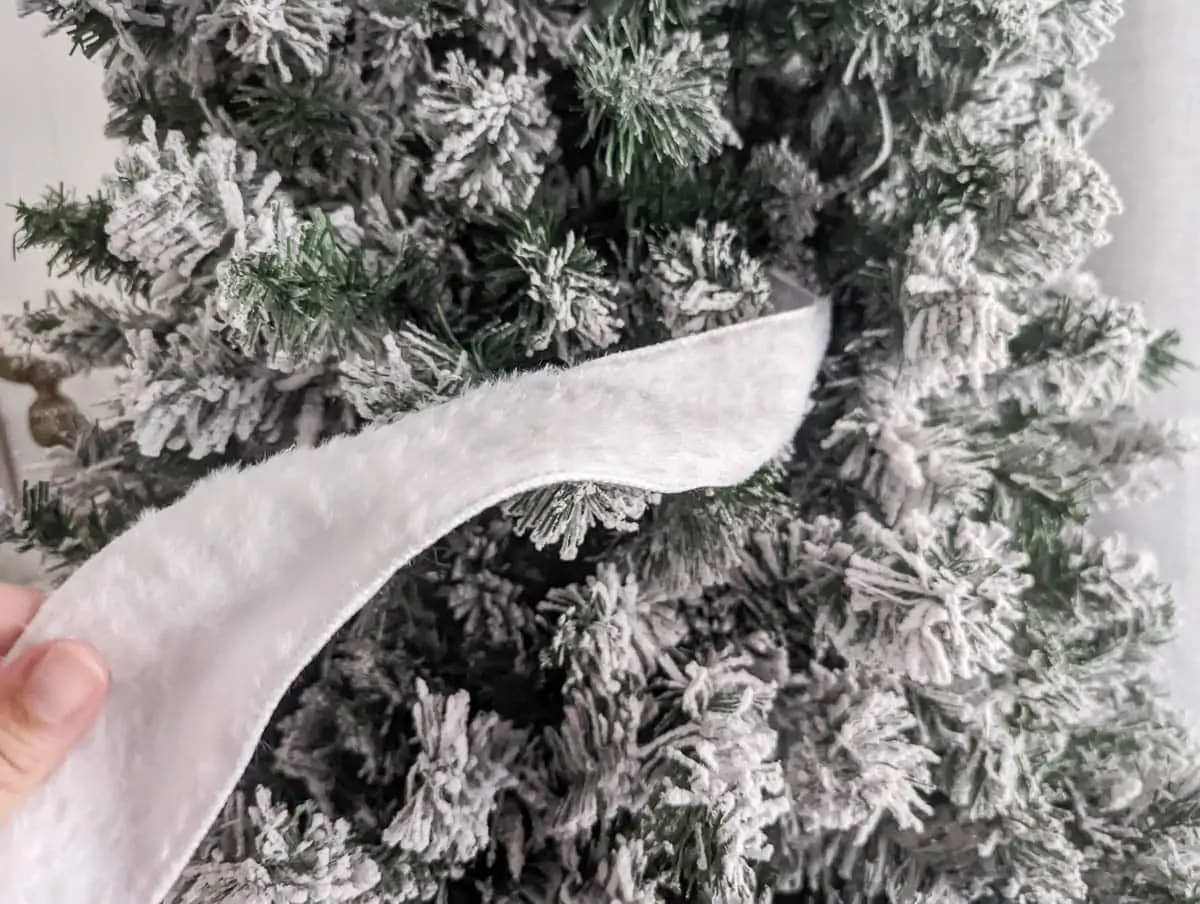
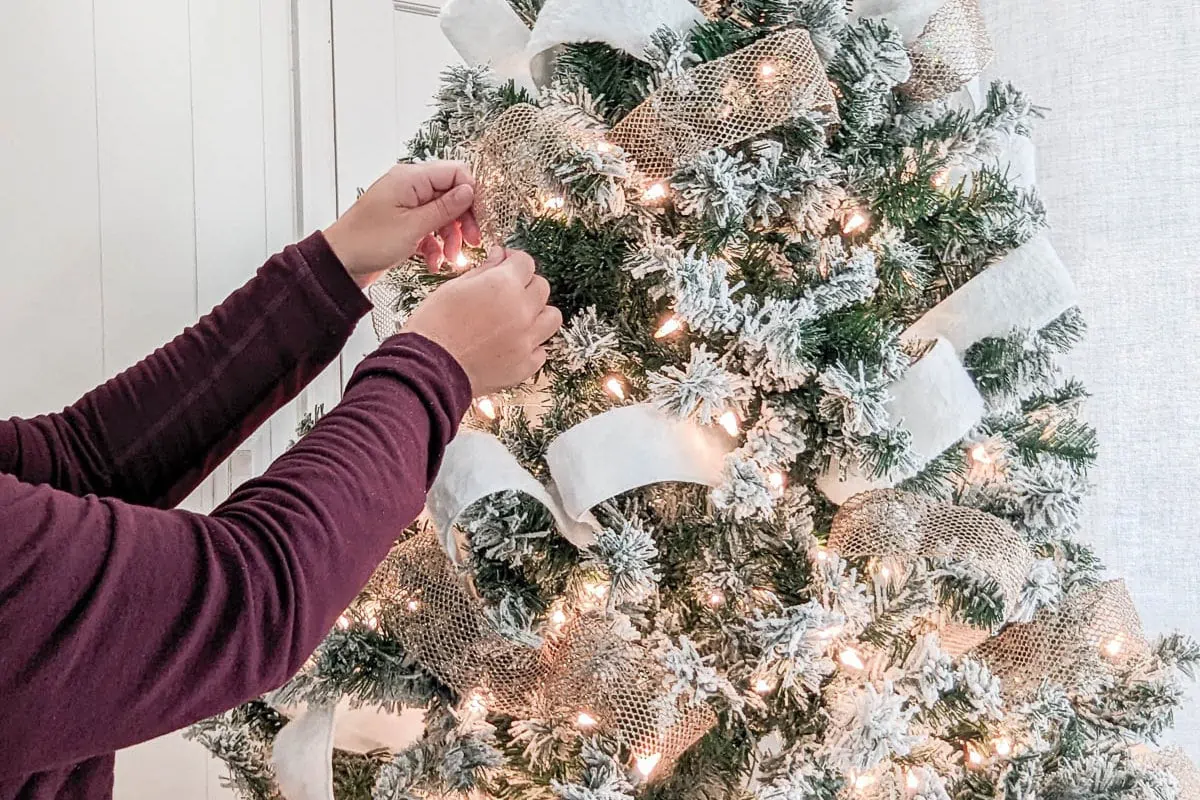
Start by tucking one end of your ribbon strip into the tree; if you are using wired ribbon, it should stay in place quite nicely without any help.
Then you can shape your ribbon. There are two main shapes I use; they’re both easy and look beautiful.
1 – The Double Tuck
Once you’ve tucked one end of the ribbon into the tree, let the ribbon drape down. Then tuck the center of the ribbon into the branches, let it puff back out, and tuck the final end into the branches.
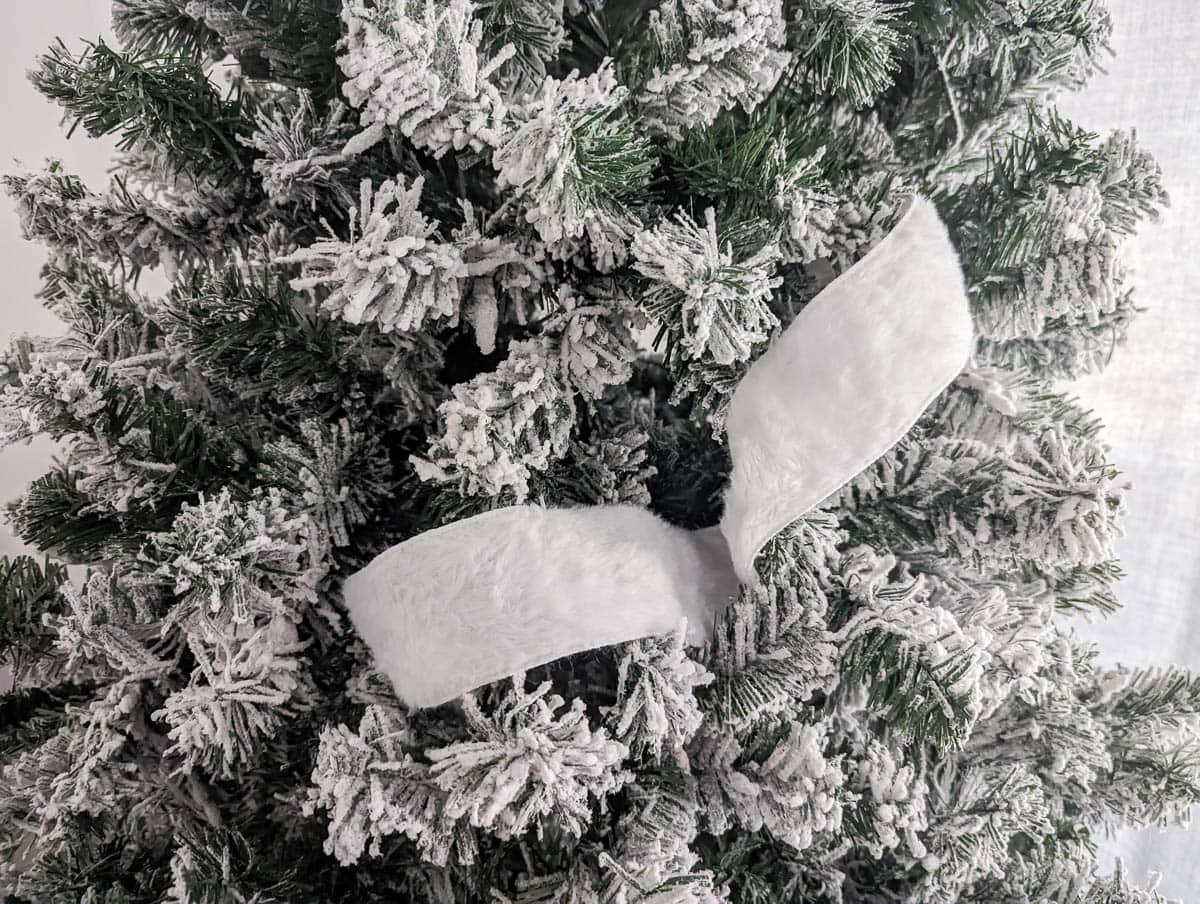
2 – The Curl
Once you’ve tucked one end of the ribbon into the tree, let the ribbon drape down. Then curl the ribbon around to make a loop.
You can then simply tuck in the other end of the ribbon.
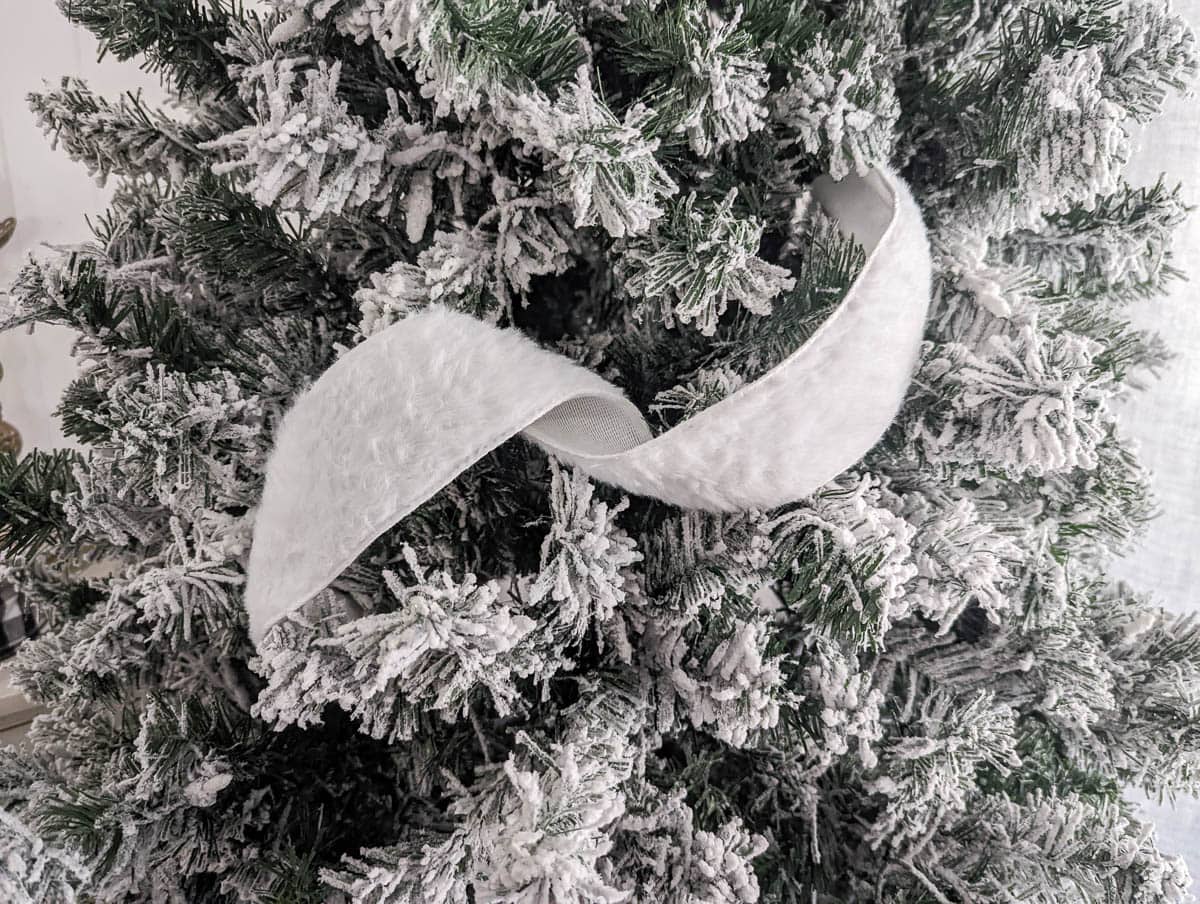
If your ribbon isn’t curling easily, sometimes it is easier to form the curl first, before tucking the two ends into the tree.
I’ve found that some types of ribbon curl well, while others don’t. The white fluffy ribbon I used was easy to curl, but the gold mesh was much stiffer and worked better tucked.
Continue adding ribbon
As you are adding ribbon to the tree, one of the keys to keeping your ribbon from looking crumpled and tortured is just letting the ribbon do what it wants.
Don’t try to force it, just let it fall naturally and then tuck it into the tree where it makes sense.
The less work you do to make it look right, the better it will actually look.
Adding ribbon diagonally
It usually looks best if you drape your ribbon diagonally across your tree rather than side to side or straight up and down.
That way it weaves evenly throughout your whole tree and once the tree is finished, all the diagonal lines will look beautiful and really help keep the eye moving over the Christmas tree.
As you add ribbon, it’s also a nice touch to try to place the ribbon strips so that when you step back, it looks like it could be one long continuous piece of ribbon woven through the tree.
This may sound complicated, but it really isn’t. Just place each new strip of ribbon in a spot that could feasibly be connected to where the last strip ended.
This is really just extra credit though; even if you don’t focus on this, your ribbon should still turn out great.
If you are using two types of ribbon, you can add the second ribbon the same way.
Adding ribbon vertically
While I prefer to add my ribbon diagonally, some people prefer their ribbon to run down the tree more vertically. This can especially work well when you are using a bow tree topper.
You can add your ribbon vertically using basically the same method including using strips and doing the double tuck or the curl.
The only real difference is you will be running your ribbon strips down your tree in rows rather than diagonally throughout the tree.
Even though you will be arranging your ribbon in a more structured way, be sure to keep it loose and let your ribbons zig zag to one side or the other a bit as you work.
Ribbon should look like it is flowing, not like it has been disciplined into straight lines.
If you want more Christmas tree help, I have another post packed with all kinds of tips and hacks for decorating a beautiful Christmas tree.
Tips for putting ribbon on sparse Christmas trees
Since originally sharing this post, I’ve gotten a new Christmas tree that’s more of a realistic shape rather than a classic shape. That means that the branches are a lot more sparse and spread out for a more natural look. (This is the tree I got from King of Christmas and it’s beautiful!)
I found that putting ribbon on a more open tree like this is mostly the same, but I did find it helpful to cut my ribbon in longer strips. Since the tree has a lot more open space, there are fewer spots to tuck the ends of the ribbon into.
For this tree I cut my ribbon into sightly larger 2-3 foot pieces. I still curled and tucked my ribbon the same way shown above, but sometimes I found it better to do a triple tuck rather than a double.
You can check out all the details and more photos of my silver and gold Christmas tree here.
Tips for putting ribbon on mini Christmas trees
If you are decorating mini Christmas trees, the method is really the same with a few minor differences.
Depending on the size of your tree, it will probably work better to cut your strips of ribbon a bit smaller. If it is a much smaller tree, you could even go as small as 12 inches.
Most of the time, the same 2-4″ ribbon will work best, but you may also be able to use a thinner ribbon if your tree is quite small.
And finally, as you are adding your ribbon, you may need to go a bit less diagonally just because there isn’t as much area on the tree to work with.
I hope you find these tips helpful! I know they’ve been a gamechanger for me when it comes time to decorate the Christmas tree!
Video Tutorial
Just hit the play button below to watch the full video tutorial. It takes you step-by-step through adding ribbon to your Christmas tree.
I’d love for you to subscribe to my Youtube channel!
More Christmas tree decorating tips I think you’ll like:
I’d love for you to pin this post on Pinterest!

Where did you get that topper? Or how did you make it?! It’s soooo lovely! Gorgeous tree.
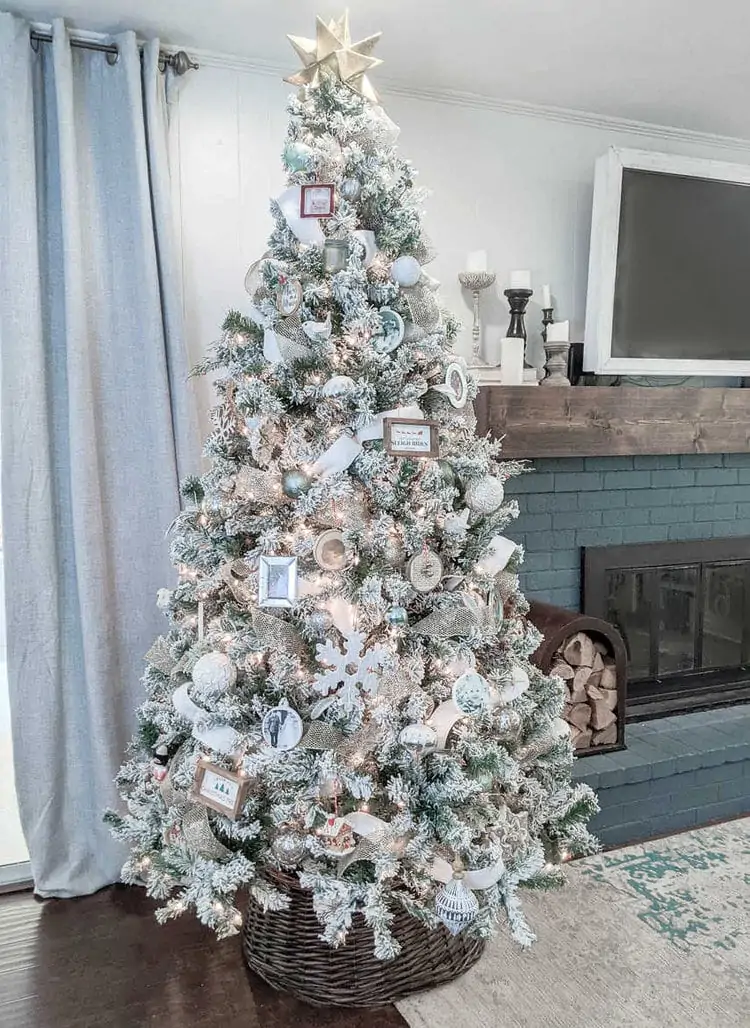
Thank you! I was super lucky and found it at a yard sale. I haven’t seen anything just like it online but if you want to search, this style is a called a moravian star. It definitely could be DIYed though. I might have to try to do my own tutorial for next year!
I lived in Winston-Salem, NC for 5 years and there are Moravian stars everywhere. The town is home to Old Salem were Moravian settled. Old Salem has a store that sells lots of different Moravian stars but they can also be found in other parts of country just by doing a search. I have a beautiful copper colored one that is hung in my front window year around. ❤️
I am only a couple of hours from Winston Salem – I will have to take a roadtrip and check that out sometime!