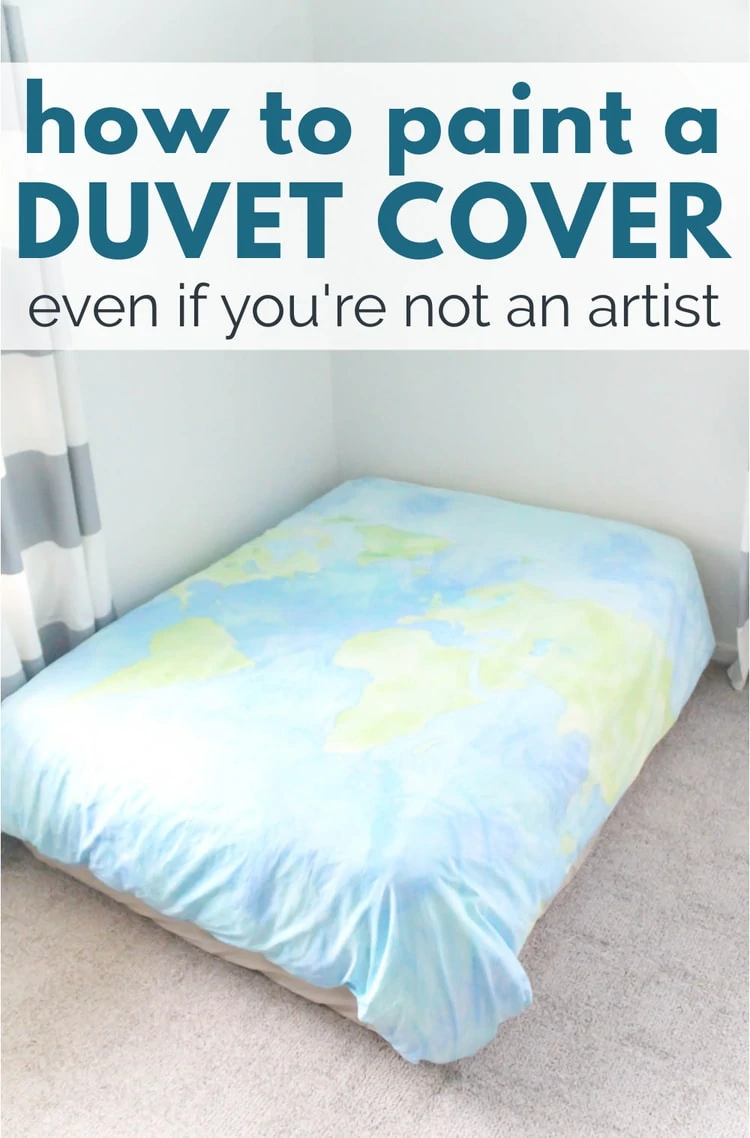
How to paint a duvet cover with any design
Painting a duvet cover may not be a traditional choice, but it’s a great way to get the exact design and colors you want for your bedding. I’m sharing everything you need to know to paint a gorgeous duvet.
Finding the perfect duvet cover can be tricky. I looked high and low for the perfect bedding for my son Griffin’s room, but I struggled to find what I wanted.
So I decided it was time to DIY my own.
This post contains affiliate links which means if you make a purchase after clicking a link I will earn a small commission but it won’t cost you a penny more. Click here to see my full disclosure policy.
When I started working on Griffin’s big boy room, I fell in love with the idea of a world map duvet cover. I found a few amazing map duvet covers like this one, this one, and this one.
But they were each well over a hundred dollars. That really isn’t a bad price for bedding these days, but it is significantly more than I wanted to spend on a two year old’s room.
So I got a crazy idea to paint my own world map duvet cover. And it actually worked! It turned out beautifully and this same method would work to paint all kinds of different designs.
Today I’m sharing a step-by-step tutorial for painting any design of your choosing on a duvet cover along with lots of helpful tips.
Materials
- plain white duvet cover
- projector – these come in handy for way more diy projects than I expected, not to mention great movie nights.
- colored pencil that matches your paint color – to trace your design onto the duvet cover
- acrylic craft paints in the colors of your choice – for the world map design, I used 3 shades of blue and 3 shades of green
- fabric medium – you can usually find small bottles of this next to craft paints in a craft supply store
- paint brushes – it’s helpful to have a small artist’s brush for outlining and more detailed areas and a large artist’s brush for filling in larger areas
- drop cloth
How to Paint a Duvet Cover
Begin with a plain duvet cover
I bought a very inexpensive plain white duvet cover and pillow sham set from IKEA to use for this project. There are also a few options available on Amazon if you don’t have an IKEA nearby.
Just be sure to pay attention to what fabric your duvet is made from. I’ve painted cotton quite a few times and it takes paint well. But I’ve noticed that many inexpensive duvet covers are made from microfiber. Microfiber may also take paint well, but I personally haven’t ever tested it to know for sure.
I did a bit of practice run on the pillow cases that came with the my duvet set. I turned the pillow cases into watercolor throw pillow covers and was thrilled with how they turned out. Which meant full steam ahead!
Draw your design
If you haven’t yet, choose the design you want to use for your duvet cover. When you are choosing your design, think about how it will look on an actual bed.
If you are painting a graphic design, be sure to think through where it will be placed on the duvet cover. If you are painting an abstract design or repeating pattern, you don’t need to worry about this.
For my own map duvet, I found a simple world map outline online and made sure the dimensions of the map would fit well on the top of the bed.
Once you’ve chosen you design, the easiest way to transfer it to the duvet cover is with a projector. I taped my duvet cover onto a wall and then projected the outline onto it.
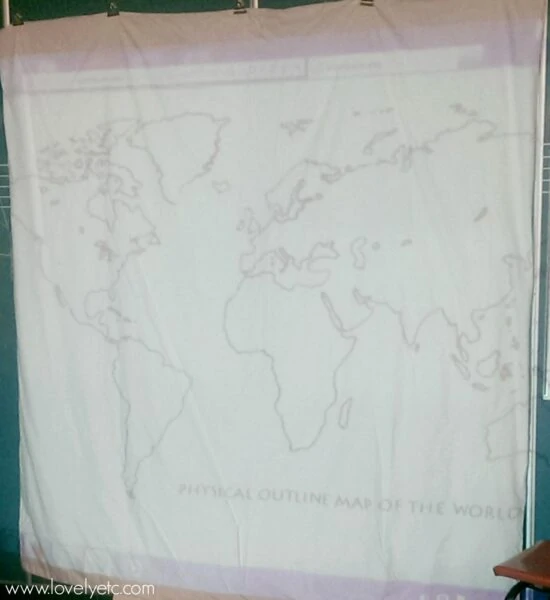
(I don’t own my own projector but was able to use one at my work. If you don’t have a projector, there is a good chance someone you know might have one you could borrow.)
Once the design is projected, you can trace it onto your duvet cover with a pencil. You could use a regular pencil, but I realized that using a colored pencil worked even better.
If you use a colored pencil that is similar to the paint color you will be using, you won’t have to worry about pencil lines showing through your paint later.
Paint your duvet cover
Once the design is drawn, it’s time to paint!
I chose to keep the back of my duvet cover white so to keep the paint from seeping through, I spread old towels between the layers of the cover to absorb excess paint and protect the back layer of fabric. Drop cloth would also work well for this.
Before you start painting, you need to mix your paints with fabric medium and water.
Your specific fabric medium will have instructions on how much paint to mix with it. You may need to experiment a little to get the colors to the brightness you want, but my basic mixture was around a tablespoon of paint, 1/2 a tablespoon of fabric medium, and 1/2 a cup of water.
For my world map duvet cover, I started by painting the ocean. I mixed each of my 3 blue craft paints in some old plastic containers with fabric medium and water.
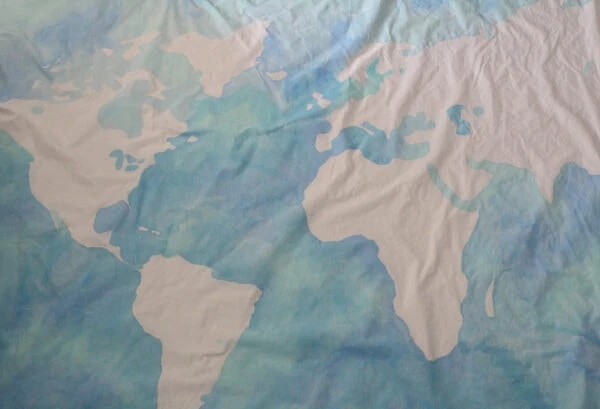
The actual painting is very easy; you can’t really mess it up. I started by loading some paint on a largish artist’s paintbrush and spreading it around in one corner of the duvet (making sure there were towels under the area I was painting).
Then I added another shade of blue paint to the same brush and continued painting, overlapping slightly with the first color I painted.
I continued adding the different shades of blue paint, overlapping them slightly and blending them together as I went.
You don’t have to worry about being precise or sticking to a pattern. Just add paint however you want.
There are only two things to watch out for.
1) Remember to keep an eye on your outline, so you don’t accidentally paint the wrong sections. In my case, I made sure I didn’t paint the land blue and the ocean green.
As you continue painting, the paint will spread some as it soaks into the fabric. This isn’t really a problem since this is a looser style of painting anyway, but it is something to be aware of as you paint near where two colors meet.
2) Try to keep a wet edge to work with as you paint. If the ‘edge’ of the paint dries, there will be a noticeable line between the old and new sections. This happened to me a few times and it isn’t a big problem once the duvet dries, but it would have looked even better if it had not happened.
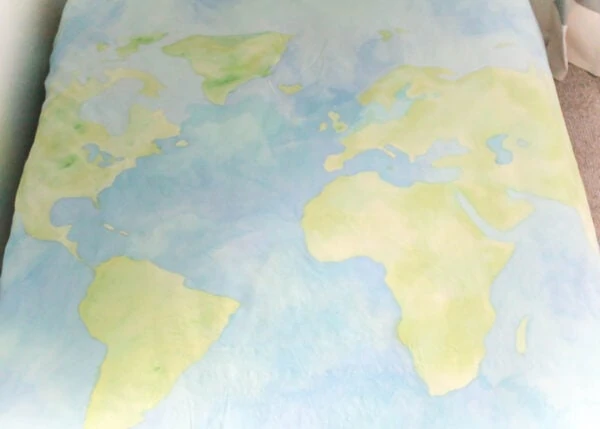
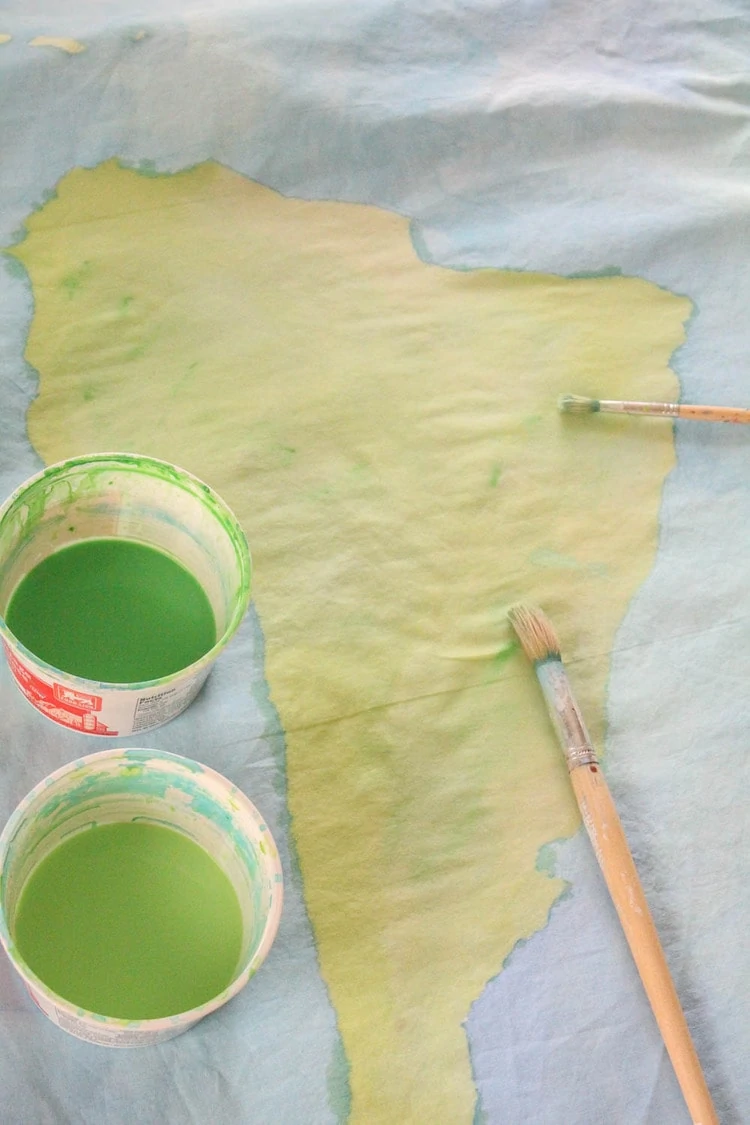
Once the first color is dry, you can start adding the next color. For my own duvet, when the ocean was fully dry, I began painting the land with my green paints.
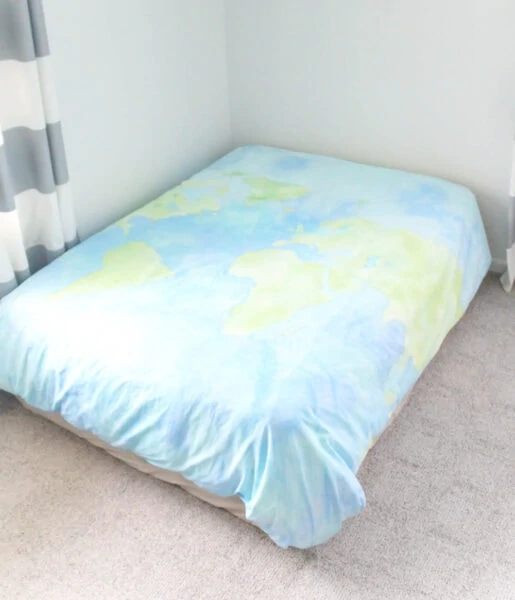
Painted Duvet Cover
Once it is dry, you are finished! I absolutely love how my world map duvet turned out. The design is soft and beautiful and truly looks like watercolor.
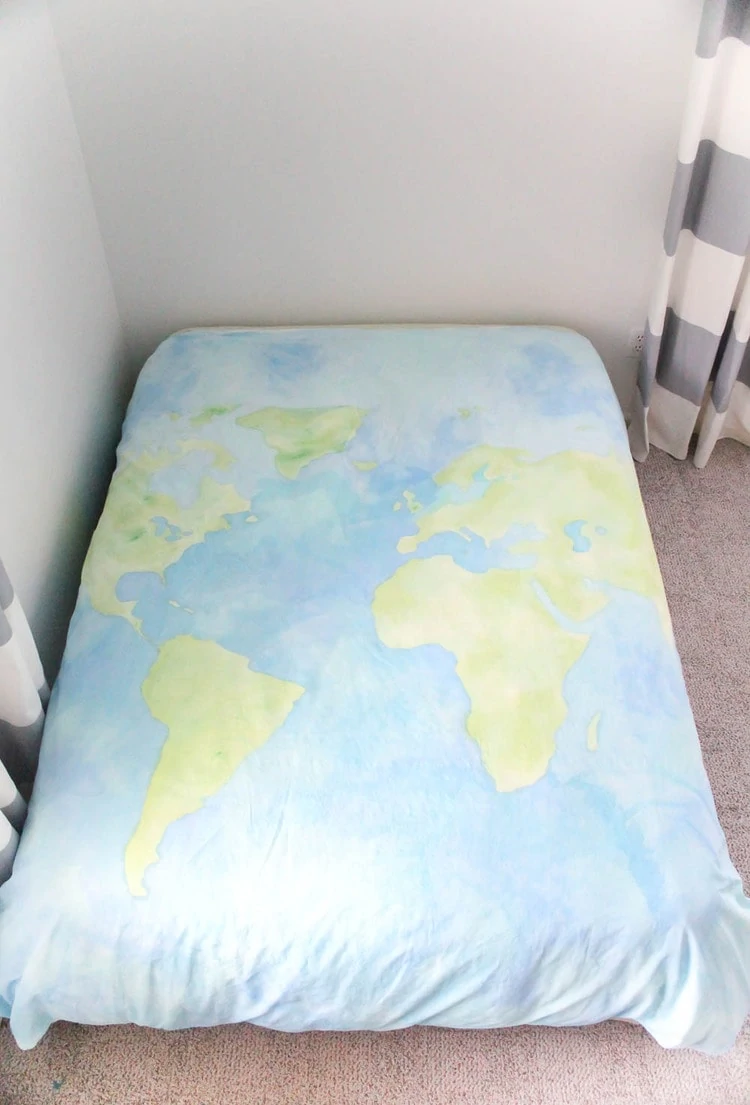
I’m sure you are wondering if the paint makes the fabric crunchy. I’m happy to report it doesn’t! The paint medium and water that were added keep it feeling quite soft.
Even better, I have now washed this duvet cover several times in the washing machine and it has held up great. I wash it in cold water and dry it in the dryer and it still looks beautiful!
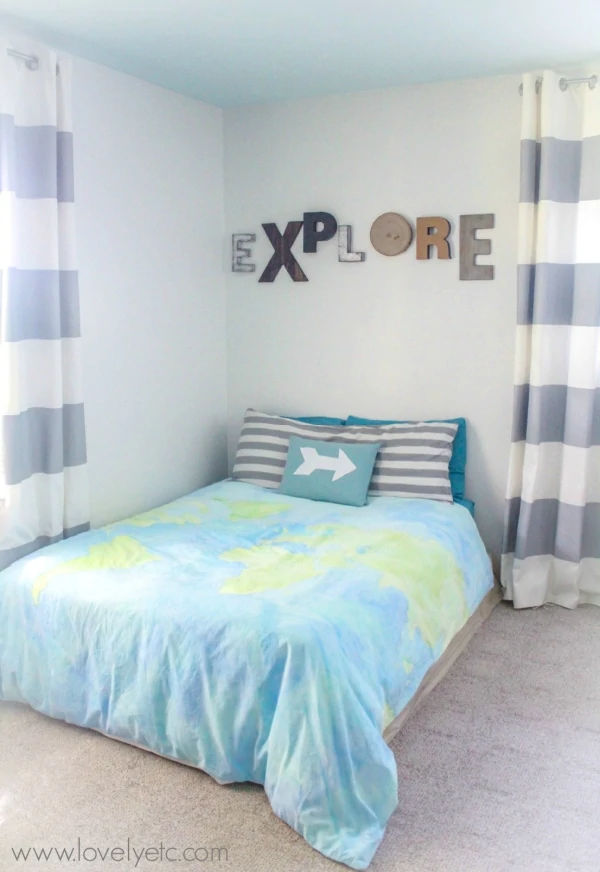
Update: I have since finished the rest of Griffin’s room and it turned out so cute! Along with the duvet cover, there’s a sweet mountain mural on the walls and lots of other DIY touches. You can check out the whole little boy explorer bedroom here.
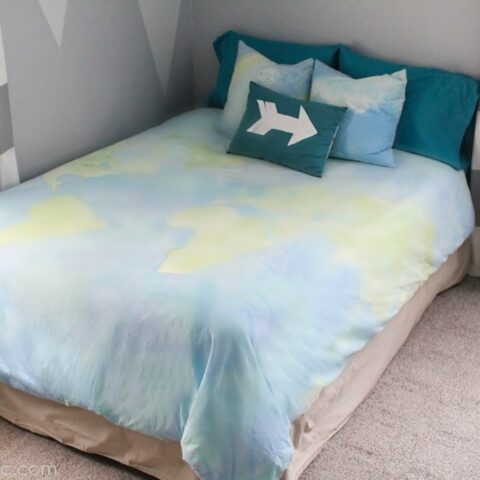
Painted World Map Duvet Cover
How to paint any design you want on a duvet cover. Create absolutely any duvet cover design you want with paint including a watercolor world map like this one.
Materials
- White duvet cover
- pencil
- 3 blue craft paints and 3 green craft paints (or paint in colors of your choice)
- Fabric medium
- Old towels
Tools
- Projector
- Paintbrush
Instructions
- Draw your map outline (or other design) onto your duvet cover using a projector.
- Spread old towels between the layers of the cover to absorb excess paint before you start.
- Mix each paint color with fabric medium and water in a plastic cup.
- Paint one color at a time with a large artist’s paintbrush. For a watercolor effect with lots of color variation, blend a few similar colors together on the duvet as you paint.
- Repeat with your other colors until the entire duvet is painted.
- Let dry thoroughly.
Recommended Products
As an Amazon Associate and member of other affiliate programs, I earn from qualifying purchases.

Wondering what other things you can make by painting fabric? It turns out there’s a lot. I put together a whole post about different types of fabric paint, methods for painting fabric, and project inspiration if you’re ready for more!

Love it! Makes me eager to see what else you do in his room!
Thanks Cecilia! I feel the same way!
Love it! In my opinion, it’s even better than your inspiration piece because it’s not as busy looking with just the two colors. Can’t wait to see how the whole room turns out!
Thanks Kim! I wanted to keep it simple and not to busy and I’m pretty thrilled with how the colors turned out!
i love this, beautiful.
b
Thank you!
can we get an update on how it washed? If you haven’t yet, maybe you could throw the pillows in?
Great question! I haven’t washed the duvet cover yet but I will within the next week or so and will definitely give an update then.
I absolutely loved this project! My kid is a big fan of dinos and I think he’ll be thrilled to have a map with his preferred dinos and their location. Please let us know how it washed. Thank you!
Cristina, Love the dino idea, how fun! I have washed the duvet cover around five times at this point and so far so good. I washed it in cold water the first few times, but since everything seemed to be going fine, I’ve just been washing it with all our other laundry since. I machine-dried it as well. If you end up making one, I’d love to see a pic!
Hi i want to make this too it looks great:) just wondering how long this took and what was the difficulty level
Josie, it wasn’t terribly difficult – really it is mostly just tracing, coloring in the lines, and swirling paint around. It is somewhat labor intensive though. I would say it took 5-10 hours to finish. (I worked it on across several days so it is hard to say for sure.) But it is one of those projects you can do while watching TV in the background which makes the time go faster. Hope that helps!
As a creative DIY type it takes a LOT to wow me.
This is STUNNING. Seriously fantastic.
Thanks so much Holly!
How did it wash?
It actually has washed really well. After quite a few washes, the colors are slightly more faded, but otherwise good as new!