DIY Photo Canvas That Looks Exactly Like The Real Thing
Learn how to make a beautiful DIY photo canvas for a fraction of the cost of the real thing!
A few weeks ago I shared my photo canvas failure – it basically looked like a photo stuck to the front of a canvas. And done poorly at that!
Well, I was determined to make another DIY photo canvas and get it right this time.
I read many of the DIY photo canvas tutorials already out there, but I found two factors that kept most of them from looking like the real thing.
- The photos were simply glued to the front of the canvas; they didn’t wrap around the canvas which is one of the most awesome parts of real photo canvases.
- The photos did not have that authentic canvas texture.
These two things really kept most of the DIY versions I saw from looking like the real thing.
The photo canvases you can buy look amazing – like genuine works of art. They just happen to be way out of my budget.
Even when you find an awesome deal, once you factor in shipping they cost a ton.
And of course who wants to get just one? This means the money adds up even more.
I am super excited to tell you I figured out how to make a DIY photo canvas that is both wrapped and textured like the real thing for only ten bucks each!

This post contains affiliate links which means if you make a purchase after clicking a link I will earn a small commission but it won’t cost you a penny more. Click here to see my full disclosure policy.

Materials for DIY Photo Canvas
- A poster print of your photo – make sure to get a poster print, not a photo enlargement. Your photo needs to be at least two inches longer and two inches wider than your canvas. You can get poster prints at various photo sites, but I have always had good luck with the regular satin poster prints from Walgreens.
- A canvas. Amazon has some great deals on packs of blank canvases or you can always use a previously painted canvas that you no longer want.
- Matte Mod Podge
This is for attaching and sealing the photo. Satin finish Mod Podge can also work, but I think matte looks the best.
- Foam brush – for applying the Mod Podge
- Duct tape – for securing the cavas to the back, you could also use a staple gun if you prefer
- Scrap of canvas fabric
– for getting that real canvas texture
- A brayer
– Optional. This is such a helpful little roller for smoothing things you mod podge.
How to Make a DIY Photo Canvas

Attach the Photo to the Canvas
With your foam brush, spread a layer of Mod podge all over the front of your canvas. This will be the glue that attaches the photo poster to the canvas.
Once the canvas is Mod Podged, center your photo on top of the canvas and press it firmly to the canvas with your fingers.
If you have a brayer, it is perfect for this. Just roll it over the photo to securely attach it to the canvas.
(It turns out this little tool comes in handy way more often than I would have thought – especially for anything involving mod podge.)
Turn the canvas over and press (or roll) along the underside of the canvas to make sure the photo is adhered.
Wrap the photo around the canvas edges
Let the mod podge dry thoroughly and then use your fingers to wrap your photo around the edges of the canvas. Sharpen the creases with your fingers.

With your foam brush, brush mod podge onto one of the sides of the canvas.
Fold the photo up around that side and duct tape it to the back of the canvas. Repeat for the other sides.
You could also use a staple gun to staple it instead of using duct tape, but I found the duct tape held it very securely with no risk of tearing the paper.
When you come to the corners, simply fold the corner in as if you were wrapping a present.
You now have your wrapped photo canvas. Phase one is complete!

Now if you choose, you can stop right here. It actually looks pretty cool just like this and I almost stopped at this point myself.
My canvas was looking really good and I was afraid of messing it up.
But, since my goal for the year is to not be afraid of failure, I decided to go for it and add texture.
Adding texture to the canvas
To add real canvas texture to your photo canvas, we are using canvas fabric. It doesn’t need to be any special type of canvas – any fabric with a canvas-like texture will work including a scrap of drop cloth.
Use your foam brush to brush a thin layer of mod podge onto the front of your canvas.

As quickly as possible, press your canvas fabric onto the top of your canvas.
Smooth it with your brayer or your fingers for a few seconds and then remove the fabric. This part is a bit of a delicate balance – you need to leave the fabric in place just long enough to smooth it in place. But you don’t want to leave it too long or the Mod Podge will begin to dry and get messy.
Keep in mind that once your fabric has been in the mod podge, you won’t be able to use it for anything else.
Once you remove the fabric, if there are any little fuzzies or threads on your photo canvas, carefully remove them with tweezers.
I found it easiest to allow the texture on the front of the photo to dry and then do each of the sides separately.
Once the mod podge has fully dried, if you aren’t totally happy with how it looks, you can simply brush on another thin layer of mod podge and repeat the process.
(Confession: I am a total perfectionist so I ended up redoing this part about three times. The first two times, I missed a few areas when pressing the fabric.)

And now you have a just-like-the-real-thing, fool-your-own-mama knock-off wrapped photo canvas!

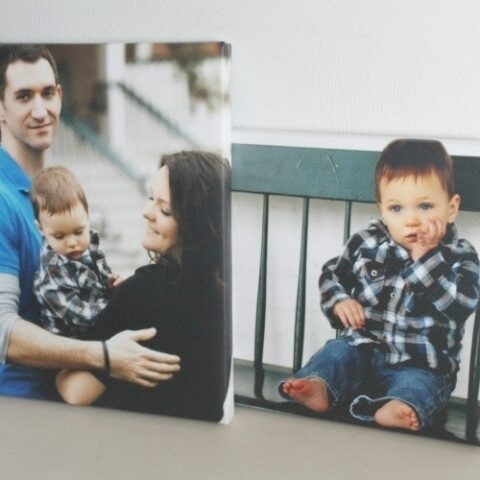
And if you aren’t sure if you want to go for the texture or not, here is a comparison of two canvases. One that has already been textured and one that hasn’t.
Both look nice but the texture really makes it look like the real thing.

I made these canvases to fit in a particular spot so I used 11″x14″ poster prints and 9″x12″ canvases.
I can’t wait to make a really huge canvas using this method.
If you are really looking to get some bang for your buck, you can save money by reusing the canvas from an old painting you no longer want (like I did on my first failed attempt at this).
And be sure to look for deals on your poster prints – online photo printing stores often run sales up to 50% off. I’ve gotten all of my poster prints from the Walgreens photo lab and had great results.
I am so excited I was able to turn my failure into a resounding success!
If you are thinking about giving this a try, be sure to check out this update for answers to frequently asked questions and more tips for making your own DIY photo canvas.
I’d love for you to pin this project on Pinterest!

Want more inexpensive DIY decor ideas? Here are a few of my favorites:
- How to Make Easy DIY Wood Signs
- How to Make a Lampshade with Your Favorite Fabric
- How to Paint Fabric for Beautiful DIY Projects
DIY Photo Canvas That Looks Exactly Like The Real Thing
Make a DIY photo canvas that is both wrapped and textured like the real thing for only ten bucks each!
Materials
- Poster Print of your photo
- Canvas
- Matte Mod Podge
- Foam Brush
- Duct Tape
- Scrap of Canvas Fabric
Tools
- Optional – a brayer
Instructions
- Use the foam brush to spread a layer of mod podge on the front of your canvas.
- Center your photo on top and press it to the canvas with your fingers or the brayer.
- Turn the canvas over and press along the underside to secure the photo.
- Let the mod podge dry.
- Wrap your photo around the edges of the canvas.
- Add mod podge onto the canvas sides with the foam brush.
- Fold the photo up using duct tape to secure it to the back of the canvas.
- Fold the corner like wrapping a present.
- Brush a thin layer of mod podge onto the front of your canvas.
- Press your fabric onto the top.
- Smooth it with your brayer or your fingers then remove the fabric.
- If there are any little fuzzies on your photo canvas, remove them with tweezers.
Recommended Products
As an Amazon Associate and member of other affiliate programs, I earn from qualifying purchases.


Google Web Story: DIY Photo Canvas
I’m impressed…great job Carrie!
~Sarah
Thanks Sarah – I am a total perfectionist but even I was happy with these!
Could I just use a board instead of the canvas?
Good question. A board would probably be fine, I just haven’t tried it that way.
I have used a piece of scrap wood and done this and worked great. Very impressed. i actually made the board ones into drink coasters and love them. Highly recommend
Great idea!
This looks GREAT!! I love the wrap around… another way to get the textured effect is simply place a blank canvas upside down on it after painting the thin layer of mode podge! :) The fabric kind of scares me.
Thanks Sterling! You are totally right – a blank canvas will work as well.
That looks fabulous! So glad it worked out for you this time. :)
I’m always curious: what was the total cost for the project? Inquiring (frugal) minds want to know. ;)
Thanks Kim, Good question. I guess the final cost varies depending on if you have to buy mod podge and a brush. I already had those on hand. I got two canvases at Michaels when they were buy one get one free so they were around $4 each. My photo poster prints were 55% off so they were around 4.50 each counting shipping. So my actual cost was $9 each (if you throw in a little money for the Mod Podge used). If you bought the supplies at regular price, this would definitely be more expensive! Looking online, the absolute cheapest 9 x 12 photo canvases I saw were $16 each, but shipping was an additional $13, making the total $29. And the savings would be even more with a larger size.
Where did you get your photo prints from?
I believe I got them from Snapfish. I have also gotten poster prints from Walgreens before when they are having a sale.
YAY! It worked! So glad you persevered because these are awesome! Great job, Carrie.
Thanks Chaney! I am so glad I kept working on it until I got the results I wanted!
great idea and explanation. will have to try this soon for my hallway! thanks for sharing!
camille davis @imperfectlyimaginable.blogspot.com
Thanks Camille – I hope yours turns out great!
GREAT IDEA! Looks good!
Thanks Becka! I’m so happy with how they turned out!
Nicely done! I have done many of the other types of photo/faux canvases, adding paint to the sides to finish it off. But, I really like how you do it and will give it a try. Here’s mine: http://lovemydiyhome.com/diy-canvases-easy-youll-amazed/
Thanks Val, I will have to check yours out!
hi carrie,
that really looks like professionally done ♥ i really love the texture that you gave it, although if i were to do it i would probably be scared to use a fabric on the picture with mod podge! but girl that really looks stunning!
i have a question though, where did you get your poster print?
found you at the SITSgirls, huggies♥
rea
Thanks! I was a little afraid that adding the texture would mess the whole thing up but it ended up working beautifully. I got my poster print from Snapfish. In the past I have also gotten them from Shutterfly and even Walgreens online photo center. I always look for sales!
Carrie these look great. I will definitely be doing this soon. I tried to do a photo transfer with medium and I consider it a total bust. I much prefer using the modpodge! Thanks for the inspiration and the tutorial! Have a great week! Shaunna
Thanks Shaunna! I am a big fan of Mod podge too.
Carrie! I LOVE your tutorial! Such a great idea to order a poster print so that you can wrap the edges. It looks GREAT! I also loved the post about your failed attempt–very funny!
Thanks Tasha! I love how it turned out – and was so glad to figure out a better way after the fail!
What a cool idea. I really love what you did with the fabric. It looks pretty amazing!
Thanks Jen! I am so glad the fabric part worked out!
What a great idea. Your photos look wonderful.
Thanks Kathy!
I’m totally impressed by this DIY. I love how you created the canvas texture. So, so smart! Thanks so much for linking up at The Makers. :)
Thanks Alexis! And thanks for hosting The Makers!
Awesome DIY! I love your blog. I’ll definitely be doing this project.
Thanks Ashley! I hope your canvas turns out great!
Oh, this is awesome! I adore those photo canvasses too, but they are SO out of my budget! :) Love this! Pinned it and am going to give this a try soon.
Thank you for sharing!
Thanks Carrie – Great name;) Hope it works out great!
Hi there! I love this and have been searrching everywhere for a tutorial that actually looks like the real thing. But.. I cannot find where on Shutterfly to get poster prints…All their posters are collages. :( Help!
Thanks! They call them large format prints – here is the link http://www.shutterfly.com/prints/large-format-prints. They also do poster prints at Snapfish. Just be sure to check who is having a good sale; one of them almost always is!
Love this tutorial! I have been wanting to do this with some wedding picture, now I’ll have to try! Thanks for sharing! #SITSBlogging
Thanks Becky!
Wow! How beautifully your canvases turned out!! Your tutorial totally made it look doable! I really want to try a huge one for my living room. Thanks for sharing! xx #sitsblogging
Thanks Ayanna!
This is just what I was looking for! I have been wanting to do this with pictures of my boys for ages…Thanks for making it look so attainable!
~Ariean
P.S. I’m featuring this Amazing idea in my round-up tomorrow morning from the Hit Me With Your Best Shot Link Party! :)
Awesome, thanks Ariean! And thanks for hosting Hit Me With Your Best Shot.
Can’t tell these aren’t professionally done – way to go!!!
Thanks Leisa! I am so excited about how they turned out!
.
Those look incredible! Where do you get a poster print from? I want to do some of these for our new home!
You can get poster prints from Snapfish, Shutterfly, or even Walgreens.com – just look for who is having a sale.
THose look fabulous! I’m a canvas print addict and would love to try making my own. Pinning this for later.
Thanks Becca!
Fantastic tutorial! Thank you for sharing.
Thanks Mia!
This is an awesome tutorial. I really like the textured look. Thanks for sharing.
Thanks Erlene! I am so happy with how these turned out!
I LOVE this Carrie- it looks amazing wrapped and with the texture added. I definitely want to try one of these for my boys’ bedroom mini gallery wall that I want to put together. Thanks for the amazing tutorial- pinning!!
Thanks Krista! I am so excited to see how your boys’ room turns out.
This is an amazing tutorial. I’m really glad I seen this and will def. be using this in a couple of weeks when starting our gallery wall of photo canvas’. THANK YOU! :)
And, beautiful pictures too! *thumbs up*
Thanks Stephanie! Glad it helped!
Thanks for the awesome tutorial! I used your directions for my project yesterday and the texture part at the end absolutely made the look!
Awesome! So glad you tried it!
What size piece of fabric did you use for the texture? Does it have to be a certain kind of fabric. Does getting the pic as a poster make it easier to to fold around the sides. I’ve been looking for the right tutorial to help get my gallery wall going and I have definately found it because they look like you had them done professionally. You go girl!!
LaJune, glad you enjoyed my tutorial! And, yes, they really do look professional in person. I used a piece of fabric that was as big as my canvas but you could also use a smaller scap and just do one section at a time. The fabric needs to have a canvas like texture – you can use a small piece of canvas fabric, outdoor fabric, or even most dropcloths. Alternatively, if you have an extra stretched canvas, you can also press that onto it to do the texture. And the poster definitely helps make the folding easier. Poster prints are much thinner than regular photos. Hope that helps!
Wow! That canvas texture looks so good! This looks like something I would like to try, but I feel like I would smudge it up really bad… but why should I be afraid of failure anyways? :)
Exactly! It doesn’t hurt to try and the texture really does look amazing in person!
What a great idea, to fold the sides and use the fabric. Yay for bravery! :D
Thanks! I am so glad I went for it!
Thank you so much for sharing this project, I found it yesterday and have already bought pics and canvases for it!! (I’m very impatiently waiting for them to arrive!!) Hoping to make Christmas gifts out of them!! One question- if you use the canvas/ drop cloth to make the texture on top can you use it more than once? Thanks again so much, the way you make these includes everything i want them to be
Awesome Jess! I hope they turn out awesome! I found that I could reuse the canvas/fabric more than once as long as it was still damp. (It gets damp from being pressed into the mod podge). Once it fully dried, it was hard to reuse it because the mod podge made it stiff.
I have tried this several times using all the same supplies and every time my poster bubbles and there are creases all over. Every canvas I’ve done I have had to throw away. What am I doing wrong?!?
Kelly, Oh no! I hate to hear that. I had no bubbling problems when I tried this but another commenter reported the same thing. I am going to have to do this project again and try to figure out what is going wrong.
Hi Carrie,
Love your instructions on canvas photos! I am starting to make these and love your ideas on wrapping the photos. I made the ones where you paint the edge of the canvas too :( – not the quality I like! So am making one with wrapped edges from a poster print too, They look just as good as the one you purchase and pay 3x the price!
Thanks for your great tips!
~~Canvas by Crystal ~~
Thanks Crystal! I love how the wrapped edges look too – they just give it that professional look!
Fabric works great for added texture!!! Tried another canvas on top and ruined my project!!! Good job and thanks for the tips!
Thanks Ahmad. I’m sorry your project got ruined but I swear by the fabric tip – it really works! Thanks for leaving feedback!
I just made a photo canvas per your instructions and it turned out beautifully! So impressive, looks just like the real thing! Thanks so much for the great tutorial!
Yay! Thanks Lindsey, I am so glad yours turned out well.
Hello,
What size canvas did you use and what size poster should I get?
My canvases are fairly small – I used 11 x 14 posters and 9 x 12 canvases. But you can use any size as long as your photos are a few inches larger than your canvas (to give you some extra to wrap around the edges).
Thank you so much for your tutorial! I just finished a 20×30 canvas, it’s look awesome! I’m so happy w/ the finished project. I used the foam brush only for 1st layer, but didn’t like it. So I tried the canvas fabric on 2nd layer & love it! Btw, didn’t have a brayer.. So I used rolling pin (hahaa).. works great! :-)
Thanks again!!
Hannah, so glad it turned out great for you too! And love the rolling pin in place of a brayer – smart thinking!
I could not figure out what bugged me so much about all the diy canvas tutorials I’ve seen…THE WRAPAROUND. Big DUH moment, thank you. This really looks awesome. Glad I put off my project until I saw this post. Even if I am late to the party!
Thanks Cathleen – I know it is a small thing but I think the wrapping makes such a big difference!
I justhink picked up my poster prints from walgreens but they seem to be the same as photo paper. Would I be able to tell a huge difference between the poster print and an enlargement? Maybe they made a mistake?
Chelsey, The difference between photo enlargements and poster prints is subtle. The poster prints are on thinner paper – they are able to be rolled up like a poster. Also, the poster prints are not as glossy as photos on photo paper. If your poster prints are large, I would bet they are on poster paper – I don’t think they have photo paper that large. Good luck with your canvases!
I love DIY crafts . I do them all the time . This is one I’ve been wanting to try. Family and I just moved have lots of wall space to add family photos and this is what im doing.
Awesome! Have fun decorating your new place!
What size poster print should you buy with an 8×10 canvas? I can’t find anywhere that does 10×12….
I would probably just go with 11×14 for an 8×10. Only a small section around the edges won’t be seen once you wrap it. If you are worried about losing too much of the photo’s border, you can add a small white border in first for free at picmonkey.com.
Thanks for your tute! I just completed my version of this. Thanks to a coupon for the poster print and a sale for the canvas, this project only cost me $12. I stapled my back instead of using tape. I will do this again, since my picture was off center.
THANK YOU!
Yay, that is a fantastic price! And stapling is a great idea. I am glad the tutorial helped!
Don’t the surface of your portrait got sticky? I know that mod podge normality dry sticky to the touch. Do that happen to your lookalike canvas?
Great question Mildred. Mine didn’t dry sticky at all. Maybe the fact I used matte mod podge helped with that – I’m not really sure. I just know it feels dry to the touch!
Great tutorial! Thank you! One question: do you think that adding the canvas texture to the poster as first step, before mounting it on the canvas, could create problems when folding? I think would be easier to add the texture for the other sides by making it on the full picture before folding. What do you think?
Emanuele, Good question. I haven’t tried it that way but I think it would probably end up being more difficult. When the texture dries, it makes the photo more stiff and probably would make it more difficult to wrap. It also might crack at the corners when you fold it.
Thank you for your reply, so I think I’ll follow your steps :-)
Hello,
so amazing! Just one question, does the tape stay on the back? or can this be removed?
Kate
Thanks Kate! I left the tape on the back. If you don’t like the look of the tape, you can use a nicer tape – I love white duct tape for this. Or you can use staples instead if you have a little more wiggle room than I had.
Wow this is so cool! I can’t wait to try this out.
Thanks Susan!
I can’t wait to try this!!! I went on Walgreen’s website and they are having a sale at the moment!!! Problem is they only offer a satin finish on the poster paper. Will that still work? What’s the difference between using a matte finish and a satin/glossy finish?
Yay for sales! I think satin finish on the poster paper will be fine. The main thing is to avoid glossy finish which is mostly used for actual photo enlargements. The glossy finish is way too glossy and the paper is too thick. But a satin poster should be safe – satin is way less shiny than a glossy finish.
I tried a small frame without using the canvas at the end. It really looks good with the mod-podge as the finish.
I’ve ordered two poster prints from WG’s at BOGO. Can’t wait to pick them up and try your suggestions.
Thanks, your tutorial is what I’ve been looking for.
Thanks Diane! I am so glad it worked well for you!
Hi, Carrie
I picked up my “poster” prints from WG’s. While they are pretty, I was expecting them to be on thinner paper not regular photo paper. I guess poster refers to size? They are going to be more difficult to bend over my canvas. Any suggestions? And is there anyway to have prints on a thinner product?
Thanks,
Diane
Hi Diane, that is strange. Every time I have ordered poster prints from Walgreens, they were on poster paper – similar to the paper used for any poster. Definitely not nearly as thick as a regular photo. It sounds like something went wrong. I would doublecheck that you ordered a poster print and not an ‘enlargement’ which is just a big photo. If so, they may have just made a mistake and printed it on the wrong paper. In that case I would politely call and ask them to redo it. I wonder if someone thought they were doing you a favor by using the thicker paper? Or just didn’t really know what they were doing. Sorry and good luck!
Hi, Carrie, thanks for your quick reply. My sweet hubbie helped me fold the corners. My project came out beautiful.
I did go back to WG, and the nice person said that the thicker paper was always used. I have the second photo to use for my next canvas. When I order again, I’ll be more careful.
One step I took, I measured the edges of the frame and then outlined the front on the back of the picture. I then wiped the mod on the paper itself and pressed the frame down on the outline. I was scarred of getting it off-center. Hope this makes sense.
I am glad it worked out! Good tip about outlining it first so everything lines up well – thanks for sharing!
Just wondering what type of paper this was printed on…in other words can you just print your document yourself on regular office paper on your inkjet?
Hi Carol, I really don’t think this would work if you print it off yourself. Regular office paper is too thin and would be a terribly wrinkly mess. And depending on what kind of printer you use, the ink might also run. You could always do some experimenting but I had my photos printed as poster prints and they worked great that way. Good luck!
So what did you do with the duct tape on the back? Can’t imagine just leaving it there!
I actually did leave the duct tape! It’s on the back so is never seen. And you can use white duct tape to make it look nicer.