DIY Photo Canvas That Looks Exactly Like The Real Thing
Learn how to make a beautiful DIY photo canvas for a fraction of the cost of the real thing!
A few weeks ago I shared my photo canvas failure – it basically looked like a photo stuck to the front of a canvas. And done poorly at that!
Well, I was determined to make another DIY photo canvas and get it right this time.
I read many of the DIY photo canvas tutorials already out there, but I found two factors that kept most of them from looking like the real thing.
- The photos were simply glued to the front of the canvas; they didn’t wrap around the canvas which is one of the most awesome parts of real photo canvases.
- The photos did not have that authentic canvas texture.
These two things really kept most of the DIY versions I saw from looking like the real thing.
The photo canvases you can buy look amazing – like genuine works of art. They just happen to be way out of my budget.
Even when you find an awesome deal, once you factor in shipping they cost a ton.
And of course who wants to get just one? This means the money adds up even more.
I am super excited to tell you I figured out how to make a DIY photo canvas that is both wrapped and textured like the real thing for only ten bucks each!

This post contains affiliate links which means if you make a purchase after clicking a link I will earn a small commission but it won’t cost you a penny more. Click here to see my full disclosure policy.

Materials for DIY Photo Canvas
- A poster print of your photo – make sure to get a poster print, not a photo enlargement. Your photo needs to be at least two inches longer and two inches wider than your canvas. You can get poster prints at various photo sites, but I have always had good luck with the regular satin poster prints from Walgreens.
- A canvas. Amazon has some great deals on packs of blank canvases or you can always use a previously painted canvas that you no longer want.
- Matte Mod Podge
 This is for attaching and sealing the photo. Satin finish Mod Podge can also work, but I think matte looks the best.
 - Foam brush – for applying the Mod Podge
- Duct tape – for securing the cavas to the back, you could also use a staple gun if you prefer
- Scrap of canvas fabric – for getting that real canvas texture
- A brayer – Optional. This is such a helpful little roller for smoothing things you mod podge.
How to Make a DIY Photo Canvas

Attach the Photo to the Canvas
With your foam brush, spread a layer of Mod podge all over the front of your canvas. This will be the glue that attaches the photo poster to the canvas.
Once the canvas is Mod Podged, center your photo on top of the canvas and press it firmly to the canvas with your fingers.
If you have a brayer, it is perfect for this. Just roll it over the photo to securely attach it to the canvas.
(It turns out this little tool comes in handy way more often than I would have thought – especially for anything involving mod podge.)
Turn the canvas over and press (or roll) along the underside of the canvas to make sure the photo is adhered.
Wrap the photo around the canvas edges
Let the mod podge dry thoroughly and then use your fingers to wrap your photo around the edges of the canvas. Sharpen the creases with your fingers.

With your foam brush, brush mod podge onto one of the sides of the canvas.
Fold the photo up around that side and duct tape it to the back of the canvas. Repeat for the other sides.
You could also use a staple gun to staple it instead of using duct tape, but I found the duct tape held it very securely with no risk of tearing the paper.
When you come to the corners, simply fold the corner in as if you were wrapping a present.
You now have your wrapped photo canvas. Phase one is complete!

Now if you choose, you can stop right here. It actually looks pretty cool just like this and I almost stopped at this point myself.
My canvas was looking really good and I was afraid of messing it up.
But, since my goal for the year is to not be afraid of failure, I decided to go for it and add texture.
Adding texture to the canvas
To add real canvas texture to your photo canvas, we are using canvas fabric. It doesn’t need to be any special type of canvas – any fabric with a canvas-like texture will work including a scrap of drop cloth.
Use your foam brush to brush a thin layer of mod podge onto the front of your canvas.

As quickly as possible, press your canvas fabric onto the top of your canvas.
Smooth it with your brayer or your fingers for a few seconds and then remove the fabric. This part is a bit of a delicate balance – you need to leave the fabric in place just long enough to smooth it in place. But you don’t want to leave it too long or the Mod Podge will begin to dry and get messy.
Keep in mind that once your fabric has been in the mod podge, you won’t be able to use it for anything else.
Once you remove the fabric, if there are any little fuzzies or threads on your photo canvas, carefully remove them with tweezers.
I found it easiest to allow the texture on the front of the photo to dry and then do each of the sides separately.
Once the mod podge has fully dried, if you aren’t totally happy with how it looks, you can simply brush on another thin layer of mod podge and repeat the process.
(Confession: I am a total perfectionist so I ended up redoing this part about three times. The first two times, I missed a few areas when pressing the fabric.)

And now you have a just-like-the-real-thing, fool-your-own-mama knock-off wrapped photo canvas!

And if you aren’t sure if you want to go for the texture or not, here is a comparison of two canvases. One that has already been textured and one that hasn’t.
Both look nice but the texture really makes it look like the real thing.

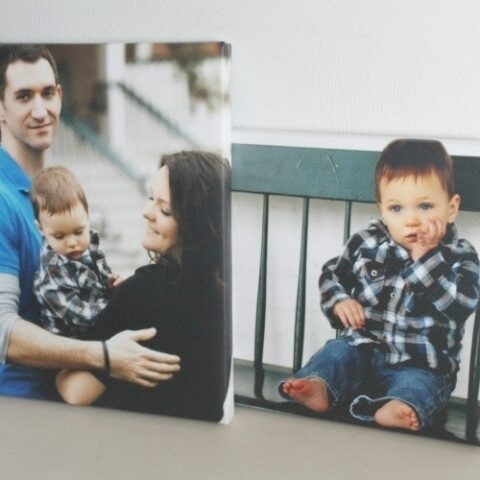
I made these canvases to fit in a particular spot so I used 11″x14″ poster prints and 9″x12″ canvases.
I can’t wait to make a really huge canvas using this method.
If you are really looking to get some bang for your buck, you can save money by reusing the canvas from an old painting you no longer want (like I did on my first failed attempt at this).
And be sure to look for deals on your poster prints – online photo printing stores often run sales up to 50% off. I’ve gotten all of my poster prints from the Walgreens photo lab and had great results.
I am so excited I was able to turn my failure into a resounding success!
If you are thinking about giving this a try, be sure to check out this update for answers to frequently asked questions and more tips for making your own DIY photo canvas.
I’d love for you to pin this project on Pinterest!

Want more inexpensive DIY decor ideas? Here are a few of my favorites:
- How to Make Easy DIY Wood Signs
- How to Make a Lampshade with Your Favorite Fabric
- How to Paint Fabric for Beautiful DIY Projects
DIY Photo Canvas That Looks Exactly Like The Real Thing
Make a DIY photo canvas that is both wrapped and textured like the real thing for only ten bucks each!
Materials
- Poster Print of your photo
- Canvas
- Matte Mod Podge
- Foam Brush
- Duct Tape
- Scrap of Canvas Fabric
Tools
- Optional – a brayer
Instructions
- Use the foam brush to spread a layer of mod podge on the front of your canvas.
- Center your photo on top and press it to the canvas with your fingers or the brayer.
- Turn the canvas over and press along the underside to secure the photo.
- Let the mod podge dry.
- Wrap your photo around the edges of the canvas.
- Add mod podge onto the canvas sides with the foam brush.
- Fold the photo up using duct tape to secure it to the back of the canvas.
- Fold the corner like wrapping a present.
- Brush a thin layer of mod podge onto the front of your canvas.
- Press your fabric onto the top.
- Smooth it with your brayer or your fingers then remove the fabric.
- If there are any little fuzzies on your photo canvas, remove them with tweezers.
Recommended Products
As an Amazon Associate and member of other affiliate programs, I earn from qualifying purchases.


Google Web Story: DIY Photo Canvas
So what if you wanted to do this but on a smaller canvas like a 5″x7″ would you still order a poster print? I guess what I’m asking is can you get poster prints in smaller sizes or do they only come big like poster size?
Good question. It looks like most poster prints start of 11″x14″ which is a great size for making an 8″x10″ print. For a 5″x7″ canvas, you could just print the photos on your home printer. The issue is going to be the paper. Poster print paper is heavier than regular copy paper but not as heavy as cardstock. If you could find some paper that was a bit thicker than regular copy paper, it would work great. Or, it may just be easier, to go to a copy center like Staples and tell them what you need. It would probably be pretty inexpensive. Or another option if you’re making multiple canvases, is to do a poster print with two photos side by side. (Many photo printing sides give an option to create a collage.) Then you can simply cut them apart and use them for two different canvases.
What size poster print for a 11×14 canvas?
The poster print needs to be at least 2 inches wider and longer than the canvas so at least 13″x16″. Since that isn’t a standard poster size, I would probably just go with a 16″x20″ unless they have something smaller. Just be sure that the important parts of your photo will fit within the 11×14 finished canvas – you can always edit the photo a bit before printing to make it better fit your final size.
Thank you!
Did you print from Walgreens? If so, did you get satin paper?
Yes, I printed mine at Walgreens on satin paper.
Would it work if I printed my photos on Canvas photo paper? I bought all this canvas photo paper and was looking for a creative way to use it. I love your idea and sure hope the canvas paper will work. Love your ideas!
Debbie
Hi Debbie, I think printing your photos on canvas photo paper would work really well! You could print the photos on canvas and then wrap them around a canvas or just wrap them around a simple wood frame for a beautiful wrapped photo canvas look.
So if I want to do 8 x 10 Pictures on Canvas – I get 9 x 12 poster at Walgreens?
For an 8×10 canvas, 9×12 would be a bit small. Two of the sides would only have 1/2″ extra which isn’t going to be enough to wrap the picture fully around the edges. You want to get 10×12 at the very least, but that isn’t a typical size, so I would recommend 11×14. There will be more photo for you to work with as you are wrapping it around which will make it much easier. Just make sure that the main part of your photo is fairly centered so important details aren’t lost around the edges of the canvas.
As someone with minimal crafting skills, I was skeptical about attempting a DIY photo canvas. However, this tutorial is a game-changer! The step-by-step guide is so user-friendly that even a novice like me could follow along. The key tips about wrapping the photo and achieving an authentic canvas texture are what set this tutorial apart. Now, I have a collection of personalized canvases adorning my walls, and I couldn’t be happier. It’s a budget-friendly way to transform memories into art!