How to reupholster furniture with gorgeous leather
Learn the basics of upholstering furniture with leather including what types of furniture work best, where to get beautiful leather, and a step-by-step tutorial for upholstering simple furniture.
I have become a huge fan of leather furniture.
We have a white leather couch that I found on Craigslist a few months ago. It is constantly getting spilled on and stained by our two little boys (okay, and sometimes me too.)
But absolutely everything wipes off with a damp cloth!
It’s like magic and I am now a total leather convert. As long as nobody stabs it, it is nearly indestructible!
I knew that the next time I needed to reupholster furniture, I would definitely be using leather, so when Leather Hide Store contacted me about working with some of their gorgeous leather, I was all in.
I was provided free leather from Leather Hide Store for this project, but the idea and execution were all me!

How hard is it to upholster furniture with leather?
Reupholstering furniture is one of those things that seems way more intimidating than it actually is. It’s mostly a matter of deconstructing the old upholstery and then using that as a pattern as you add the new upholstery.
If you are able to pay attention to detail and work carefully, there is no reason you can’t work with leather.
However, leather is more difficult to work with than other fabrics. It is thicker and harder to manipulate. Because of that, certain types of fabric are much more difficult to upholster with leather.
What types of furniture work best for leather upholstery?
Some furniture shapes just don’t work well with leather upholstery. And furniture that has a lot of curves will be very difficult to upholster with leather – it can be done, but it often requires advanced techniques like massaging the leather.
Furniture with a more intricate shape or with more complicated upholstery like diamond tufting also isn’t the best choice. Leather is a very thick materials and it just doesn’t bend and fold the same way other fabric does. And even if you do manage to get it into the shape you want, it is often too bulky to work well. These types of furniture are best left to the pros.
So what does work well? Furniture with lots of flat surfaces and square lines. Especially if this is your first time doing upholstery work or working with leather, keep it simple. A simple bench or chair seat or ottoman is a great place to start.
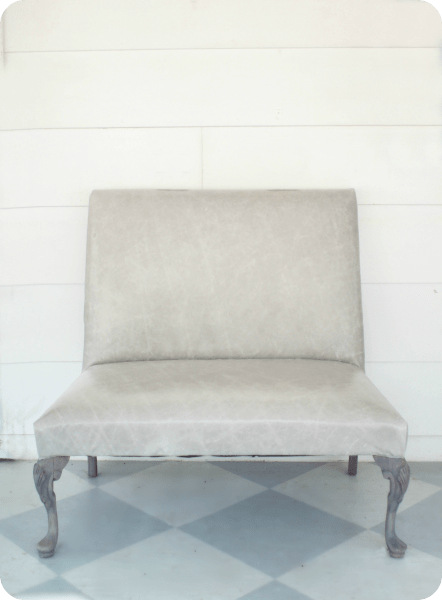
My own leather project involves a cute settee with very simple lines. I picked up this little settee for $15 at a yard sale. I love the proportions of it and those gorgeous legs.
At one time this was a beautiful piece of furniture with leather upholstery and mahogany wood.
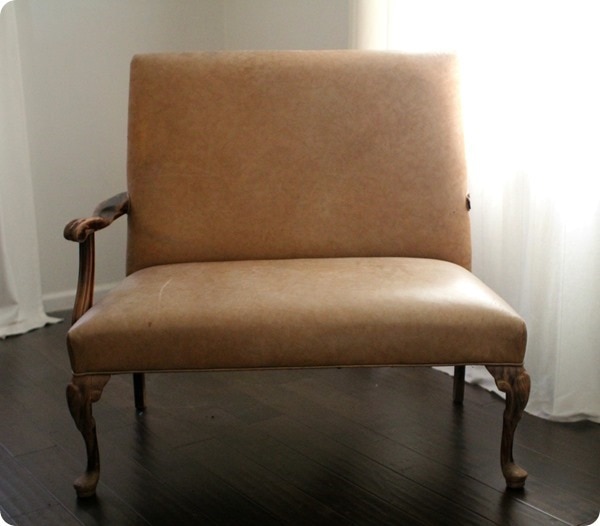
Unfortunately it was in horrendous shape. The finish on the legs was wearing off, one arm was missing, and the leather was severely scratched up.
The funny thing is I was sure that this was a vintage piece of furniture based on the shape and condition, but then I found a receipt on the underside.
This little settee was bought from a furniture store in 2003! How in the world did it get in this terrible condition so quickly!
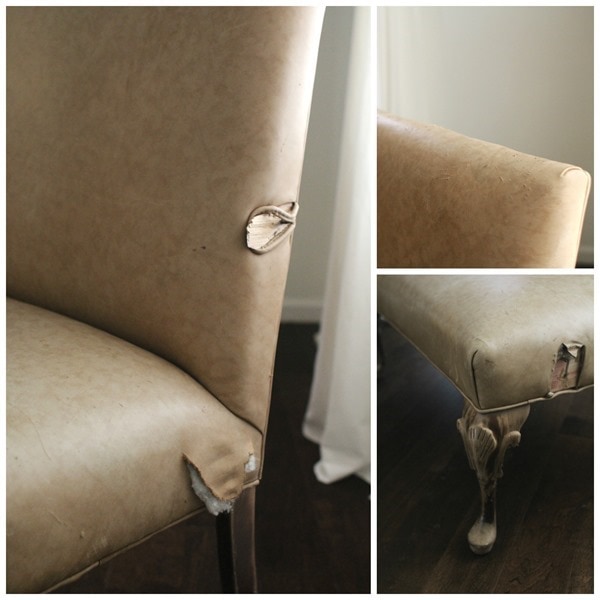
I knew this would be the perfect piece to reupholster with leather from Leather Hide Store.
This post contains affiliate links which means if you make a purchase after clicking a link I will earn a small commission but it won’t cost you a penny more. Click here to see my full disclosure policy.
Materials
- Simple furniture piece to upholster – Facebook marketplace, thrift stores, and estate sales are great places to find sturdy upholstered fabric for a steal
- Leather – I was really impressed with all the leather options at Leather Hide Store. After looking at tons of samples, I chose an amazing gray leather called grey bone distress. But if you want to save a bit of money, you can also buy yards of faux leather at many fabric stores.
- Upholstery staple remover – this thing makes removing the old upholstery 1000 times easier
- Flathead Screwdriver
- Needle nose pliers – if you don’t have an upholstery staple remover, you can use a screwdriver and needle nose pliers to remove the old stapes
- Hammer or upholstery hammer – to help with removing and attaching tack strips and other upholstery parts. An upholstery hammer is also super helpful if your furniture has nailhead trim to attach.
- Sharpie – for labeling the old upholstery pieces as you remove them
- Rotary cutter and cutting mat – for cutting your leather
- Good fabric scissors – these are also for cutting the leather, I’ve found that it is helpful to have both to use in different situations
- Staple gun – this is a must-have for any upholstery project
- Leather glue – if you need to glue any pieces in place, not just any glue will work. A special leather glue is your best bet (and isn’t expensive) but most contact cements will also work.
- Leather sewing kit – this isn’t necessary for every leather upholstery project, but if your project involves any sewing, it will come in handy
How to Reupholster Furniture with Leather
Because my little settee is mostly straight lines, it wasn’t terribly difficult to reupholster – definitely much easier than the armchair rocker I upholstered, but more difficult than a simple dining chair cushion.
Remove the old upholstery
The first step is to start removing the old upholstery – and in my case the lone remaining arm. The deconstruction is actually the most important part of the whole process.
As you are taking each piece apart, you are also uncovering exactly how it was put together – and exactly how you need to put it back together.
For pretty much any kind of chair, you start at the bottom. Remove what is at the bottom of your seat, making note of how exactly it was attached.
As you are taking things apart, it really helps to take pictures of how things looked, make notes of what you are doing, and label each piece so you know where it goes.
Also, make sure you don’t throw away any of the pieces you remove.
The fabric or leather you are removing will become the pattern for your new upholstery.
Also keep any cardboard, tack strips, or extra foam you remove. All of this can be reused when you reupholster.
I highly recommend using an upholstery staple remover to remove the staples from your piece. It will save you tons of time and effort and it’s definitely worth buying if you think you will tackled more upholstery projects in the future.
But if you don’t have an upholstery staple remover, you can also use needle-nose pliers to remove all the staples. If there are some that need a little more help, just use a small flathead screwdriver to pry them out.
Once the bottom of your furniture is removed, the back is generally next.
Continue to remove pieces as you come to them, making sure to label each piece you remove.
There may be some places where you don’t need to remove the old upholstery.
If the old fabric is in good shape, is nice and tight, and provides a smooth surface to the new leather, you may be able to upholster right over it. Just make sure that you are able to access all of the places where you will need to staple the new leather to the furniture.
In my case, I was able to leave the old leather on the seat and the front of the settee.
Cut your leather pieces
The next step is using your old fabric pieces as a pattern for cutting your leather.
This leather is so gorgeous, I have to admit I was nervous about messing this part up!
Since I didn’t remove the old leather from the seat and seatback, I needed some way to make a pattern for these pieces.
I decided the easiest thing would be to use scrap paper to make a pattern. I had plenty of leftover wrapping paper and it was nice and large, so I just used that. I grabbed my least favorite Christmas wrapping paper and draped it over the piece to cut out a pattern for each piece.
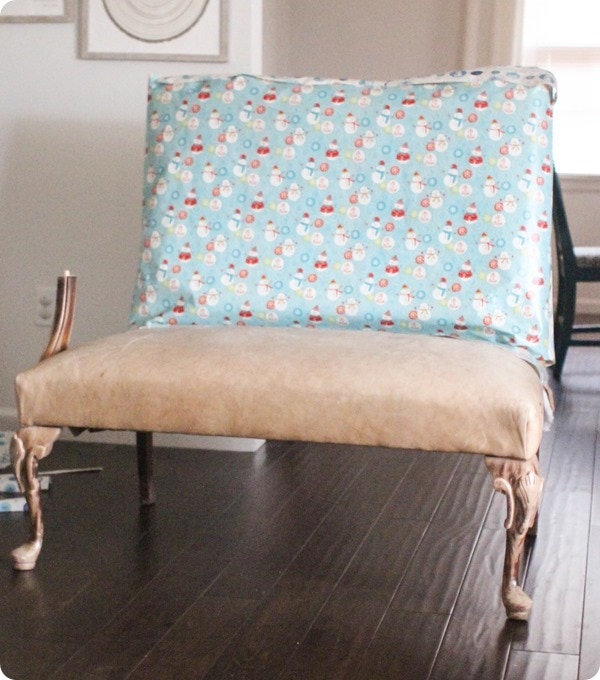
This is the point in the project where things started to look a bit hopeless. Honestly, it happens at some point or another in every DIY project.
As I laid my pieces out on my leather, I quickly realized that I wasn’t going to be able to fit all three pieces (the seat, seatback, and back).
While my leather was technically big enough, I needed three pretty large rectangles and there was just no way to make that happen. This is one of the downsides to working with real leather – it comes in very irregular pieces rather than uniform rectangles.
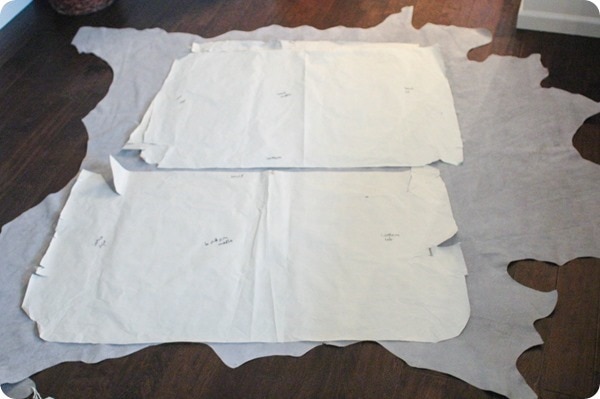
Luckily, I thought of a creative solution that I am happy with.
I laid out my seat and seatback pieces, traced them onto the back of the leather, and then cut them out using sturdy scissors.
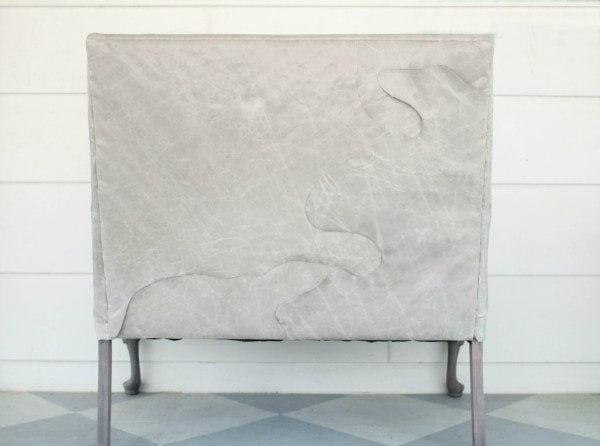
The back of the piece is where things got creative. I took the scraps that were left over and pieced them together to make one large piece for the back.
Instead of trying to make straight-line seams, I let the natural curves of the leather show.
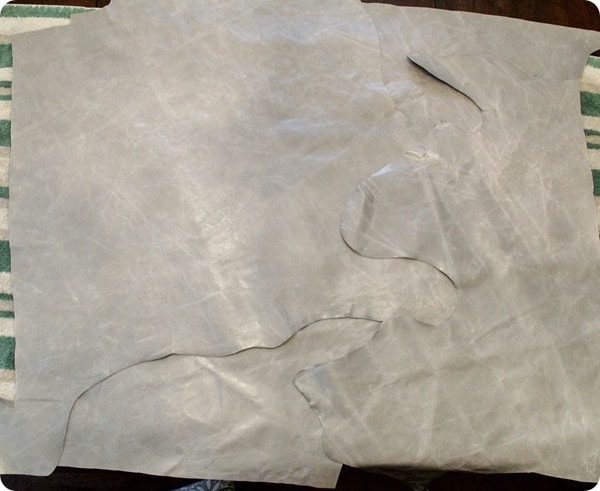
Once everything was laid out the way I wanted, I simply glued the pieces together. I’m sure they would be much better stitched together, but to be quite honest, this was good enough for me.
I read recommendations online to glue leather using contact cement and the closest thing I already had on hand was E6000 glue so that is what I used and it worked great.
To make it extra durable, I also used duct tape to help seal the seams from the back. (Classy I know, but hey, it works and it isn’t visible on the finished piece.)
Refinish the legs
I went ahead and dealt with the scuffed-up legs before adding my new leather.
The old finish was in really poor shape so I started by sanding off what was still hanging on.
Even though mahogany is amazing wood, the reddish tone just wasn’t right for me. So even though wood purists may want to stone me for this, I gave the legs a wash with some watered-down light gray paint and then a dark gray glaze.
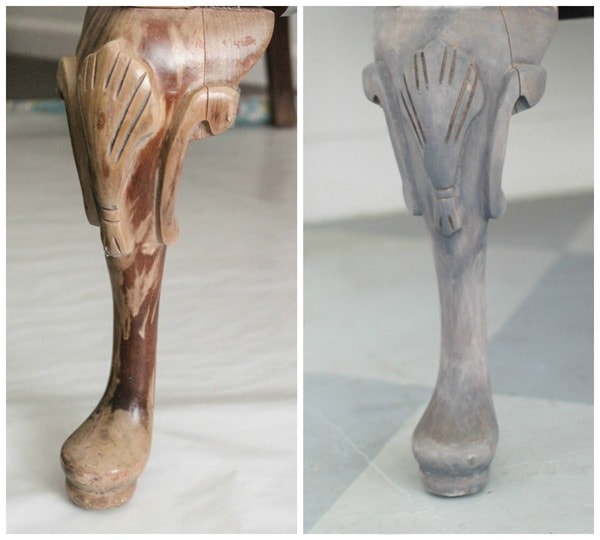
Because the legs blend so nicely with the gray leather, your focus stays on the beautiful upholstery where it belongs.
Attach the leather
Then it was just a matter of putting everything back together the same way I took it apart. Start by replacing the last piece you removed and work until you get back down to the bottom.
If you are upholstering a simple piece of furniture with nice straight lines, this should be very straightforward. Most of your upholstery will be attached either by stapling it directly to the frame or by attaching it with tack strips.
I have lots more details about all the different ways to attach upholstery to chairs and benches in this upholstery guide.
There is also a chance you may have some sections of upholstery that are attached with nailhead trim. Nailhead trim is popular for leather furniture because it is one of the easier ways to attach the bulky material.
As you are stapling the new leather in place, be sure to pull everything nice and smooth as you go.
Beautiful!
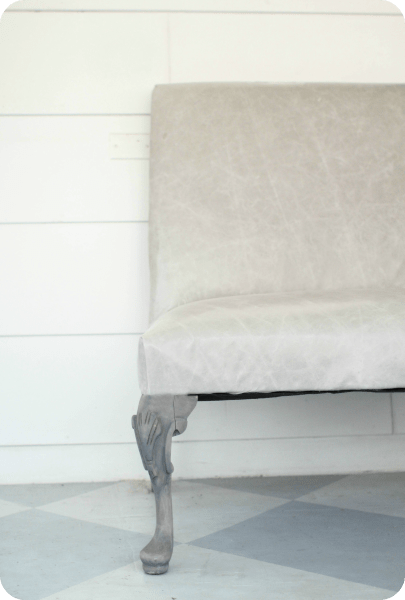
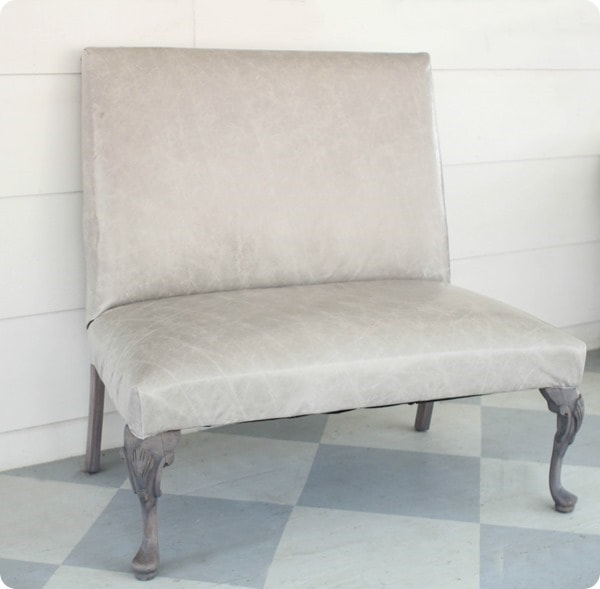
And here’s the back – I love it. My husband isn’t as sure, but he isn’t really known for his design eye, so I’m not worried about it. Plus, to be honest, nobody in real life sees the back anyway because it’s against a wall.
For now, this little settee has found its home at our dining table.
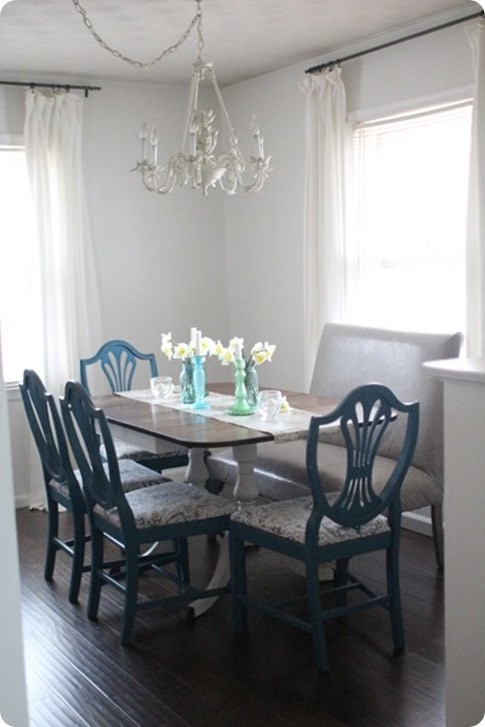
I am a little sad that it is so hidden away, but it looks great there. I love how well it works with the chairs I previously painted and reupholstered.
Plus my 3 year old loves to sit on the ‘couch’ at dinner and I have no problems letting him since it is so easy to wipe clean.
It’s the perfect blend of pretty and functional.
If you’re thinking about tackling a furniture upholstery project of your own, The Leather Hide Store has put together a fantastic resource for figuring out how much fabric (or leather) you need to reupholster more than 100 different types of furniture along with a fabric calculator right here.
Happy upholstering!
Other DIY upholstery ideas I think you’ll love:
- How to Reupholster Chairs: A Simple Step-by-Step Guide
- 10 Secrets for Finding Incredibly Cheap Fabric
- How to Reupholster a Couch on the Cheap


I love how this turned out! The back looks really cool too! :-)
I like your chandelier as is but I’m with you on the curtains – something more colorful! :-)
Thanks Cecilia! I’m going to have to be on the lookout for the perfect fabric to make some!
I love it Carrie! You did such a fab job with this settee!
Thank you so much Angela! I love it!
WOW! This is stunning!
Thank you Morena!
That looks easy! I thought leather would be hard to work with.
It really wasn’t any more difficult than any other fabrics I have used – and the results are so long-lasting!
Wow that is so cool. It looks so elegant! Great job. I pinned it for future inspiration!
Thanks so much Malia!
I have been trying to decide on a material to reupholster the seats of my antique dining room chairs with. You gave me the great idea of using leather! I am now worried that it might be too modern looking. What do you think?
Pam, I think leather would work wonderfully. It really is the best as far as being easy to clean. I think leather doesn’t have to look modern – it mostly depends on the style of the chair and the type of leather you use. Think about leather chesterfield sofas – they don’t look modern at all, just classic. Personally, I love a distressed looking leather because it looks like it has some age on it.
That is a lot of white in the dining room. Maybe an accent of teal in the curtains, and a bold accent color in the chandelier. What ever you choose will be great I bet.
Thanks Linda. I totally agree – way too much white for me! I think some kind of color in the curtains is a must – and by color, I pretty much mean teal:) And I also adore the idea of a bright statement making chandelier.
This is amazing – I had no idea it was this “easy.!”
Thanks Amy! It really is way easier than you’d think.
This is stunning! You did such a fab job with this settee! I love how this turned out!
Thank you so much Melisa! I love it!
So pretty! What a transformation!
Thanks Maryann! It really did undergo a huge transformation!
Great job! I love the look of a different fabric on the back of furniture. I’ve done it a few times when I have reupholstered chairs. How about the same or a coordinating fabric that matches the seats of your chairs for the back? That would make your new settee look like a professional job and would tie everything together in a really cute, trendy way.
Betsy, That is a great idea – I love chairs with a punchy fabric on the back as well! The fabric on the chairs was repurposed from a beautiful shower curtain and I just might have enough left over to use on the settee. I don’t think I’m going to tackle that now, but may just take it on in a few months.
You probably could staple it to back with pressed seam allowances for sides and bottom, flip it over staples, and glue sides and bottoms so you don’t have to take it apart! Then it won’t be such a daunting task. You have a lot of very cool ideas!
You inspired me to stencil my screen porch floor and it looks fantastic- 4th year through snow and rain. :)
Now that’s a good idea. And thank you so much Betsy – I’m actually planning to stencil my own screen porch floor this summer. (Hopefully, if I can get some other projects done first!) I painted it eight years ago but didn’t know anything about sealers then and it is ready for a refresh!
It’s beautiful! You did a wonderful job on it! LOVE!
Thank you so much Linda!
Ok, I love your work and you have given me the courage to try covering 4 wingback dining chairs “PRAY FOR ME”…. I will keep you posted once I receive my material, may need you to coach me through.
You can do it! It is scary to start, but you really just remove the old fabric and put the new fabric on the same way. I just finished reupholstering a new set of chairs and posted it that may also help! https://www.lovelyetc.com/how-to-reupholster-chairs-a-simple-step-by-step-guide/