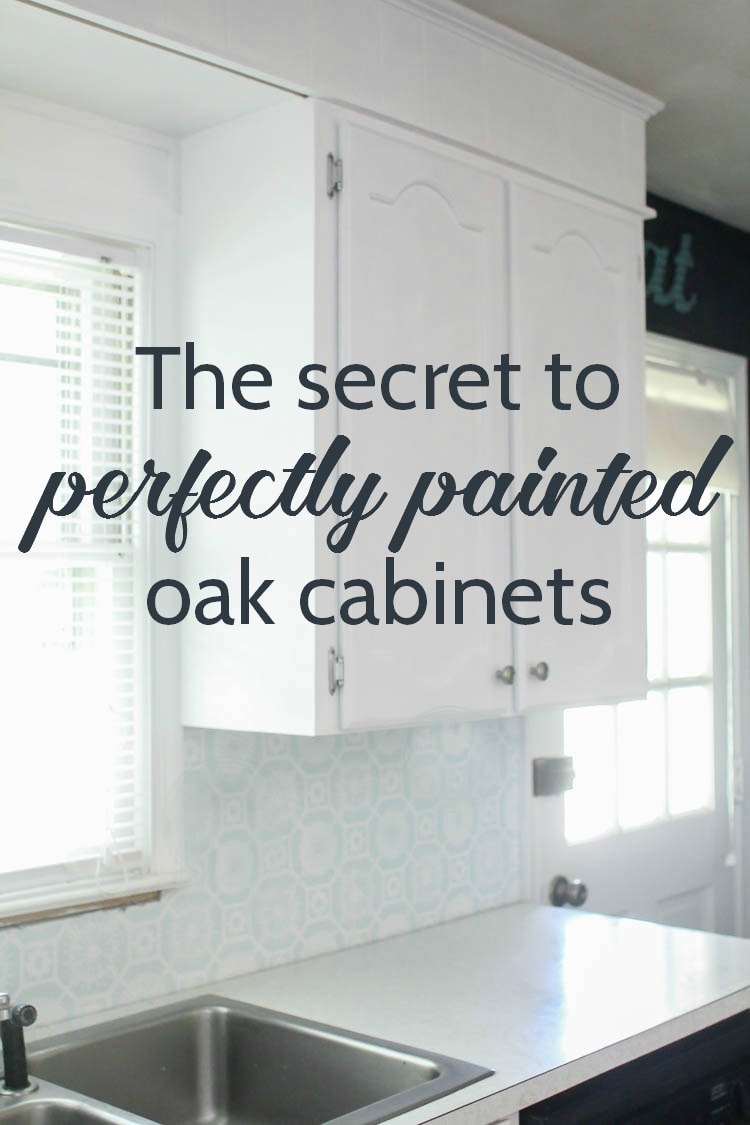
Painting oak cabinets white: An amazing transformation
Painting our oak cabinets white is one of the most worthwhile DIY projects I have ever tackled. Seriously, one of the very best.
It certainly isn’t the flashiest project I have done and it wasn’t the fastest by a long shot. But the difference this one simple step has made in our home is unbelievable.
When I was deciding what process to use to paint my kitchen cabinets, I was focused on two things:
- I wanted really beautiful, professional looking results.
- And I wanted it to be as quick and painless as possible. In that order.
I’ve seen lots of tutorials for painting your cabinets the absolute fastest, easiest way possible and while I am all for that, I am a total perfectionist at heart. I knew I wouldn’t be happy with anything less than a perfect paint job and I wasn’t willing to save time if it meant less than perfect results.
And yes, that meant doing extra work to eliminate that oak wood grain. But even with my high expectations, I was able to eliminate a few steps by using the right paint and materials.
*Update: I’ve gotten tons of questions about how my painted cabinets have held up now that it has been over two and a half years since I painted them. I put together a full post sharing all of the details of how my painted oak cabinets look now along with plenty of pics right here. I would definitely recommend checking it out before tackling your own painted cabinets.*
This post contains affiliate links which means if you make a purchase after clicking a link I will earn a small commission but it won’t cost you a penny more. Click here to see my full disclosure policy.

Okay, before I get into all the how-to stuff, let me take a moment to talk about oak cabinets and the wood grain debate.
Oak cabinets have the special distinction of having a very prominent wood grain. Most pine, maple, cherry etc. wood cabinets don’t have this extra issue.
I am not just talking about the fact the cabinets look like wood, this grain is etched deep into the face of the cabinets. When you paint oak cabinets white, the grain texture remains very apparent.
This doesn’t bother some people one bit. But as I said, I’m a total perfectionist and it bothers me. Instead of fresh classic white cabinets, to me, they look like dated oak cabinets that are trying to hide behind white paint.
So there was no question I had to take care of the wood grain before I could really start painting. This was by far the most time-intensive part of the whole project, but the final finish on my cabinets is flawless so it was totally worth it.
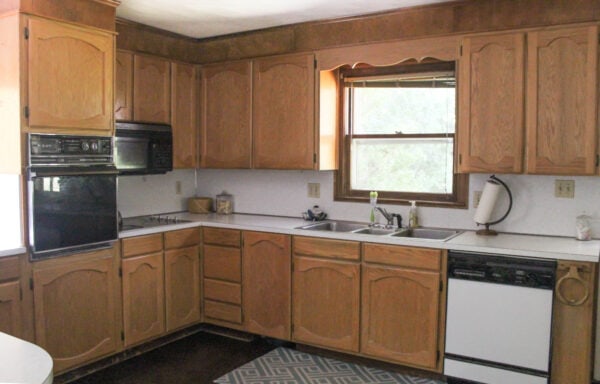
Here’s a look at how my cabinets looked before painting. They were definitely in need of some help!
Materials for Painting Kitchen Cabinets White
- cleaner – I love KrudKutter PrePaint Cleaner for this. My other favorite cleaner is Dawn dish soap diluted with water in a spray bottle.
- painter’s tape – if needed to protect adjoining surfaces
- Zinsser Oil-Based Primer – this is my favorite primer for sealing the wood so that wood tannins don’t bleed through your paint and cause yellowing
- Spackling
- Small putty knife
- 320 grit sandpaper
- high quality paintbrush – These are my favorite paintbrushes for getting a smooth finish on cabinets and furniture.
- small foam paint roller
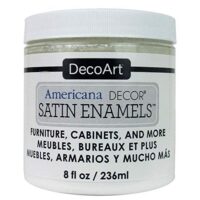
- A high quality paint – I used DecoArt Satin Enamels paint in Pure White to paint my cabinets and it worked really well. Another great paint that I recommend for painting cabinets is General Finishes Milk Paint.
Painting Oak Cabinets White
Step one: Remove the doors
Before you can really get started at all, you have to remove all of the cabinet doors and drawers.
Be sure to label each door as you remove it so you will know exactly where it goes. If you are reusing your hinges, be sure to label them as well.
I simply labeled a small baggie and stuck all of my hinges and screws in the baggie. This is important because even though cabinet doors may look the same, if they are put back in the wrong spot, they will not fit correctly.
(Trust me. I have a friend that did this and their cabinets that they worked so hard to paint looked awful because the doors were all misaligned.)
Step two: Clean the cabinets
As with most painting projects, preparing the surface for paint takes the majority of the time. But if you want your paint to last, it is vital.
Before doing anything else, your cabinets need to be very, very clean. Even though they look clean, cooking grease builds up over the years and paint most definitely does not like to stick to grease.
A lot of people use TSP to degrease their cabinets, but I read a tip that Dawn dish soap works just as well. And since I swear by Dawn for cleaning just about anything, that is what I went with.
I wiped my cabinets down with soapy water and then wiped them with a clean rag to remove any soapy residue.
I followed this up with DecoArt stain blocker. This helps with making sure any lingering grease and grime is sealed away, but more importantly, it keeps wood tannins from ruining your paint job.
Have you ever painted a piece of wood furniture white only to find the wood color seeping through your fresh white paint? These are wood tannins seeping through.
The first time I was painting a piece of furniture and this happened, I tried to cover it up with more and more layers of paint. This was a big mistake and did not work.
What I didn’t know is that certain dark woods and red-toned woods have to be sealed before painting or the tannins will continue to leak through your paint no matter how many coats you add.
You can also accomplish the same this with a good oil-based primer – I’m a big fan of Zinsser oil-based primer.
If you choose to use primer rather than the stain sealer, I would wait to do it after the next step – spackling the wood grain.
(And if you want more info on using oil-based primers with water-based paints, I have a blog post that breaks down everything you need to know about primer.)
Step three: Deal with the wood grain
I did a lot of research and a bit of experimentation on the best way to deal with the oak wood grain.
The clear consensus was that spackle is the best way to eliminate wood grain. Yep, I’m talking about the same spackle you use to patch nail holes in drywall.
Use a flexible putty knife to apply a very, very thin layer of spackling over the surface of your cabinets. Give it a few minutes to dry and then sand all of the excess off using a very high grit sandpaper. (I got the best results from 320 grit.)
Once it is sanded, the spackle will only be left in the little crevices of the wood grain, leaving them smooth with the surface of the wood. When everything is sanded smooth, use a microfiber cloth to remove the sanding dust. Do not use a wet cloth, as the water will pull the spackle out of the wood!

Personally, while I did paint the inside of my cabinet doors, I did not spackle them. I only did this step on the most prominent areas – the drawer fronts, cabinet doors, and cabinet boxes.
Because of this, it is really easy to see the difference between filling the wood grain and skipping it. Here are a few pictures that show how the wood grain looks painted to help you decide if it is something you want to worry about or not.


Step four: Paint
And finally, the last step is to actually paint.
I used a foam roller meant for painting smooth surfaces to paint the flat areas and I used a high quality paintbrush for getting into smaller areas.
After hundreds of painting projects, I’ve learned that the paintbrush you use matters. A lot.
I’ve turned into a bit of a paintbrush snob, so when I saw these DecoArt paintbrushes I wasn’t even planning to use them at first. But I decided to give them a try, and I am so glad I did. The bristles are extra soft and are perfect for getting a very smooth finish. I will definitely be using these again in the future.
Okay, so here is the secret to getting an incredibly smooth finish on your cabinets without using a paint sprayer.
Foam rollers are great at giving a pretty smooth surface, but in my experience they tend to leave a bit of a speckled surface. The color is uniform, but the texture is similar to the surface of a football with tiny raised bubbles from the roller.
This isn’t always a big deal, but I was going for perfection. I wanted cabinets that looked professional.
I painted the cabinets using the roller as usual. Then before the last coat of paint, I gently sanded everything using my 320 grit sandpaper again. This made the cabinet surface silky smooth.
Then I brushed on the last coat of paint using my super soft paintbrushes.
Yes, this added more time to the process yet again. But the cabinets look and felt amazingly smooth and beautiful.
And the best part? No top coat is needed. DecoArt satin enamels is an enamel paint which means it dries to a very hard finish. Which means you don’t need to put anything over it for protection like other softer paints.
I was able to reattach my cabinet doors the same day I finished painting them, though I did try to be extra gentle with them for a few weeks just in case.

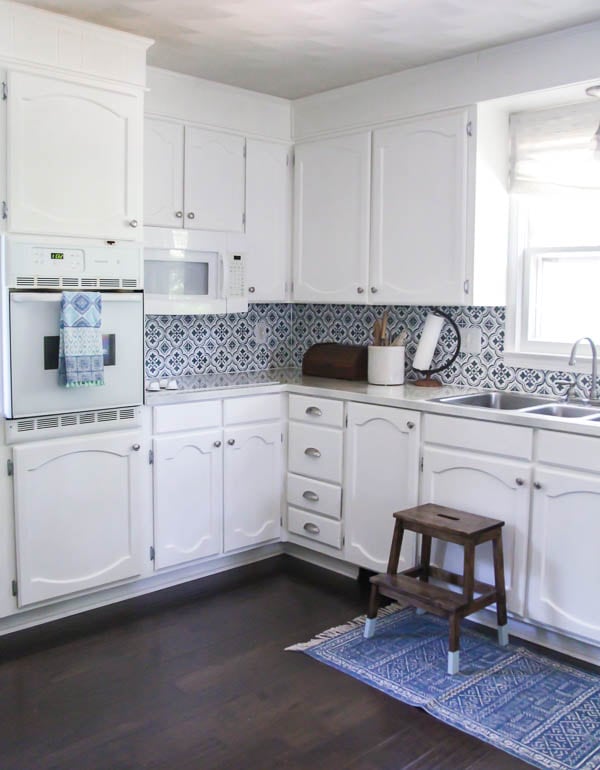
As you can see, we also finally removed that little flourish above the sink. Good riddance!

It is absolutely unbelievable what a difference painting our kitchen cabinets white made. Yes, it is time consuming. Yes, it is a pain to have your kitchen in chaos. But it is so very, very worth it in the end.
Even if we didn’t change anything else – not the gold speckled laminate countertops, not the appliances from the 80s, nothing – painting the cabinets alone makes it feel like an entirely new kitchen. I know that sounds crazy, but I am completely serious.
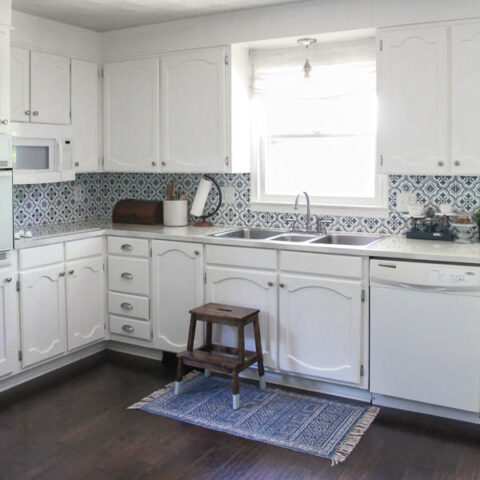
And now with a few other budget DIY projects, our entire kitchen is transformed!
Take a look at this before and after – now that is a serious update!

I also recently painted my oak bathroom cabinets using mostly the same method but a different type of paint that I like even more. I recommend heading over there next if you are considering tackling this project.
Painting Oak Cabinets
This tutorial explains step by step how to paint oak cabinets white and achieve a perfectly smooth finish.
Materials
Instructions
- Remove the cabinet doors and drawers. Label each door, drawer, and hinge as you remove them so you can easily put them back where they go. You can place the hinges and hardware for each door in a labeled plastic bag.
- Clean your cabinet boxes, doors, and drawers well to remove any dust and grease.
- Paint a coat of DecoArt Stain Blocker onto all of the bare wood surfaces. This will prevent the tannins in the wood from bleeding through your fresh paint and causing yellowing. (Or if you prefer, you can use an oil-based primer instead, but if you choose to use a primer, you will apply it after the next step.)
- To smooth the heavy oak wood grain, use a putty knife to apply a very thin layer of spackle onto your cabinets. Once the spackling has dried, sand it smooth with 320 grit sandpaper.
- If you are using primer instead of the Stain Blocker, apply it using a smooth foam paint roller.
- Use a foam roller to paint your cabinet doors, drawer fronts, and cabinet boxes. You can use a paintbrush to paint smaller areas the roller can't reach. You will need at least two coats of paint, possibly more if you are painting with pure white paint.
- To get a very smooth paint finish on your cabinets, sand each flat surface with 320 grit sandpaper before painting your final coat of paint. Then brush on the final coat of paint rather than using the roller.
- Once your cabinets are completely dry, carefully reattach the cabinet doors, drawers, and hardware. Be extra gentle with your painted cabinets for the first few weeks until the paint is fully hardened.
Recommended Products
As an Amazon Associate and member of other affiliate programs, I earn from qualifying purchases.
More Budget Kitchen Makeover Inspiration
Be sure to head over and see the update on how our painted cabinets are holding up two years later as well as our final kitchen makeover reveal. We transformed our entire kitchen on a tiny budget with painted cabinets, painted countertops, a stenciled backsplash, and lots of other budget DIYs.
I’d love for you to pin this post on Pinterest!

I love what you did in your kitchen and how you used sparkle to fill in the grain lines….GENIUS!!!!
Thanks Jess! It worked so well!
oh, wow–those look so good! I have oak bathroom cabinets to paint soon(ish), and it hadn’t even occurred to me to try to fill in the grain, but seeing the difference it made with yours….hmm….
Thanks Gretchen – it definitely added a lot of time onto the project but was so worth it.
The whole process took some time. I was working on this mainly during my kids’ naptimes, so it is hard to say exactly how many hours it took, but I worked on it for around 2 weeks total for 1-2 hours most days.
Your kitchen looks awesome! Painting had to have been a pain but was totally worth your time.
Thanks Paula – it definitely was!
I love your attention to detail. I’m a perfectionist too…well, maybe not totally, but I can spot poor workmanship a mile away and it bothers me. You did a great job and your kitchen is looking fabulous. What a difference!
Thank you so much Kris! Being a perfectionist is definitely both a blessing and a curse. Everything takes so long to finish – but it looks really good once it is done!
I love everything you did! Thank you for sharing such wonderful information! I had just had a conversation with my mother in law about changing my cabinets to white and she told me that was a bad idea, that streaks will be seen, that it will chip, and that the paint is so strong that my condo will smell like paint for a very long time. Is this true?
Thanks Carolina! I do not regret painting my cabinets one bit. First of all, paint smell is not a problem at all. There are awesome low-VOC paints out there and I never smelled that ‘paint smell’ once with the paint I used. Also the paint surface looks great – as long a you are careful with your cabinets for the first couple of weeks, you shouldn’t have any problems with chips. The one big downfall of white cabinets is they definitely do show dirt/food/whatever more. I have a baby and a preschooler so we have way too much food all over the place. With white cabinets, I am definitely having to wipe them down more often. That is really the only downside I have seen so far.
Your kitchen looks awsome and I love your attention to detail. I have oak cabinets and I see the difference between my cabinets to your cabinets. Thanks for sharing.
Thanks Kim!
So I’m incredibly curious why you choose this pain as upposed to other paints? I’ve been reading a lot about painting cabinents. I wonder what paints are better than others.
Hi Liz! I chose this paint because I love that you don’t need to use primer or sealer with it. (Especially sealer – for some reason, that is always my least favorite part of painting!) I like that it goes on smoothly and dries to a really hard finish. I’m sure there are other great paints you can also use, but I’ve been very happy with the paint I chose.
Wow. It looks great. Love the freshness of white. That really is an amazing transformation. thanks a lot for sharing the tips.
Thanks Kevin!
Wow, your kitchen looks so amazing after repainted, makes me feel cleaner, fresher!
And thanks for your detailed steps, just saved them and will redesign my kitchen for my partner soon. She also like white color like you.
Thanks Alan! I am glad my tutorial helped!
its wonderful, I love what you did in your kitchen, it seem brightly, Painting had to have been a pain but was totally worth your time.
thanks for share
Thank you Tamar. It was a big job but so so worth it!
It is a great transformation when you make your kitchen becomes white. It is really beautiful. Such a good idea for decoration.
Thanks Erin!
Just with the paint layer, the kitchen looks so bright and clean now. woohoo. You’re so handy !!! Thanks for the suggestion, Carrie :)
Thanks Thomas! I am loving it!
I couldn’t close my mouth when seeing that lol. Just amazed by what you have done. You are so talented Carrie! I admire the way you put the best effort in everything. Well done.
Thanks Ana! I am loving how fresh and bright it is now!
you truly did a great job Carrie, Your kitchen is definitely clean, fresh now.
I wanna take a transformation for my kitchen as you did, i love white. Thanks for inspiration!
Thanks Laura! It is definitely so much more clean and fresh now. I love it.
Is the paint sold other places besides Amazon? I also see on Amazon that it is 8 oz is that the only way it comes?
Shelly, I saw it in Michaels just the other day as well (So you could take advantage of their awesome coupons.) And as far as I know it does just come in the 8 oz size. The coverage is pretty good, although you do have to use more coats of white than other colors. (Sadly, I haven’t found a pure white paint that doesn’t require extra coats.)
So it only comes in 8 oz. containers?! How many jars did you use? and How many coats were necessary?
Jan, As far as I know it does only come in 8 oz containers. For my kitchen, I think I ended up using 8 containers but I have a lot of cabinets. I did four coats of paint. If you were doing a different color, you could definitely get away with 2-3 coats, but I have yet to find a true white paint that covers well with less coats. (I have seen this paint being sold at Michaels – so it would be a great thing to use some of their awesome coupons on.)
Thanks for the tips. I’m going to redo an oak breakfast nook. My question to you is . Did you just sand by hand ? Did you sand looking for a certain appearance ? I’m a wannabe DIY girl and I really don’t want to mess up this project thanks !
I did sand by hand. The spackling is not very hard, so it is easy to sand off without too much elbow grease. A power sander could also work for the flat surfaces, I just prefer hand-sanding. I used 320 grit sandpaper. You will know you have sanded enough when the wood is completely smooth to the touch. It really should not take very much sanding at all. And we all start out as wannabe DIY girls – once you’ve done a few projects, you are totally a real DIY girl!
Carrie, I just read your post and I am getting ready to do my bathroom oak cabinets. I want to try your method but I was wondering why you did not prime after the spackeling step. Is that not necessary before applying the paint?
Judy, Priming isn’t necessary for the specific paint I used. You can also use the spackle method with other paints and they probably do require priming. Good luck!
Was wondering if after you applied the DecoArt sealer/ stain blocker did you let it cure for 5 to 7 days (as directions recommend) before applying the spackle? Also how may coats of sealer did you use?
Melanie, great question. I didn’t let it cure that entire time, which was of course a risk. I did let it cure for at least a day. And because I was working in small chunks of time, some areas did get to cure the full five days simply because I hadn’t gotten to them yet! I haven’t seen any problems for not waiting the entire time.
How many coats of stain blocker did you use? If more than 1, how many days between coats.
How long in between coats of the satin enamel?
Hi Barbara, I did one coat of the stain blocker. It is supposed to cure for 5 days before painting, but I think I started painting after three days. And I waited about a day between coats of the satin enamel. I might have attempted to recoat sooner but I only had a couple of hours a day to work on this.
Love the way your cabinets look and great advice. I started ours by doing the island first. I have yet to tackle the rest. My question is …do you have an idea how much paint it took? It looks like it comes in small quantities. Thanks!
Thanks Lorna! The paint does come in pretty small quantities – I think I used 8 jars to cover all of my cabinets. I have quite a few cabinets and used several coats.
Just wondering if now 6 months later with as you said lots of wiping from kids etc, is the finish still in good shape with no peeling paint or any other blemishes? We painted ours several years ago (oak to white), having bought expensive paint suggested at paint store, and are constantly repainting to cover heavy “traffic” areas to cover blemishes.
So far so good Angie. I definitely have to wipe certain areas down more often like the area under the sink and the cabinet door that hides the trash can, but I haven’t had any areas of paint chip or fade yet. Here’s hoping it stays that way for the next six months and beyond!
I assume you use the same process with colors other than white?
Yes, the process would be the same. The only difference is you probably won’t need as many coats of paint with any other color!
I love your results! Inspires me to tackle my own:-) Just to be clear, no sanding before sealing the wood tannins or prior to cleaning? Thanks, Tori
Tori, glad you are feeling inspired! And yes, the only sanding I did was to sand the spackle I used to cover the wood grain. Other than that, no sanding needed!
Did you remove all the hinges before painting? Does it strip the cabinet doors if they are removed than re-applied?
I did remove all of the hinges before painting. I didn’t have any problems removing the hinges and screws and then using them again to rehang the cabinets.
Great post! I am getting ready to undertake this project! I was wondering what steps you took to paint the frame of the cabinet once the door was off? I also have oak cabinets and the frame has the oak texture and appearance too. I am trying to avoid sanding the frames since I cannot take them to the garage–dust will be everywhere! Thanks!!
Ashley, Hooray for painting cabinets! I actually did the same thing to the frames -spackle, sand, paint. It was a bit messy inside but I was able to do it pretty quickly since there really isn’t much surface area to the cabinet frames. I covered everything still in the cabinets with plastic trash bags and then sanded all of the frames at once so I only had to clean up the dust once.
This looks amazing. I think my husband and I are going to attempt painting our cabinets before investing in new cabinets. You’ve given me hope. Not sure if we are going to do white or light gray, but I’m going to follow your tips on our oak cabinets. One question – did you paint the interior of the cabinets? Does it look funny having white on the outside and oak on the inside?
Laura, I didn’t paint the inside of the cabinets, though I did paint the back of the doors. I don’t think it looks strange at all having the insides unpainted. I don’t think anyone really pays attention to the insides of your cabinets once they are full of dishes and things.
Hi, Carrie!
Your cabinets look great! I’m in the middle of my kitchen cabinet “forever” project. Hiding the oak grain has been the biggest pain the butt for me as I’m looking for the smoothest finish possible which is requiring a couple of rounds of wood filler (then re-prime and re-paint). It has been slow going for several reasons – working full-time, trying to have a small life outside of renovating the kitchen, and no work area to speak of…but, hanging in there because it is starting to take shape.
I painted the backs of the cabinet doors first (without filling the grain) and they look okay, but now I’m second guessing myself when i hold them up to the fronts…how does it look when you open your cabinet doors and the insides show so much of the oak grain? Have you regretted not filling the grain on the inside of the cabinets?
Thanks!
Hi Andrea, I haven’t regretted not filling in the back grain at all. When you hold them up next to the fronts it is very obvious. But when the doors are actually on your cabinets and you are going about your day, you aren’t going to notice at all. And nobody else will be judging the paint job inside your cabinets. I wouldn’t worry about it!
Carrie how many coats of paint did you use to get them looking like that? They look great!
Thanks Maria! I believe I did four coats of paint to gt a really even finish. I have yet to find a pure white paint that doesn’t require extra coats to get everything looking good.
Looks beautiful, Carrie! Just wondering what you used to clean your hinges/hardware? The Dove soap like the cabinets or something else? Thank you!
Thanks Nina, I soaked my hinges in dawn soap and hot water and then scrubbed them with an old toothbrush to get any grime off.
One more question? Did you use the Deco Art Americana Chalky Finish Paint, 8-Ounce (Delicate, Treasure, new life or one of the other names) or the Deco Art Maxx Gloss Acrylic Paint, 8 oz, White China? These are the only ones I’m seeing on Amazon but I haven’t looked at Micheals yet. Thanks again!
Nina, I used Deco Art Satin Enamels in Pure White. It is still available on amazon – http://amzn.to/2xHn2E9.
They look great! Some other sites recommend using a deglosser or sanding prior to anything. Any reason why you didn’t?
It definitely wouldn’t hurt, but it just isn’t necessary for this paint so I didn’t. The less work, the better!
Hobby Lobby has the paint in 8oz jars. They have 40% off coupons online. I just made a couple of trips to get what I needed.
Great suggestion! I have done the same thing at Michaels though I haven’t seen it there lately.
Hi! I am just wondering how your cabinets have held up since you painted them more than a year ago. We will be painting ours white, too, and I am so grateful that you shared your experience with everyone, and you explained each step. I am so excited. We wanted to do it much sooner but we had projects after projects that came in between at higher priority. We are ready now, and so I wish to ask you if the paint stayed as nice as in day 1. I also wish to ask you how you applied the stain blocker-did you brush it on or did you wipe it on? How long should we wait before we continue to the next step? I do not know if it would be just fine not to follow the 5 to 7 days curing period in the manufacturer’s instruction. That was a lot of wait in my opinion. Is that really necessary? I would really appreciate hearing from you. Many. many thanks to you already-you are such an inspiration!
Hi Len! Yay for painting cabinets. I put off painting mine for years too while finishing up other projects but I was so happy to finally get them painted! I need to write a follow up post on how they are holding up, but in general, they are still looking beautiful. There are a few tiny chips on the cabinet where we keep our trash can but it does get handled very roughly. As far as the stain blocker, I just brushed it on with a paintbrush. It is always safest to follow the paint manufacturer’s instructions but I think I started painting over it after about three days and it worked ok. Good luck!
Are you seeing any issues with the adherence of the spackle to the wood to fill in the grain? Trying to decide what type of wood filler to use.
Hi Montiel, I haven’t had any problems at all with the spackle. I tried a more traditional wood filler first on one of the doors and it did not work so well. It was nearly impossible to get it applied thinly enough and sanding it smooth just didn’t work out the way I thought it would. For me the spackle was 100% better.
Excited to get this started in my kitchen–question for you…If you do not spackle, would you suggest sanding first, then sealer/blocker, then paint…or sealer/blocker, sand, then paint..or NO sanding at all? Thanks for the inspitation!
Hi Katie, If you aren’t going to spackle and aren’t worried about wood grain, I would probably skip sanding altogether. Just be sure to clean the cabinets well with a degreaser first. (I just used Dawn dishsoap.) Then I would do the sealer. If the cabinets feel a little rougher than you would like, you could lightly sand after the sealer before painting, but you probably won’t need to. Good luck! Painting cabinets is time consuming but so worth it!
Your cabinets look more professional than mine! & I paid a professional to paint! They didn’t fill in the grain, it looks terrible. Im wondering now that they are painted do i need to strip them to start over or just sand, spakle & paint again?
Hi Lynn! If the paint is in good condition and not chipping or anything, I would do a test on one door of spackling over the old paint, sanding, and painting. If it adheres well and gives a smooth finish, you can continue on that way. If for some reason, it doesn’t work well, you may need to strip them. Generally I avoid stripped furniture at all costs if I am going to repaint it, but of course cabinets are a permanent home fixture which makes things a little different. Good luck!
This looks great! How many total coats of paint did you do? Also do you think the first couple of coats could be a standard paint (Behr or the like) and then complete the last coats with the DecoArt since it’s pricey? Thanks!
Hi Amy! I believe I did four coats total. You could definitely get away with two for any color other than pure white but white is always tough to get good coverage with. I don’t know that I would combine types of paint but I do think you could do a couple of coats of white primer followed by the DecoArt paint. That would cut down on the amount of coats of paint you need.
Hello!! Your kitchen looks beautiful!! I have a couple oak wall cabinets I would like to paint and hang over my laundry machines. I have a couple questions though:
1. I read it in your steps given, but just want to make sure I’m understanding correctly- you cleaned the cabinets ,then used the stain blocker, and then used the spackle? If I was doing this blindly I would have assumed clean, spackle, stain blocker so I just want to make sure.
2. The cabinet doors do not have knobs on them and presently but I would like to add those, should we drill the hole for that before or after painting?
Thanks!
Hi Sara, Yes, you definitely need to use the stain blocker before the spackle. Once you have spackled and sanded, anything wet will pull the spackle out of the grain. (Other than paint anyway.) And as far as drilling the holes it is up to you. I had to add hardware to my cabinets too and I waited until after painting to drill the holes. The one advantage to doing it before is if you mess up, it would be really easy to fill any mistakes back in with wood filler and sand them smooth between painting.
I am getting ready to paint cabinets and am wondering how your cabinets are holding up with the paint you used?
Hi Deb, they are holding up really well! It has been about a year and a half since I painted the cabinets and they are holding up well so far. There are a few spots on the cabinet where we keep our trash can that could use a touch up. We open that door many, many times a day so it has gotten the most wear and tear. Otherwise, they have held up really well. And I am still soo happy I painted them!
would like an update….
How do you like the cabinets after two years?
how do they clean?
Thanks so much!
Hi Melinda, I really need to do a full update post on the cabinets. The cabinets clean great, but there are a few more dings in the paint than I would like after two years. There are a few areas that definitely need a touch up.
Hi, we bought our house a year ago and the cabinets are painted already, but not it great condition. You can see the wood grain and there are lots of scratches and knicks. I’ve thought about sanding them down then doing your technique. Do you think it would work?
Hi Katie, I think it would work but the best thing to do would be to try it out on one door before taking on the whole kitchen. Good luck!
Thank you for all your help and answers! I think I’m ready to tackle our cabinets next week. Before doing so, do you still recommend doing the same steps and same paint? I was wondering if after spackling, could primer be used and then any type of paint from Home Depot, or does it have to be the paint you used in order for the spackle to remain on the cabinets as filler? I’m so excited!
Hi Becky, I’m sorry I’m so late replying. Summer has me behind on everything. Hopefully this isn’t too late for you, but the spackle trick should definitely work with other paints as well. You can definitely primer over the spackle and use any paint. But I would talk to the people at the paint counter because some paints are definitely better than others for cabinet painting. Good luck!
I’m in Canada. Where did you buy the paint
I can find it at Michael’s but in a gloss not satin. Is there a lot of difference between the two, as far as the look is concerned.
Hi Linda, I haven’t seen it in gloss, but I probably would avoid buying gloss paint. Gloss is usually very shiny and shows every imperfection. Another paint that would be awesome is General Finishes Milk Paint or you can go to your local paint store and ask what their best paint is for painting cabinets. It is absolutely fine to use primer and a different paint over the spackle. Good luck!
Hello!
Your kitchen looks fantastic! I have two questions:
1. I noticed the paint you used comes in 8oz jars. How many did you use to do your kitchen? I’m about to start mine and it’s almost the same size as yours.
2. How has it stood up to the test of time? I have a busy family kitchen too. Pics would be nice of the same kitchen today to compare with your initial reveal.
thank you so much… looking forward to your response,
D
Hi Dion, I am sorry for being so slow to reply. It was a busy month for my family and I haven’t been online as much as I wanted. It may be a bit late to answer your questions, but I still wanted to get back to you just in case it isn’t. I have been a little disappointed with how the paint has held up. It has been over two years since I painted the cabinets but they are definitely showing more wear than I would like, especially around the hardware. If I were doing it again today, I would use the same spackling technique to hide the wood grain but I would probably use a different paint. I have heard really great things about Sherwin Williams paint for cabinets as well as General Finishes milk paint.
This is fabulous! Thank you! How are they holding up? With the paint you used is it satin, gloss, or semi gloss finish, how easy are they to clean with the finish?
Hi Tessa! The paint finish is satin – it is just a bit less glossy than semigloss. I actually just took photos yesterday to do a follow up post but I probably won’t get it posted until January. The finish has held up well but not quite as well as I had hoped. There are several chips around the cabinet knobs. It looks like it is where people’s fingers/fingernails have scraped against the paint. This is after two years of heavy use, but I still had hoped the paint would hold up better than that. I do have to clean these pretty regularly since they are a bright white and I typically use Magic Eraser. They are very easy to clean.
This post and pictures inspired me to do the same in my oak-cabinet kitchen! With the 5 day cure time for the stain-blocker and the 6 coats that it took to cover the oak with pure white paint (and the high number of cabinets in my kitchen and laundry room), it ended up taking me 2 months to paint all the uppers! I only had space to lay out 5 cabinet doors at a time to dry, so that really slowed the pace – having to do the kitchen in sections. I decided to pre-sand the doors so the spackle stuck better, and to apply a thicker coat of spackle to really hide the grain. After all the time it took to do the uppers, I switched gears mid-project and went with DecoArt paint in BLACK for the lowers. This only required 3 coats of paint and the dark color was much better at hiding imperfections. I was able to finish the lowers in a few weeks instead of months. The end result of white uppers and black lowers is stunning!
That is awesome Heidi! That black and white combo sounds beautiful. And yes, pure white is truly the worst color to paint because it always requires so many coats, but I still love it. Great job getting it done despite all of the obstacles!
Very nice. Love the difference but noticed no microwave. Are you using a venthood? I am going to paint but think I might like seeing the grain.
Thank you! We actually ended up installing a microwave over the stove again. I really wanted to do a cute wooden hood but there just wasn’t another good spot for the microwave without taking on a bigger renovation. And for some cabinets, I think seeing the wood grain could really work well.
They look wonderful and I just wonder from what I have read if they will yellow in a couple of years. How long has it been since you did this, and are you seeing any yellowing? I want to do a white wash with a distressed look. Any suggestions? Then at least, if they yellow it would be easier to touch up. Yours look pro, and I really would love to do them like yours, but again, I have read blogs where they take pictures after 1 year, 2 years, and so on. Opinions were this yellowing. Comments?
Hi Debbie, It has been about two years since I painted our cabinets and so far no yellowing. I think whether or not the paint yellows depends a lot on what type of paint you use. People used to recommend oil-based paint for cabinets because it dries very hard, but it does yellow with time. Most newer water-based paints do not. There have been a few places where the paint has chipped though, especially around the hardware. I recently shared a post with pictures of how the cabinets are looking now: https://www.lovelyetc.com/painted-cabinets-two-years-later-the-good-the-bad-the-ugly/
Which foam rollers do you recommend? I was going to buy on amazon but there are so many!
I use a 4″ smooth foam roller like this one (affiliate link): https://amzn.to/2XaoFZ1
What kind of paint did you uses? And what type of finish?
I used DecoArt Satin Enamels paint in pure white. But I recommend you also read my follow up post about how they are wearing after two years. It has some recommendations of other paints to try: https://www.lovelyetc.com/painted-cabinets-two-years-later-the-good-the-bad-the-ugly/
Spackle I guess works OK. However, the correct method for this is a WOOD GRAIN FILLER. Solvent or water based. Easy to use and with better results. It is the professional way to do. You can buy these products online or go to Mohawk Finishing and check their website. I have finished furniture for over 30 years.
Spackle actually works surprisingly well. I did do a bit of research into wood grain filler but the reviews online were very mixed and a lot of people reported finding it very difficult to work with. As a newbie, I decided to stick with something I knew I could do well.