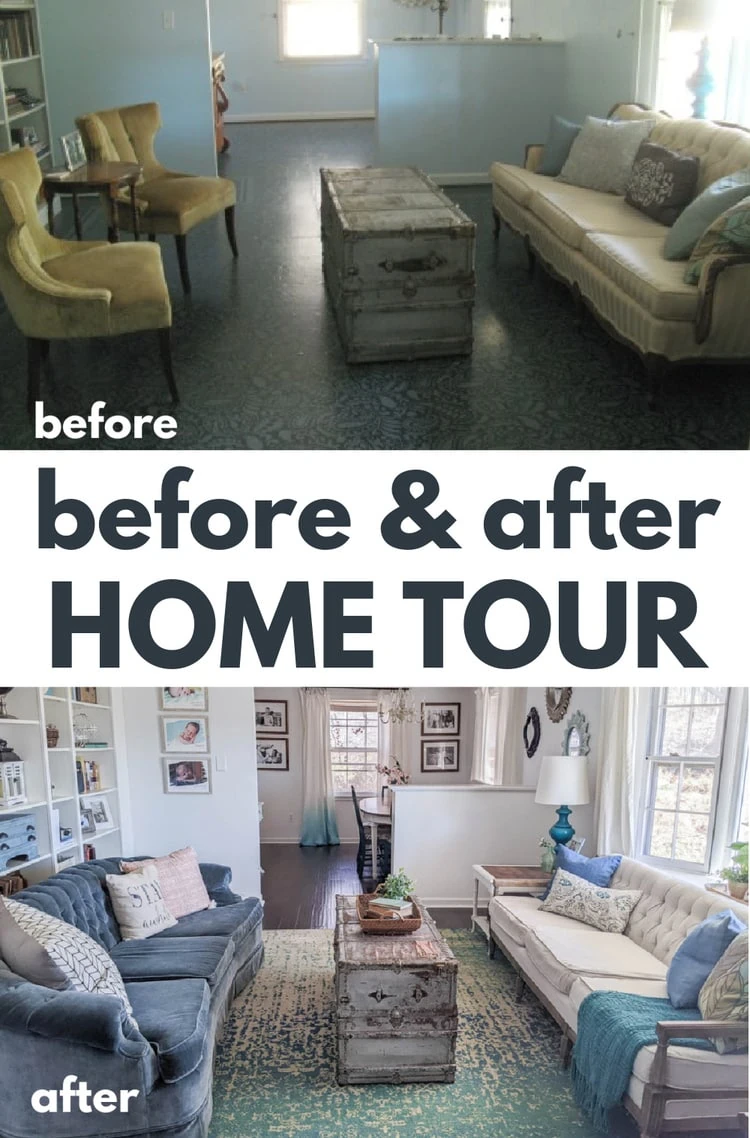
My Home Tour Full of Budget Friendly Before and Afters
I love a good before and after. And while I’ve shared several home tours over the years, I’ve never put all the before and after photos of our home together.
What’s funny about these before and after photos is at one point these befores were my afters.
We’ve lived in this house more than a decade now and when we first moved in, taking before photos was not something that crossed my mind. I just dug in and got to work.
Of course now I deeply regret not taking before photos of the saloon doors in our hall bath. And the dining room light fixture that was an exact match for the stained glass lights in every 1990s Pizza Hut. And the guest room that was completely pink – pink walls, pink trim, pink carpet, pink blinds, pink light, pink everything!
But sadly I don’t have photos of any of that. What I do have are photos of my own early decorating efforts.
At this point I should probably make a confession: I used to be a terrible decorator.
Seriously. Even for the first few years I had this website, I was sharing all kinds of crafts and DIY projects, but I never showed photos of my house because it was decidedly not cute.
I was painting great furniture and making all kinds of beautiful stuff, but I had absolutely no idea how to put it all together.
Decorating was not my forte. I bought a red rug because my friend had a red rug and it looked great at her house – but I don’t even really like the color red! I hung brown curtains to go with the red rug that I didn’t really like and as you can imagine, this was not a recipe for success.
I had the tiniest of decorating budgets and I really had no idea how to use what little money I did have.
So I ended up buying random vases and other small things that made absolutely zero impact on how my home looked.
And all of that would have been perfectly fine. It is completely okay to simply not care about decorating your house.
But the problem was I did care. Deeply.
I wanted a beautiful home where I could relax and feel peaceful and content, not a red and brown mess that seemed to be a constant reminder of how much I just wasn’t getting it right.
So I decided to turn things around. I had been honing my DIY skills for a few years, but I decided it was time to get serious about figuring out how to decorate as well.
I read books and blogs. I researched how other people put rooms together. I started actually paying attention to the colors and styles and objects that I personally loved – not just what looked good in other people’s homes.
I started working on my house again. And this time it started to really come together.
Walking into our house didn’t make me cringe anymore – it made me feel at home.

I decided to put this home tour together to share what I wish I had known then – even if you’ve always been a terrible decorator, it doesn’t have to stay that way.
You can learn to turn your house into a home you always wanted.
I’ll never be a professional interior designer, but I’ve learned a lot about decorating and creating a welcoming home and putting together a room on a budget over the years. And I think that definitely shows in these photos!
Now lets see some before and afters!
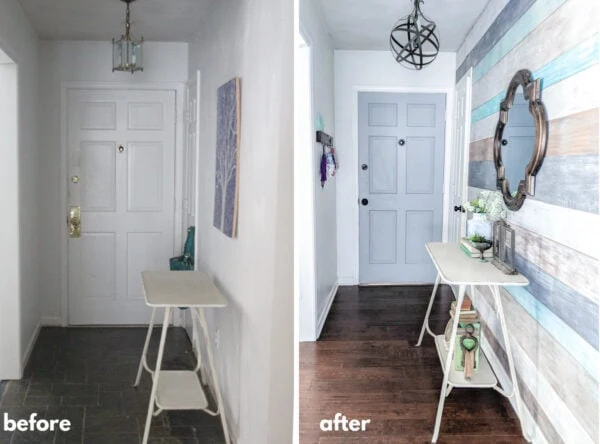
Entryway
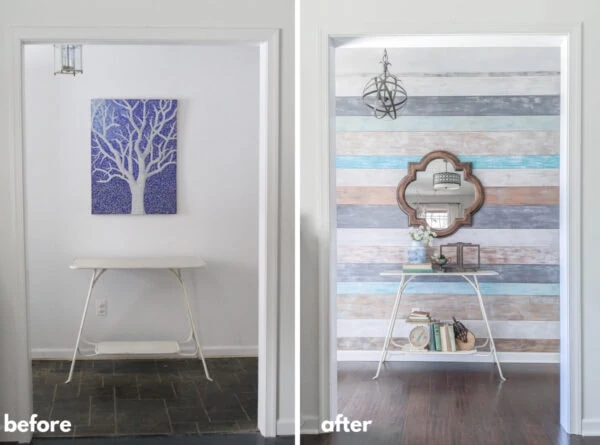
I used to hate our entryway. It was dark, the floor was impossible to clean, and I had no idea what to put there.
But now I love it! The inexpensive plywood wall transformed it from a boring white box and brightens the whole space up. I also painted the front door, gave the old light a new look, and added some of my favorite vintage finds.
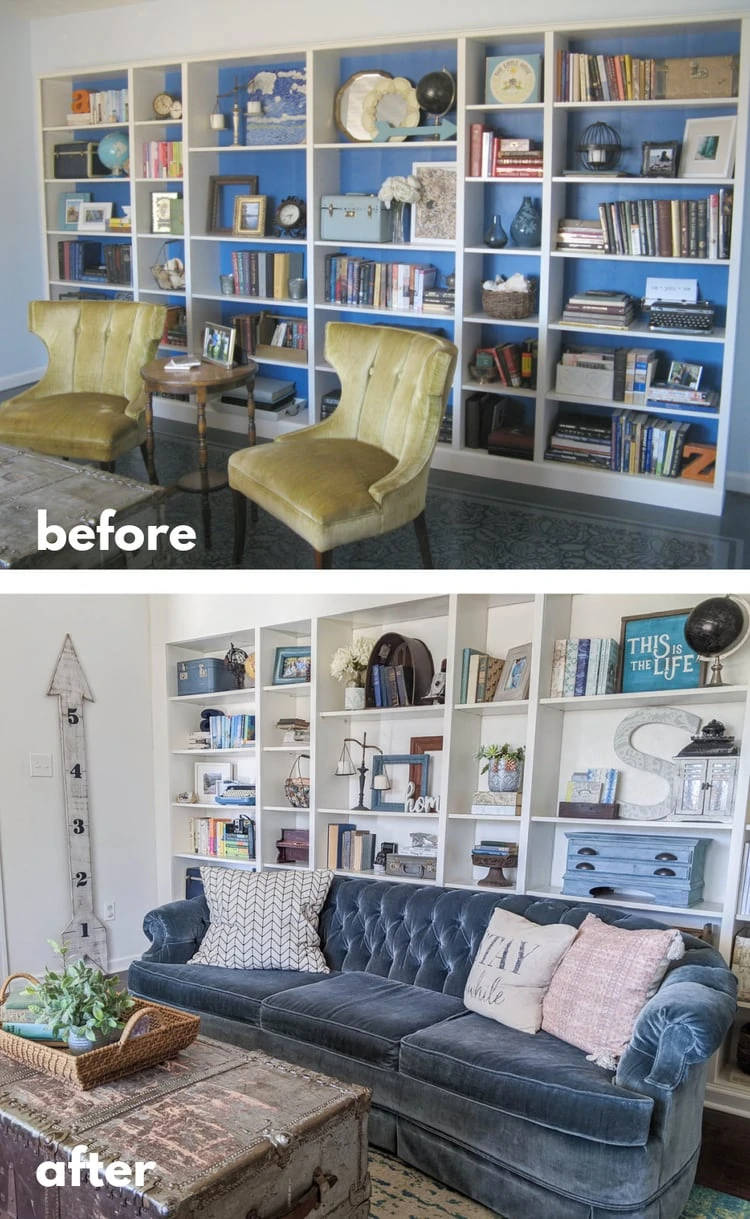
Library
This room was originally intended to be a formal living room, but my kids call it the library because of the wall of built-in bookshelves I added. I’m a big reader, so I love the idea of a home library. Plus it sounds so fancy!
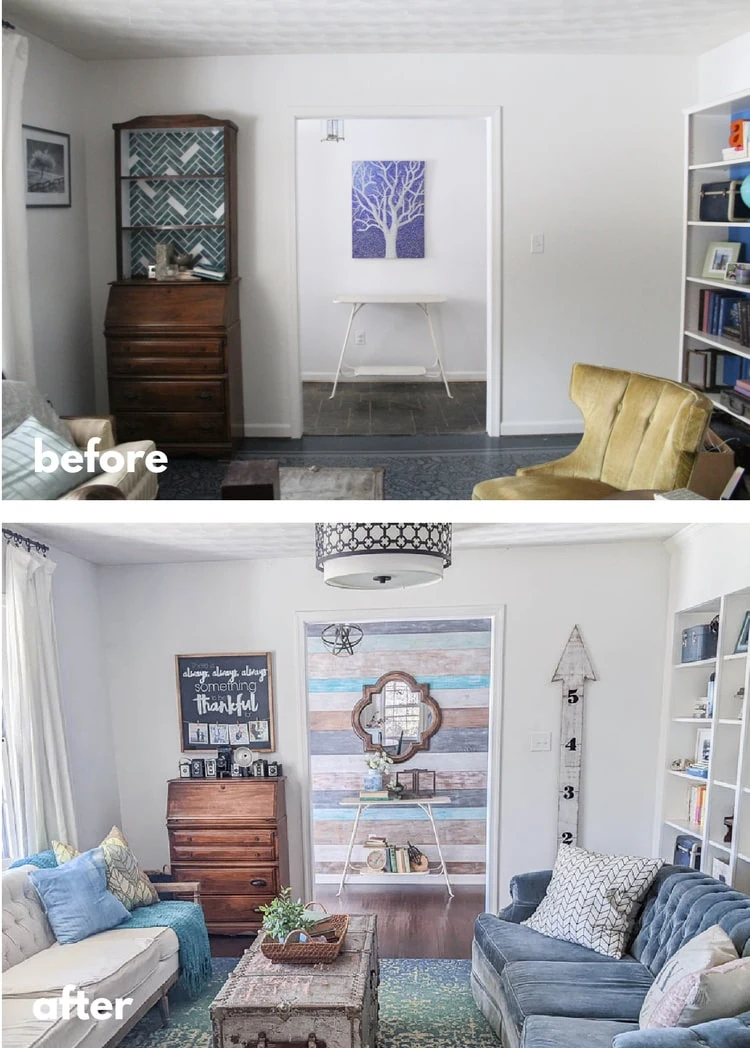
The before photos of this room aren’t the worst, but it’s clear that among other things, I really struggled with finishing rooms! There are no curtains, no rugs, no wall art, very few accessories.
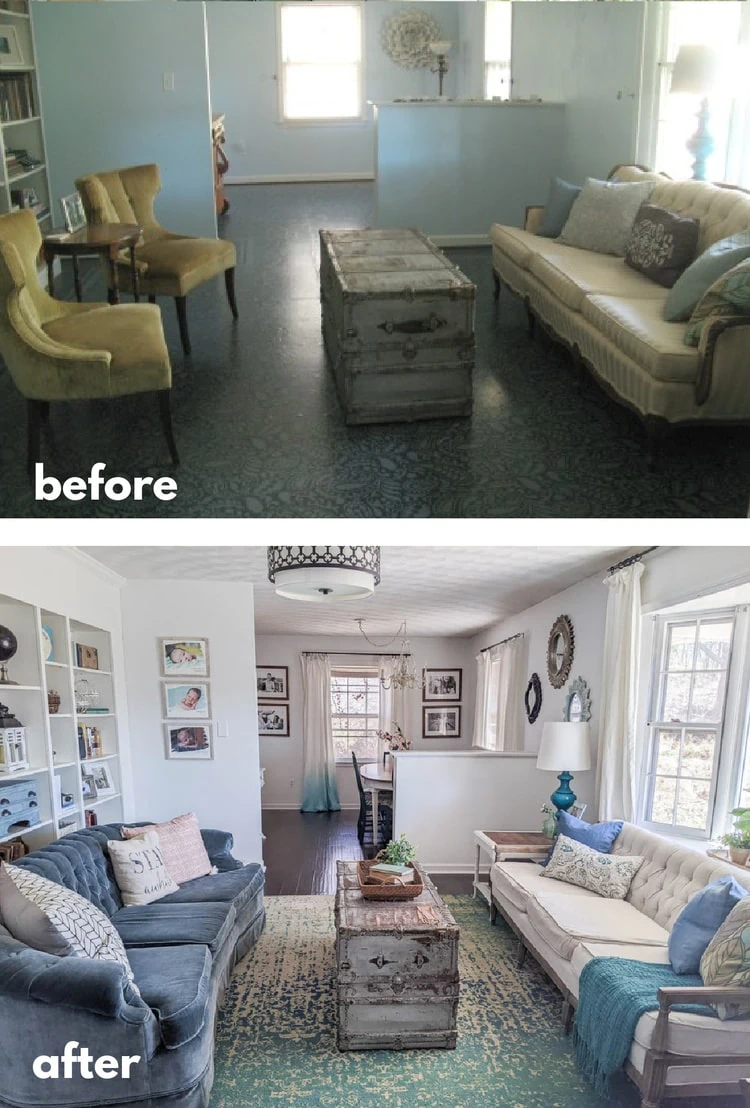
This room helped me learn to love neutral paint colors. When the walls are neutral, everything else in the room can breathe.
My favorite projects in this space are definitely the huge wall of built-in bookcases and the vintage sofa I reupholstered.
Dining Room
The dining room was one of the more put-together rooms in the house, but it also was perpetually unfinished with no curtains and not even a light fixture.
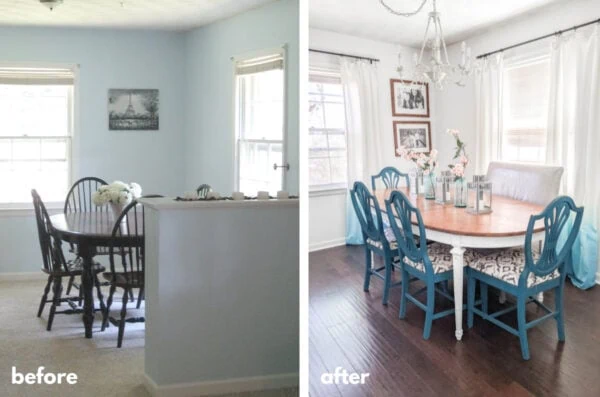
Now this room is so warm and inviting and it is completely filled with inexpensive DIY projects.
Along with installing new flooring, I refinished the wood table, painted and reupholstered the chairs, reupholstered the bench seat, and dyed the ombre curtains.
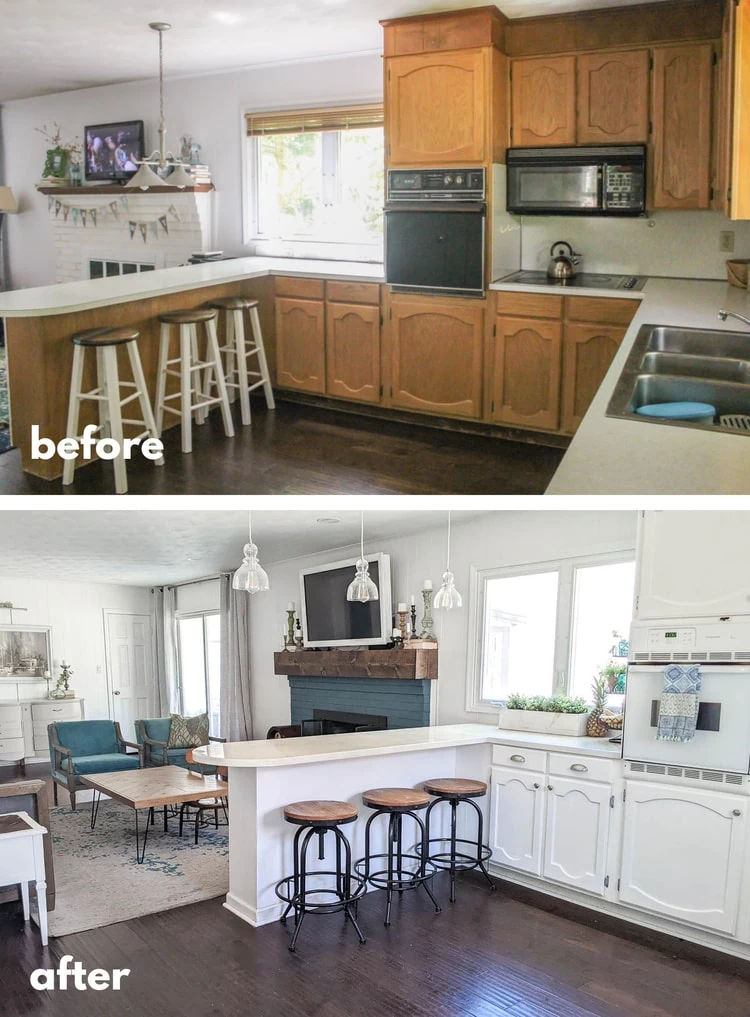
Kitchen
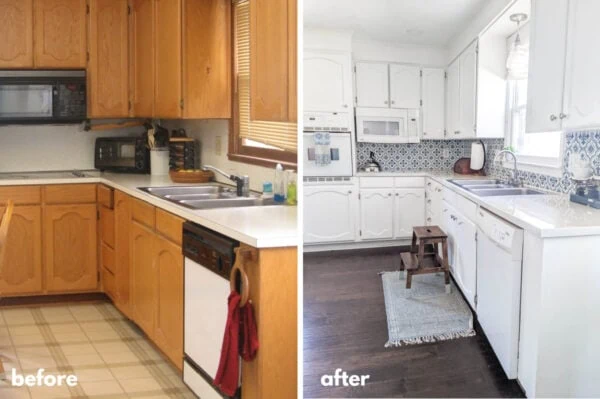
I absolutely hated our kitchen for the first few years we lived here. The photo above is one of the only photos I have of the original floor and as you can see, the entire room was just an explosion of brown and tan.
We had a tiny budget for updating our kitchen – less than $1000 and that needed to include some new appliances! For several years, I was too scared to tackle this room. I just didn’t think it could be done on our budget.
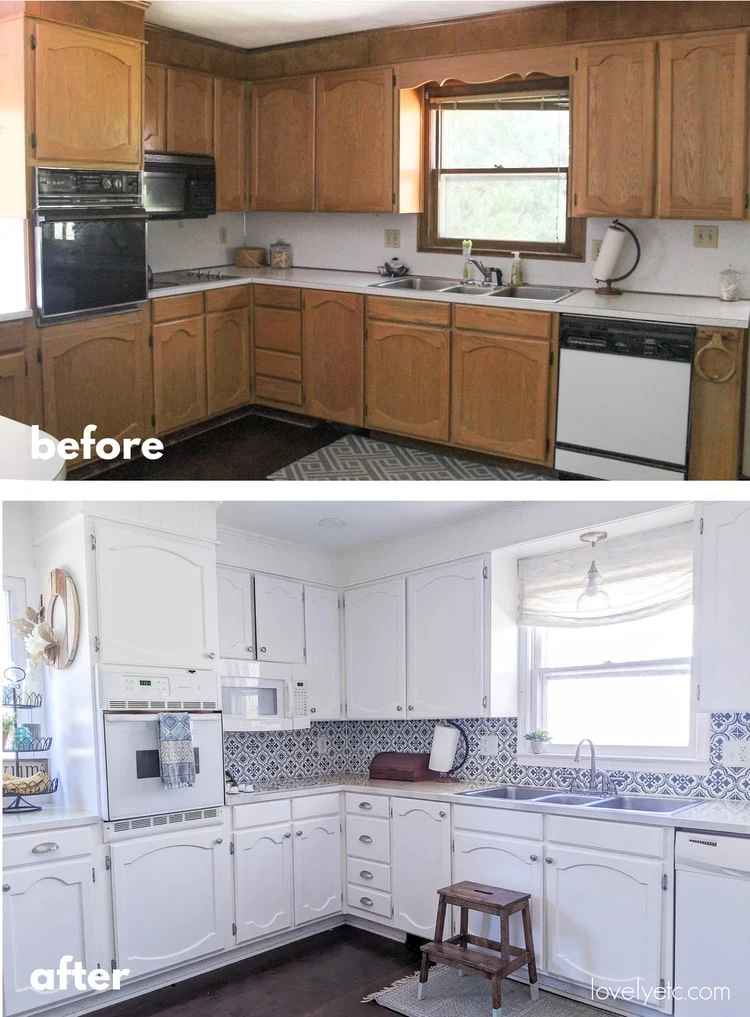
But then I decided to go for it. I completely redid the kitchen from top to bottom.
I kept the layout the same to save money, found used appliances on Craigslist and transformed the rest of the room with lots of paint. I painted the cabinets, I painted the countertops, and I painted the backsplash. I found hardware super cheap at a yard sale and sewed new window treatments.
And now it’s like a totally different space. If you’re interested in more info on my budget kitchen makeover, I have a post with tons more details about everything I did along with how the budget breaks down.
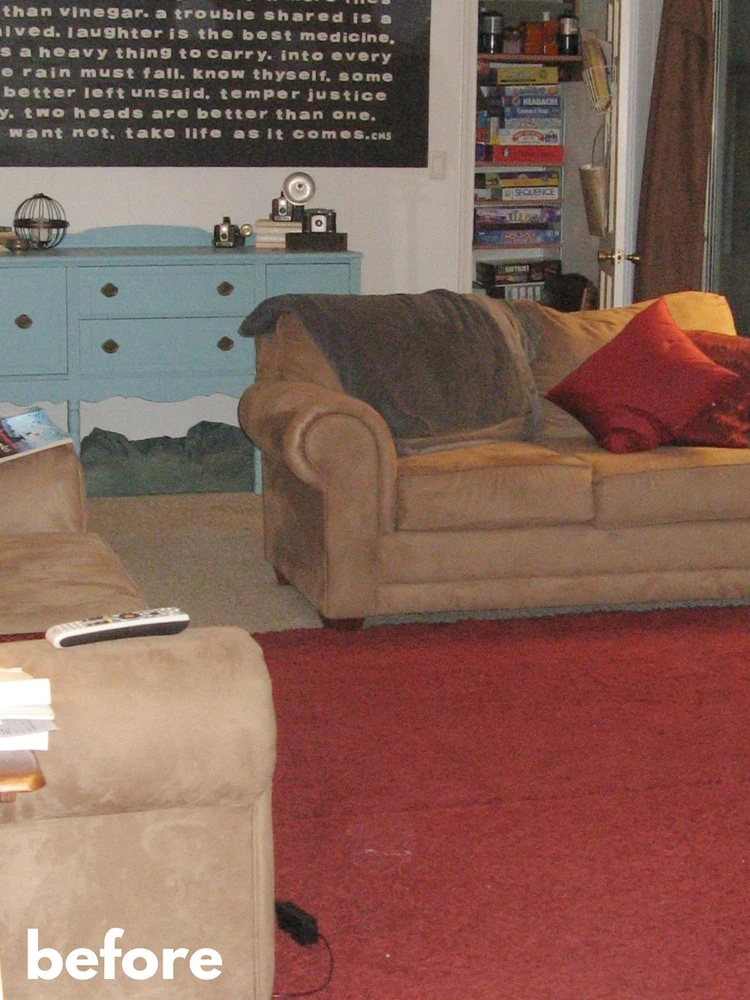
Family Room
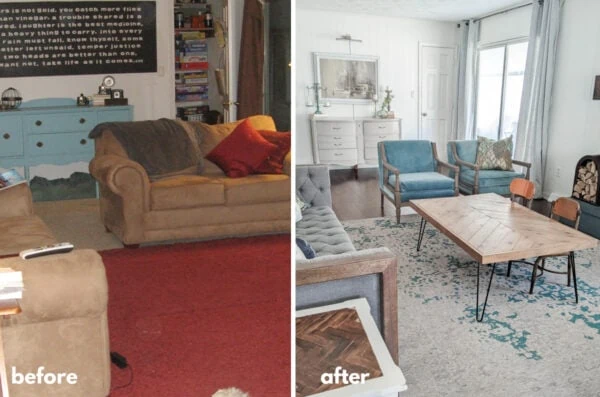
Our family room is where we spend the majority of our time and it is probably the room I struggled with the most.
I had those red rugs I hated and I could not figure out what went with them.
Even after I finally ditched the rugs, the room was just beige and lifeless.
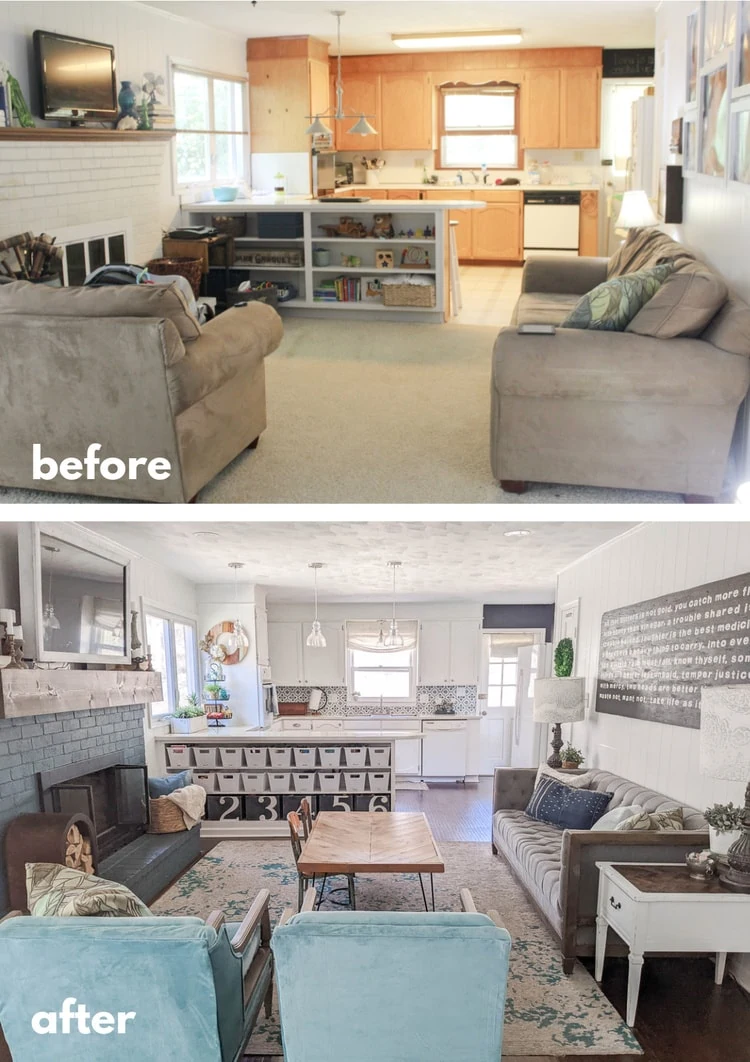
Now this room looks like a completely different space.
Replacing the tired sofas made a huge difference and wasn’t nearly as expensive as you might think. I found our gray tufted sofa on Facebook marketplace and the armchairs were another secondhand find that I reupholstered.
I painted the fireplace and made the coffee table, the new fireplace mantel, and the TV frame.
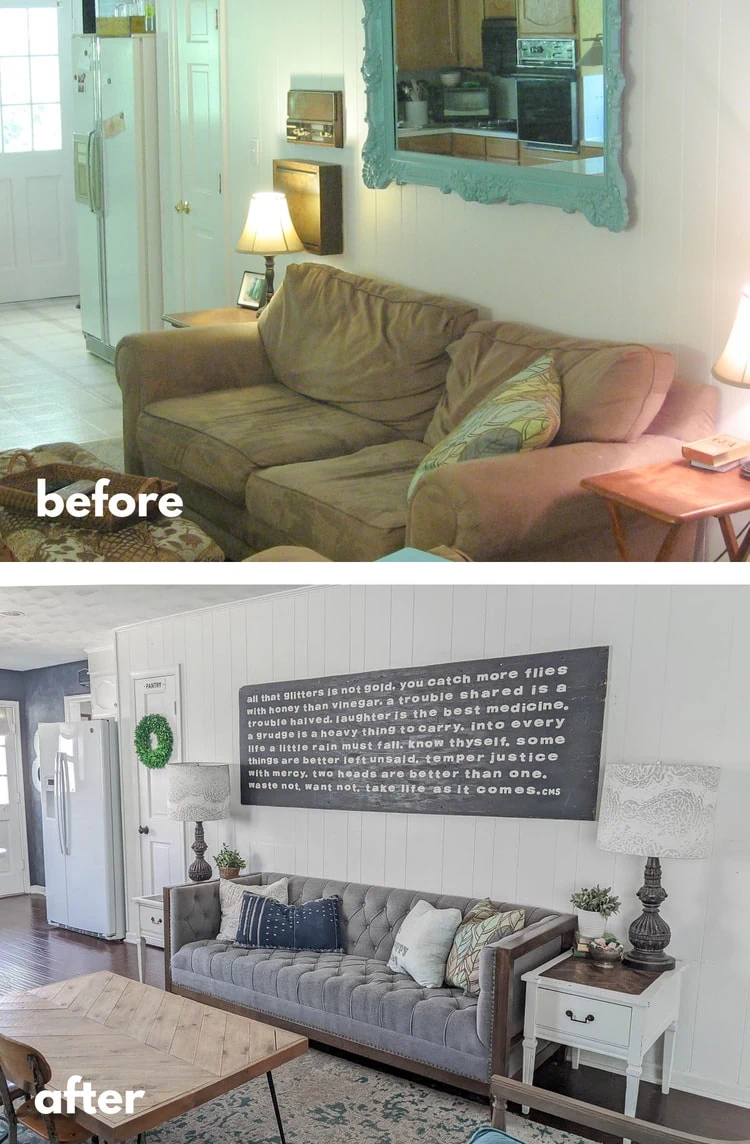
I also made the huge sign over the couch and refinished the end tables.
DIY has definitely played a huge role in transforming this house on a budget. But so has learning how to put things together in a way that makes sense and feels finished.
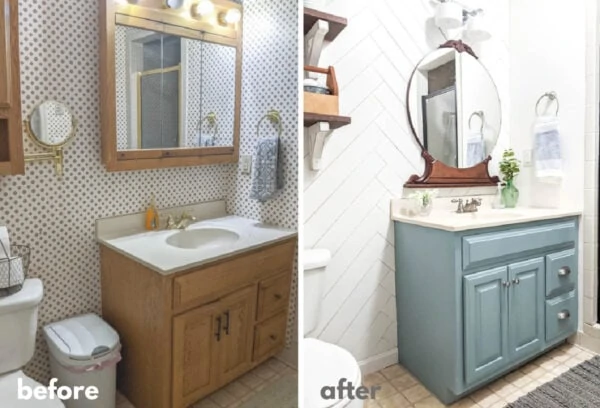
Hall Bathroom
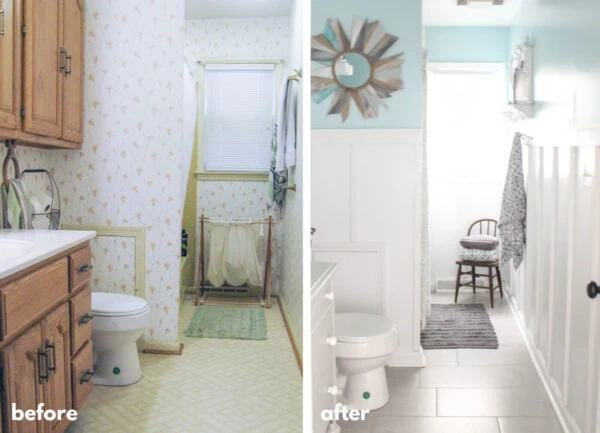
Our hall bath was another room that I was scared to take on. I hated everything in this room from the floors to the wallpaper.
But then some leaky pipes forced me to get brave and do something about it.
By this point I was finally starting to figure out my own style rather than just looking for other people to copy.
I added board and batten walls and turned a vintage dresser into a vanity and I love how this room came together.
If you want more details on this room, I have a whole post on our budget bathroom makeover here.
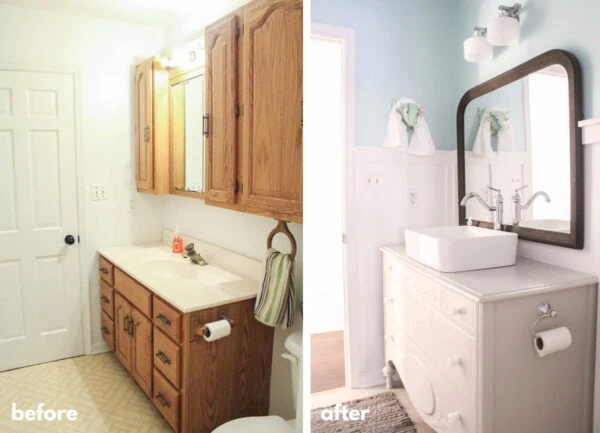
Master Bath
I also gave our tiny master bathroom a makeover on a tiny $100 budget.
I painted the vanity, removed the wallpaper, added a herringbone wood wall, and hung a vintage mirror. You can see all the details of that bathroom makeover here.
Screened-In Porch
And finally, I had to include our screened-in porch. I could only find one before photo and it only shows one small corner but I think that’s enough to get the idea.
This porch had green Astroturf carpet, peach walls, and window boxes full of fake flowers.
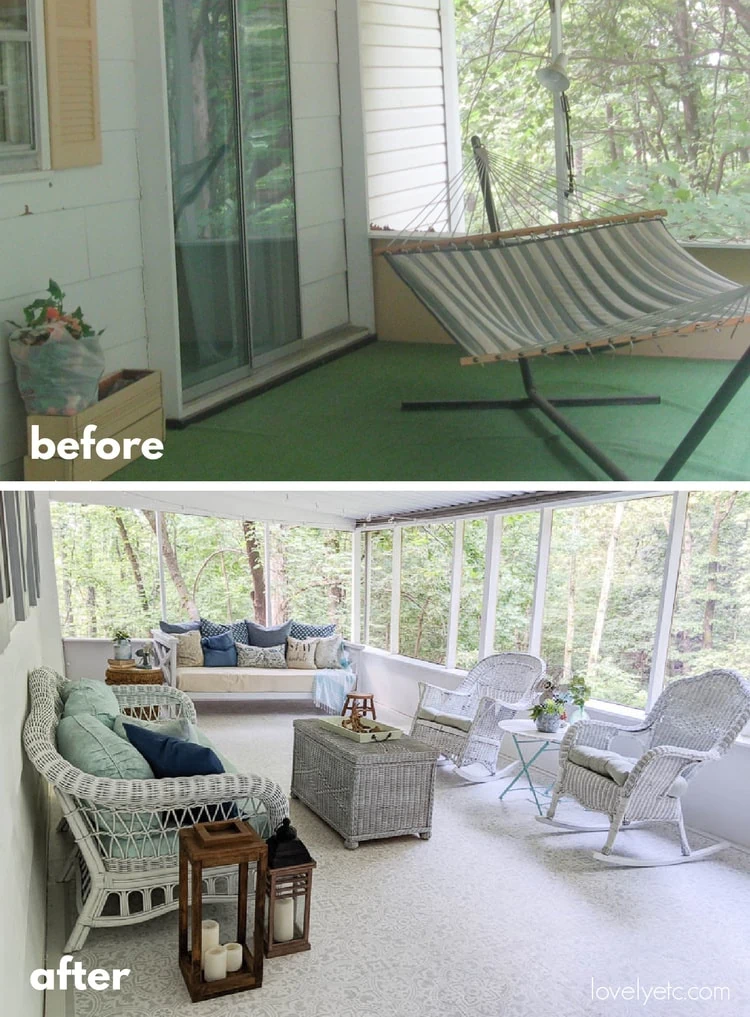
For the first few years we lived here, we stuck a hammock on the porch and called it a day. But I knew we were wasting what is probably the best part of our entire house. So I got to work.
I painted and stenciled the plywood floor, built a daybed, painted our old wicker furniture, and built new shutters among other things.
And now it is the best place to curl up with a good book and a glass of lemonade.
And that’s my before and after home tour. I wanted to include our bedrooms too, but I just couldn’t find any before photos to share.
Before I end, I’d love to leave you with some encouragement.
You really don’t have to be a naturally talented decorator to create a warm, welcoming home. Anyone can do it.
Decorating your home is all about figuring out what you love and then following a few simple decorating guidelines that make the entire process easy.
You can do this!
And if you’d love some more help making decorating your own home easy, you can get on the wait list for my online course, Decorate with Confidence. Just enter your email below and I will let you know as soon as enrollment opens again! And in the meantime, I’ll send you my weekly newsletter full of DIY and decorating tips and ideas.
I’d love for you to pin this post on Pinterest!

Google Web Story: Before and After Budget Home Tour
Simply Gorgeous! Awesome job.
Thank you!
I am in awe of all the physical work that you did-building furniture, upholstering, adding wall covering, etc. Makes me want to get to work!
Thank you! It really is so satisfying seeing the changes and knowing you did it yourself!
Love all that you have done, especially since it was done with a realistic budget. Your home looks beautiful and inviting. The kids’ chairs at the coffee table… Love that!
Thank you! I love those little chairs too!
I think you did an awesome job. Just goes to show that you don’t need tons of money.
Thank you! And yes, you really can do so much on a small budget!
What a fabulous job you’ve done!!! Thank you for sharing. It’s quite an inspiration!
Thank you!
Wow! What an amazing transformation! Everything looks lovely and so warm and inviting.
Thank you so much!
Girl you nailed it! It’s absolutely beautiful!
Thank you so much!
Amazing…..I can’t stop looking..well done x
Thank you so much!
Wow! I have done some remodeling/redecorating so I understand when I look at your after photos just how much work you’ve done. You have made your home look amazing and you give me hope that with enough time and “elbow grease”, I will get there. Thank you for sharing this “full of hope”, “lots of potential” post.
Thank you! And yes, it takes time and work but you can definitely do it!
You did a Great Job !!! I hope everyone in your family is proud of your hard work. And most of all you are for what you have accomplished. You deserve that glass of lemonade.
Thank you! I know my husband is proud for sure!
Great job! Just goes to show you can update on a budget with ingenuity and elbow grease!
Thank you!